
Due to a child with a peanut allergy, Sheri, a Premium Member of CraftyBaking.com asked me for a good almond cookie recipe. She wrote me back and simply loved the results!
COOKIE RECIPE HELP
INGREDIENTS
2 1/2 cups unbleached all-purpose flour, spoon into dry measuring cup and level to top
1 1/2 teaspoons baking soda
1 teaspoons baking powder
1/4 teaspoon salt
1 stick (1/2 cup) unsalted butter, can be cold from the refrigerator
1/2 cup (Crisco) shortening or unsalted butter
1 cup almond butter (find in health food stores or grind your own)
1 cup light brown sugar, packed; can substitute dark brown sugar
1 cup granulated sugar
2 large eggs, can be cold from the refrigerator
2 teaspoons vanilla extract
Extra granulated sugar for rolling
INSTRUCTIONS
1. Preheat the oven and prepare the baking pan: Position one oven rack one rung up from the middle and another one rung down. Preheat the oven to 350 degrees F.
You’ll need at least two, preferably four UNGREASED non-insulated cookie sheets or sheet pans; do not grease them. Instead, you can cover them with parchment paper (not waxed) or a silpat (silicone) mat liner, if desired.
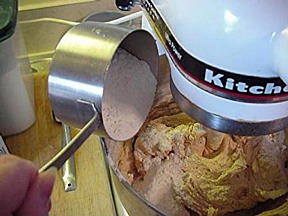
2. In a medium bowl blend the dry ingredients and in another, the sugars: combine the flour, baking soda, baking powder, and salt. In another medium bowl, combine the sugars.
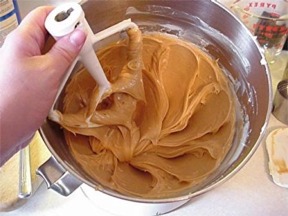
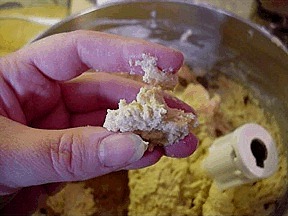
3. Cream the butter and sugar: In the bowl of a stand mixer, beat the butter on low speed with a paddle attachment until softened. Add in almond butter and beat until incorporated. Add the granulated sugar in a steady stream at the side of the bowl until combined. Increase the mixer speed to medium and beat for 1 to 2 minutes until light in color and creamy. Stop the mixer and scrape the bowl often.
4. With the mixer still on low, add the eggs, one at a time, and vanilla and mix until just incorporated. Add each egg and mix for 20 seconds before adding the next. Turn off the mixer when done.
5. Turn the mixer on low and slowly add in the flour at the side of the bowl.
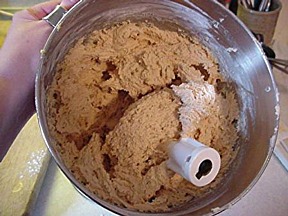
Sarah Says: Mix the dough only until it is stiff and slightly sticky – NOT dry otherwise the cookies will be dry. Stop mixing when you reach this point. Do NOT overmix!
NOTE: If you have time, cover the mixing bowl with plastic wrap and let dough chill for an hour or a couple of hours before shaping the cookies in the next step, Step #6. Sheri says they will be easier to form!
6. Shape the cookie dough into 1- to 1 1/2- inch sized balls. (Make them all the same size per baking pan so they bake evenly) A # 40 cookie scoop is the perfect size. Roll in granulated sugar to coat.
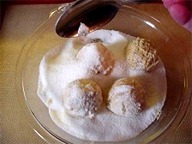
Place on sheet pans with a silpat, parchment paper or regular ungreased pans, about 2-inches apart. For my 12- x 18-inch sheet pans I place them three deep by four across on my parchment paper or silpat mat.
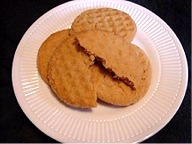
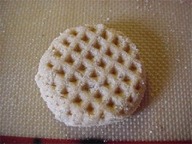
Traditional with peanut/nut butter cookies make a criss-cross hatch pattern, with a fork.

Or make a pattern with a cookie stamp. This pattern for these cookies, also shown at the top of this page, was made with a meat mallet pressed against the cookie dough before baking.
7. Bake cookies for approximately 13-15 minutes until they JUST start to turn golden. Be sure to rotate the pan in the middle of the baking time. You want the tops to just start taking on color, and still be a “hair” puffy and moist. When you take the cookies from the oven, they will flatten and show tiny cracks.
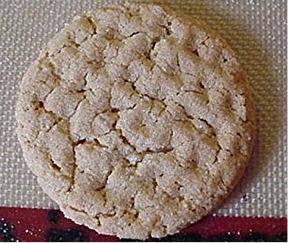
Cool the cookies in the pan for 1 to 2 minutes. (This allows the cookies to firm up.) Then, transfer cookies with a metal spatula to a wire cake rack to cool completely. If baked on parchment paper, cookies can be cooled right on its surface; slide the paper with the cookies on top to a wire cake rack to cool. Remove cookies when cooled.
STORAGE
Store cookies in airtight containers or freeze wrapped in plastic zip bags in a plastic container. This dough does not freeze well.