
Variation: Grilled Pizza – Three Variations
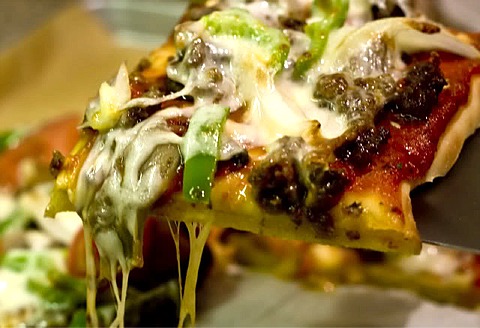
Pizza and photo by odetteganda © Sarah Phillips
Making homemade pizza is an incredible experience and we show you how – in the oven and on the grill. This recipe has been adapted from Peter Reinhart. He is an acclaimed baker, author and teacher at Johnson & Wales culinary college. I am a big fan of his many books, especially the Bread Baker's Apprentice.
BREAD RECIPE HELP
Dillonsmimi, Premium Member, Says: “I have made the pizza dough that Sarah has available for the Premium members many times. It has become the Friday night tradition at my house, along with many of her other tried and trues. Sarah's Thick-With-a-Chew Peanut Butter Cookies come to mind. That is the main reason she has signed over thirty thousand members! These are the best…recipes ever!”
INGREDIENTS
1 recipe Sarah Phillips’ No-Cook Zesty Tomato Sauce
1 6-ounce piece of dough from Napoletana Pizza Dough recipe, below, or refrigerated pizza dough
2 cups shredded mozzarella cheese
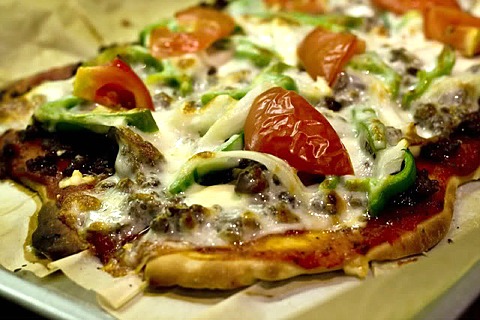
Toppings: chopped onion, green or red bell pepper rings, shredded fresh basil, sliced pepperoni, sliced mushrooms and/or black olives
STEP I: MAKE THE PIZZA DOUGH
Napoletana Pizza Dough
Makes six 6-ounce pizza dough balls
INGREDIENTS
4 1/2 cups (20.25 ounces) unbleached bread, or all-purpose flour, chilled; you can also use 100% white whole wheat flour or 50% all-purpose flour and 50% whole wheat flour
1 3/4 (.44 ounce) teaspoons salt
1 teaspoon (.11 ounce) instant yeast
1/4 cup (2 ounces) olive oil (optional)
1 3/4 cups (14 ounces) water, ice cold (40°F)
Semolina flour or yellow cornmeal for dusting pan
SARAH SAYS: As with all yeasted bread dough recipes, you may not need all of the water (or flour) in the recipe. Add only the amount necessary until the dough reaches the desired consistency. If the dough is too wet, add in the flour, one tablespoon at a time, and mix after each addition. If the dough is too dry, add in water, one or two teaspoons at a time, and mix after each addition, until you reach the desired texture.
INSTRUCTIONS
Prepare the pan:
1. Prepare a sheet pan by lining it with baking parchment.
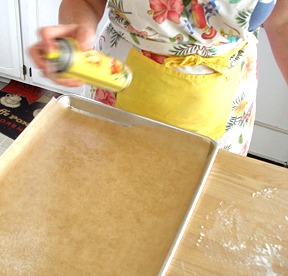
2. Mist the parchment with spray oil (or lightly oil the parchment). Set aside.
Make the pizza dough:
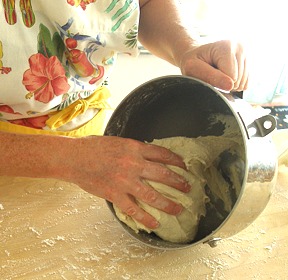
1. Stir together the flour, salt, and instant yeast in a 4-quart bowl (or in the bowl of an electric mixer).
KELLY SAYS: I like to put the dry ingredients through a fine mesh strainer first to eliminate potential lumps.

Then, I combine the ingredients with a large spoon.
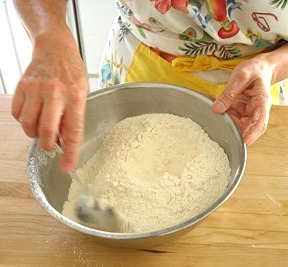
And, place them in the mixer bowl of a stand mixer.

2. Fit the mixer with a paddle attachment, and with the mixer on low, drizzle the oil at the side of the mixer bowl.
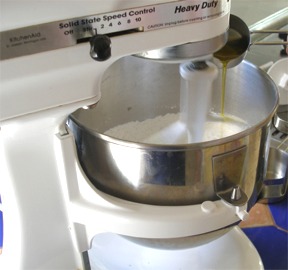
Continuing with the mixer on low, slowly add the cold water at the side of the bowl and mix until the flour is all absorbed.
NOTE: If you are mixing by hand, with a large metal spoon, stir in the oil, and then add in the cold water until the flour is all absorbed. Repeatedly dip one of your hands or the metal spoon into cold water and use it, much like a dough hook, to work the dough vigorously into a smooth mass while rotating the bowl in a circular motion with the other hand. Reverse the circular motion a few times to develop the gluten further. Do this for 5 to 7 minutes, or until the dough is smooth and the ingredients are evenly distributed.
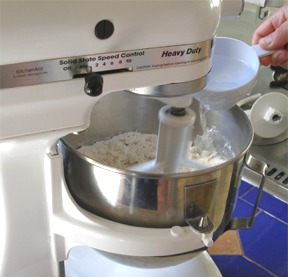
3. Switch to the dough hook and mix on medium speed for 5 to 7 minutes, or as long as it takes to create a smooth, sticky dough.
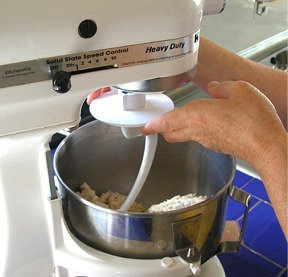
Mix until the dough clears the sides of the bowl but sticks to the bottom of the bowl.
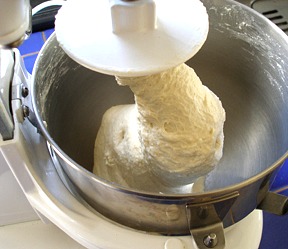
SARAH SAYS: If the dough is too wet and doesn't come off the sides of the bowl, sprinkle in some more flour, one tablespoon at a time, just until it clears the sides. If it clears the bottom of the bowl, dribble in a teaspoon or two of cold water. The finished dough will be springy, elastic, and sticky, not just tacky, and register 50 to 55 degrees F with an Instant Read Thermometer.
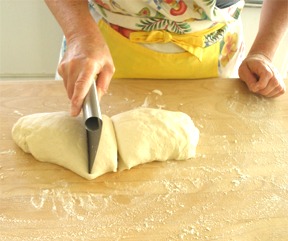
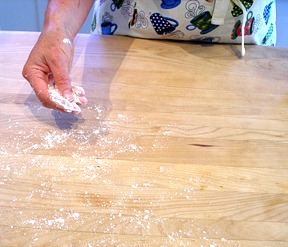
4. Lightly sprinkle flour on the counter and transfer the dough to the counter.
SARAH SAYS: Avoid using excess flour on the countertop when shaping the dough into a ball. If the dough has been mixed correctly, you need only use a small amount.
5. Using a metal dough scraper, cut the dough into 6 equal pieces (or larger if you are comfortable shaping large pizzas).
SARAH SAYS: When dividing dough, cut straight down, not in sawing motion; you do not want to tear or stretch the gluten strands in the dough. You can dip the scraper into the water between cuts to keep the dough from sticking to it.
KELLY SAYS: I formed the dough into a sausage shape and first cut it in half and then cut each section into three equal portions.
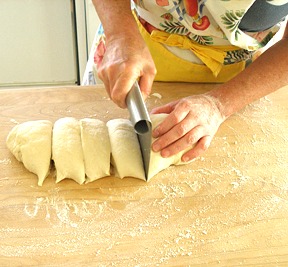
SARAH SAYS: If you are unsure if the pieces are divided evenly, weigh each piece on a kitchen scale to double check. Do not tear off small pieces of dough from the cut pieces to correct the individual weights; use a bench scraper and cut straight down through the dough. Just place the cut piece with the larger piece; they will be shaped into a ball together in the next step.
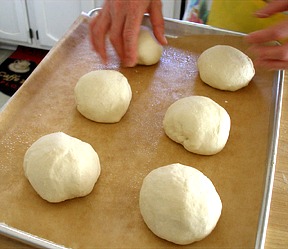
6. Sprinkle flour over the dough. Make sure your hands are dry and then flour them. Lift each piece and gently round it into a ball. If the dough sticks to your hands, dip your hands into the flour again.
KELLY SAYS: To form a nice round ball, gently pull the sides of the dough down to the bottom and then pinch them together underneath the ball.
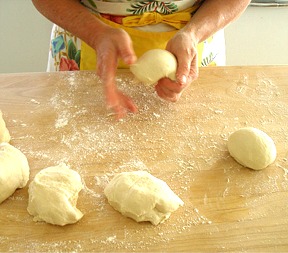
7. Transfer the dough balls to the parchment-paper lined sheet pan.
8. Mist the dough generously with spray oil.
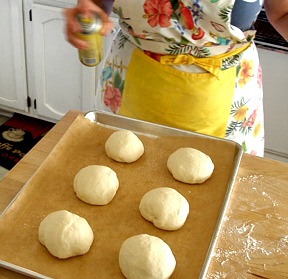
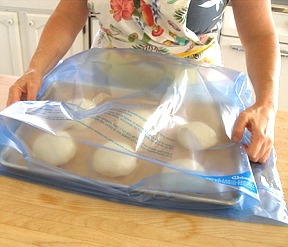
Slip the pan into a food-grade plastic bag.
SARAH SAYS: Never use a garbage bag to wrap food in; it is not deemed food safe to use.
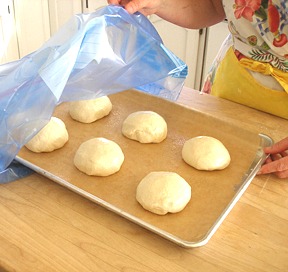
KELLY SAYS: I used a huge ziplock storage bag. They now come in very large sizes, up to 20 gallons. After use, I am setting the bag aside to reuse it the next time I make this dough.
9. Put the pan into the refrigerator overnight to rest the dough, or store there for up to 3 days.
STORAGE
If you want to save some of the dough for future baking, you can store the dough balls in individual zippered freezer bag. Dip each dough ball into a bowl that has a few tablespoons of oil in it, rolling the dough in the oil, and then put each ball into a separate bag. You can place the bags into the freezer for up to 3 months. Transfer them to the refrigerator the day before you plan to make pizza.
STEP II: MAKE THE PIZZAS
Pre-shape the pizzza dough:
1. On the day you plan to make the pizza, remove the desired number of dough balls from the refrigerator 2 hours before.
SARAH SAYS: Always keep yeasted bread dough covered with plastic wrap. Make sure it has been lightly greased with oil and then, covered, otherwise a dry crust will form on the outside of the dough. If it does, not dough will not fully rise in the oven and/or crack during baking, causing blow-outs in the dough.
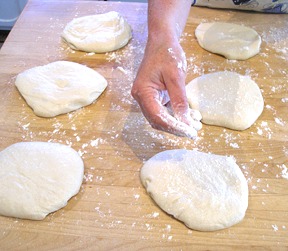
2. Dust the counter with flour, and then mist the counter with spray oil.

3. Place the dough balls on top of the floured counter and sprinkle them with flour; dust your hands with flour.
KELLY SAYS: After removing your rested dough from the baking sheet, the dough balls will not look like “balls” anymore, they will look like light little pillows of dough.
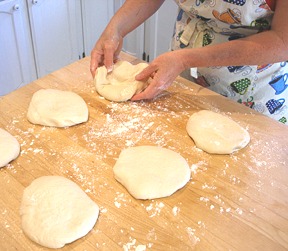
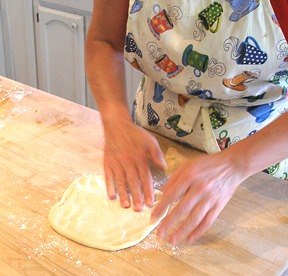
4. Gently press the dough into flat disks about 1/2 inch thick and 5 inches in diameter.
5. Sprinkle the dough with flour, mist it again with spray oil, and cover the dough loosely with plastic wrap or a food-grade plastic bag. Let rest for 2 hours.

Preheat the oven:
1. At least 45 minutes before making the pizza, place a baking stone either on the floor of the oven (for gas ovens), or on a rack in the lower third of the oven.
Preheat the oven to 450 degrees F. If you do not have a baking stone, you can use the back of a sheet pan, but do not preheat the pan.
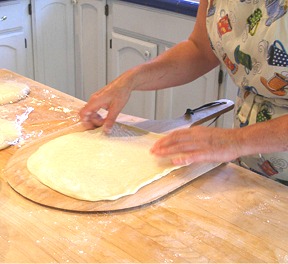
2. Generously dust a peel or the back of a sheet pan with semolina flour or cornmeal.
Shape the pizza dough: make the pizzas one at a time.
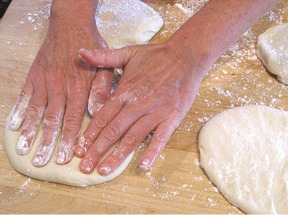
1. Dip your hands, including the backs of your hands and knuckles, in flour.
Lift I piece of dough by getting under it with a pastry scraper.
2. Very gently lay the dough across your fists and carefully stretch it by bouncing the dough in a circular motion on your hands, carefully giving it a little stretch with each bounce.
KELLY SAYS: This is a VERY stretchy dough. It is beautiful to work with because it doesn't give you any resistance when you are trying to shape it.
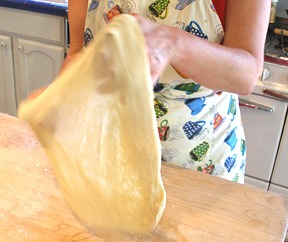
NOTE: If it begins to stick to your hands, lay it down on the floured counter and re-flour your hands, then continue shaping it. Once the dough has expanded outward, move to a full toss, if you know how. If you have trouble tossing the dough, or if the dough keeps springing back, let it rest for 5 to 20 minutes so the gluten can relax, and try again. You can also resort to using a rolling pin, though this isn't as effective as the toss method.
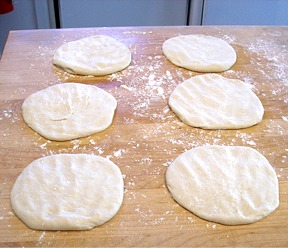
3. When the dough is stretched out to your satisfaction (about 9 to 12 inches in diameter for a 6-ounce piece of dough), lay it on the peel or pan, making sure there is enough semolina flour or cornmeal to allow it to slide.
STORAGE
Brush pizza crust with a light coating of olive oil. Cover loosely with plastic wrap if using within 10 minutes.
Wrap and freeze if not using right away.
Top the shaped pizza dough:
1. Lightly spread EACH pizza dough with as much SARAH PHILLIPS' NO-COOK ZESTY TOMATO SAUCE as desired, avoiding the edges; you may not use all of the sauce (freeze extra).
Sprinkle cheese evenly over the sauce and then top with your other toppings, remembering that the best pizzas are topped with a less-is-more philosophy.
A few, usually no more than 3 or 4 toppings, including sauce and cheese is sufficient.
2. Slide the topped pizza onto the stone (or bake directly on the sheet pan) and close the door. Wait 2 minutes, then take a peek.
If it needs to be rotated 180 degrees for even baking, do so. The pizza should take about 5 to 8 minutes to bake.
The cheese should bubble, but not burn. If the top gets done before the bottom, you will need to move the stone to a lower self before the next round. if the bottom crisps before the cheese caramelizes, then you will need to raise the stone for subsequent bakes.
SERVE
Remove the pizza from the oven and transfer to a cutting board. Wait 3 to 5 minutes before slicing and serving, to allow the cheese to set slightly.
SARAH SAYS: Cut pizza with a pizza wheel, kitchen shears or serrated knife.
STORAGE
Serve immediately. If the pizza has to wait, the crust may become soggy and reheating may make it hard rather than crisp. I often freeze the left over slices. Let cool and then wrap in foil.
Pizza and photo by odetteganda © Sarah Phillips