
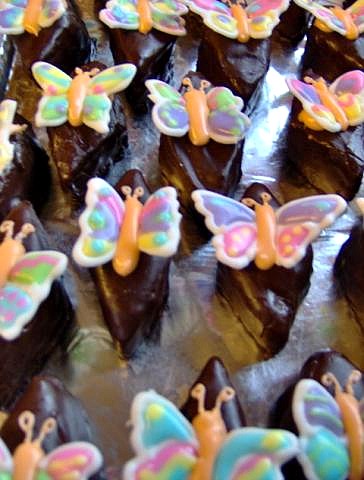
Butterfly petits fours and photo by msbreez © Sarah Phillips
msbreez, Premium Member, Says: “I finally finished the project and took it to my meeting today. I am a member of our local MOPS group and part of the theme this year uses butterflies. SO, I decided to make petits fours for this large group, with a mom flavor AND incorporate butterflies somehow. This is the final outcome. Ok, so, which part of this whole thing have I done before? NONE of it! Well, I have baked a cake from scratch, but not a Genoise. I have decorated cookies before, but not on this level. What will I do again? ALL OF IT! That cake was so awesome, and the coffee flavors with the chocolate were so grown-up tasting. I'm not sure when I will be making something like this again, lots of women there were telling me I should do that for some kind of business here, there's just a Walmart and a grocery store, no specialty cake stores. Maybe…I might consider it.
Thanks, Sarah for making this accessible to the 'average home baker'. I never would have done anything close to this if I hadn't started a search a couple years ago for a lemon cake recipe. Neat how things turn out! I posted pictures including the various stages of assembly. Thanks for looking!”
CAKE RECIPE HELP
INGREDIENTS
Butterfly Wings:
1 recipe Royal Icing Master Recipe; use the Safe Royal Icing Recipe
Corn syrup
Gel colors
Petitis Fours:
2 recipes Basic Genoise Cake Tutorial for the cakes
1 recipe Coffee Syrup from the Opera Cake or Joconde
1 recipe Coffee French Buttercream
1 recipe Chocolate Ganache from the Opera Cake or Joconde for the center filling
1 recipe Chocolate Glaze from the Opera Cake or Joconde
Attaching Butterfly Wings:
1 recipe Royal Icing Master Recipe
Corn syrup
Gel colors
toothpicks
INSTRUCTIONS
STEP I: MAKE THE BUTTERFLY WINGS – A DAY IN ADVANCE

Butterfly petits fours and photo by msbreez © Sarah Phillips
INGREDIENTS
1 recipe Royal Icing Master Recipe
Corn syrup
Gel colors
INSTRUCTIONS
1. The butterfly wing pattern I used was a picture of mini cookie cutters someone was selling. I enlarged the picture on my word program and printed a couple to a page. Then I taped that under a piece of waxed paper. I was not real careful to make the outlines, just kind of loosely followed the pattern.
2. I made the butterfly wings with royal icing. I made it thick for outlining the wing shapes and then divided up a batch of white and thinned with some corn syrup and colored with gel colors at the same time. I used new plastic storage bags for all of the icing, just clipped off a corner to 'write'.
I would tell you how much, but I really didn't measure. Toba states in her book for a flow icing, it should disappear into itself by the count of 10. I guestimated and probably had about 1/3 – 1/2 cup icing in each plastic baggy and added about 1 teaspoon corn syrup and a dab of color.
When the outlines were pretty dry I filled in with the colored flood royal icing. That was so fun!
My daughter and son had to do some too. Since I made extra wings I let them ice up a couple each. They loved it. Sam had to eat his before he was done. Eliana waited till it was dry – next day.
3. I did place the pans in the oven with the light on overnight, that dried the tops good, but they were still a bit wet underneath and I needed to use them soon. So, I peeled them off carefully and placed them back in upside down so the backs would dry really well. That was another overnight. They became dry and hard as rocks, yet still melt in your mouth sweet!
STEP II: MAKE THE PETITS FOURS CAKES
INGREDIENTS
2 recipes Basic Genoise Cake Tutorial for the cakes
INSTRUCTIONS
1. I baked each recipe in 2 parchment paper lined jelly roll pans. That gives you 4 layers of cake total.
2. Remove from pans after baking. Carefully remove parchment paper.
3. Let cool on a wire cake rack.
STEP III: FILL, STACK AND THEN, CUT THE PETITS FOURS SHAPES
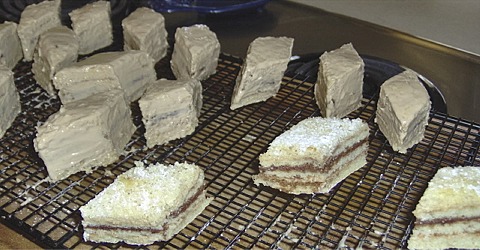
Butterfly petits fours and photo by msbreez © Sarah Phillips
MSBREEZ SAYS: I had to practice since I never really frosted anything, and I discovered that I can't handle tiny pieces.
INGREDIENTS
4 baked and cooled genoise cake layers from STEP II
1 recipe Coffee Syrup from the Opera Cake recipe
1 recipe Coffee French Buttercream
1 recipe Chocolate Ganache from the Opera Cake recipe for the center filling
INSTRUCTIONS
1. Line a baking sheet with parchment or wax paper.
2. Place one trimmed cake layer on the parchment. Moisten it with a light coating of Coffee syrup by brushing it with a pastry brush.
Spread the Chocolate Ganache over the surface.
3. Top with the second trimmed cake layer. Moisten it with Coffee Syrup.
Spread about 3/4 of the coffee buttercream evenly over it. (If the buttercream is soft, put the cake in the freezer for about 10 minutes before proceeding.)
4. Top with the third trimmed cake layer, moisten, and spread Chocolate Ganache over the surface.
5. Top with the last cake layer, moisten with Coffee Syrup. Then, chill the cake in the freezer for about 10 minutes
6. Cover the top of the cake with the remaining coffee buttercream. Smooth with an offset icing spatula. Refrigerate the cake for at least 1 hour.
7. Cut the cake: My petits fours were slightly big, about 2×3 inches or so. I just used my knife to cut the pieces, but you could use tall cookie cutters, or find petits fours cutters also.
8. Chill the cakes, again, for at least an hour up to 6 hours; it should be cold when you pour over the Chocolate Glaze. You can also rapidly chill it by placing it int the freezer for about 20 minutes.
STEP IV: GLAZE THE PETITS FOURS
INGREDIENTS
1 recipe Chocolate Glaze from the Opera cake recipe.
Chilled Petits Fours Shapes from STEP III
INSTRUCTIONS
1. Place the Chilled Petits Fours Shapes on a rack over the parchment-lined pan.
3. Immediately, pour over the Chocolate Glaze, using a long offset spatula to help smooth it evenly across the cake tops, if necessary.
SARAH SAYS: If desired, you can also dip the cake pieces into the chocolate glaze.
4. Slide the cakes into the refrigerator to set the glaze.
STEP V: ATTACH THE BUTTERFLY WINGS WITH ROYAL ICING
INGREDIENTS
Dried Butterfly Wings from STEP I
Safe Royal Icing from STEP I
Glazed Petits Fours Shapes from STEP IV
1 recipe Royal Icing Master Recipe
Corn syrup
Gel colors
Toothpicks
INSTRUCTIONS
1. I just made bodies on the cakes with orange tinted royal icing and added an extra dot of royal icing on the sides to help hold the wings up.
Thin the royal icing with corn syrup, if necessary.
2. Then I put the wings on and supported them with toothpicks till they dried enough to hold themselves.
I was thinking about making some kind of form to use to finish them off the cakes, something like a V shape to hold the dry wings up and attach a body and antenna. I ran out of time for that. I think next time I'll try to make them earlier and make the form to finish them off the cake. But, I guess it did work this way too.
Next project will be to learn how to pipe with all the different tips and stuff. I think I'll get a book and just go through it page by page, learn each before I move on the the next. I'm just having fun! If you made it this far, thanks for reading this whole long-winded post!
STORAGE
Petits fours must be kept refrigerated because French Buttercream is perishable; Icing must be kept refrigerated and will keep for about 1 week. Icing can be stored in an airtight container and frozen for up to 2 months.