

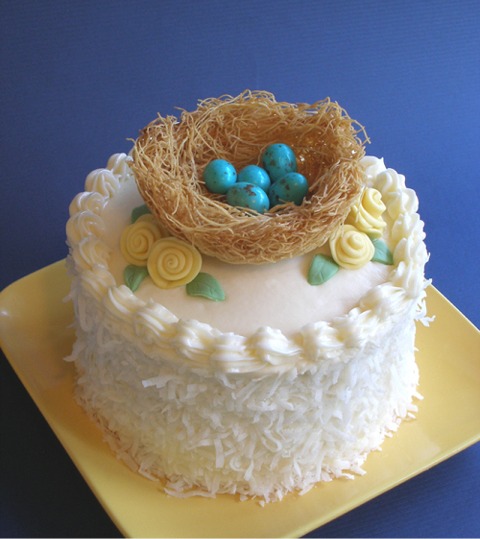
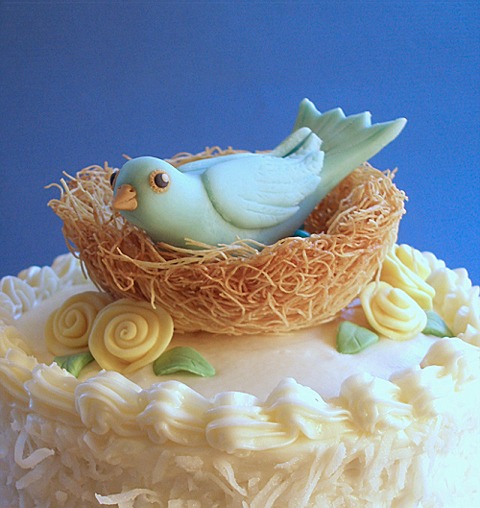
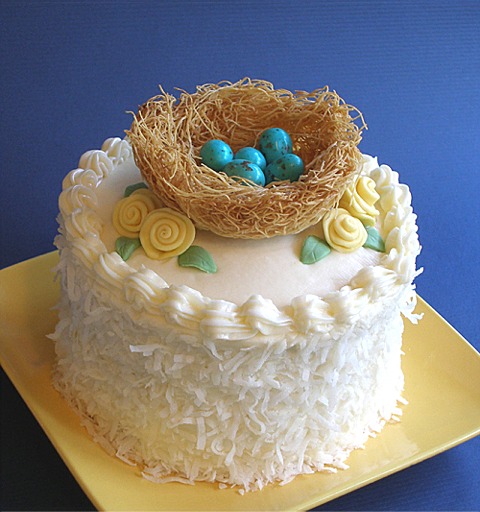
This is a moist coconut cake recipe, baked in 5-inch layers, with lime curd filling. It's frosted with tangy coconut cream cheese frosting, and with simply adorable decorations. We show you how to make the baked Kataifi nest (shredded phyllo dough) and the sculpted fondant mama bird, watching over it all. We also show you how to make the fondant ribbon roses, and how to assemble the entire cake. This is quite an extensive recipe tutorial all packed in one! This cake must remain refrigerated because of the cream cheese frosting.
CAKE RECIPE HELP
KELLY SAYS: “The cake is delish and I have to congratulate Sarah on this truly yummy cake. It is very moist without being heavy.
The frosting is a great counterpoint… The tang of the cream cheese frosting cuts the sweetness, as does the tartness of the lime curd filling.
This cake would be awesome as some sort of Almond Joy cake…with chocolate frosting and coconut and almonds!”
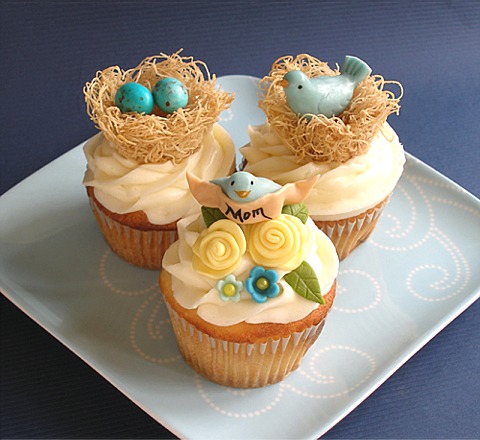
KELLY SAYS: “I had a bunch of cupcakes, frosting and lime curd left over from the Mother's Day Coconut Cake, so I decided to make some companion cupcakes. They are filled with lime curd, using the cone method, so they are super-yummy too!”
This delicious and show-stopping dessert is made from a couple of recipes and steps:
STEP I: MAKE THE LIME CURD – can be made two days in advance
STEP II: MAKE SARAH'S CLASSIC COCONUT CAKE – can be made a month in advance and frozen
STEP III: MAKE THE COCONUT CREAM CHEESE BUTTERCREAM FROSTING – can be made two days in advance
STEP IV: MAKE THE FONDANT MAMA BIRD AND FONDANT RIBBON ROSES AND LEAVES – can be made 2 days in advance
STEP V: MAKE THE BIRD NESTS FROM KATAIFI – make a day or two before needed
STEP VI. ASSEMBLE THE CAKE – the day or a day before serving
~
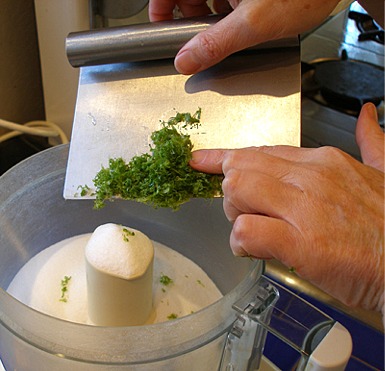
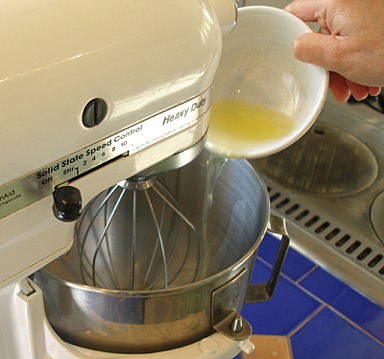
STEP I: MAKE THE LIME CURD
Since the lime curd needs to be cold, before we can fill the cake, make it first. You will not need all of it for the cake.
LIME CURD / Recipe alone
KELLY SAYS: I love this lime curd. It is really zesty!
INGREDIENTS
4 to 5 medium-size limes or 1/2 cup lime juice
1 1/2 cups sugar
1/4 pound unsalted butter at room temperature
4 large eggs at room temperature
1/8 teaspoon salt
INSTRUCTIONS
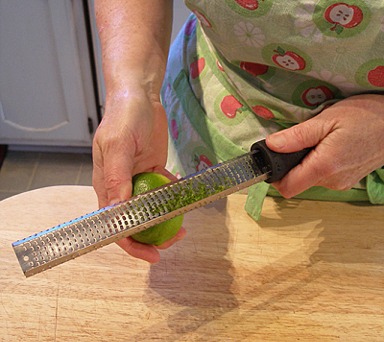
1. Remove the zest of 4 or 5 limes with a zester or vegetable peeler, being careful to avoid the white pith.
2. Squeeze the limes to make 1/2 cup of juice and set the juice aside.
3. Optionally, put the zest in a food processor fitted with a steel blade. Add the sugar and process for 2 to 3 minutes, until the zest is very finely minced and the sugar is processed until fine.
SARAH SAYS: Processing sugar in your food processor will scratch it, but not ruin your food processor! I just want to warn you in advance. Optionally, you can chop the lime zest into finer particles with a sharp knife and use super-fine sugar, instead. The super-fine sugar is not necessary, however.
4. In the bowl of an electric mixer fitted with a paddle attachment, cream the butter with the sugar and lime zest.
5. Add the eggs, 1 at a time, and mix for 20 seconds on low after each one. Scrape the bottom and side of the bowl before moving to the next step.
6. Next, add the lime juice and salt. Mix on low until combined.
7. Pour the mixture into a 2-quart saucepan and cook over low heat, stirring constantly, until thickened, about 10 minutes.
NOTE: Do not be alarmed if your mixture looks curdled when you pour it in the pan. It will smooth out when you cook it.
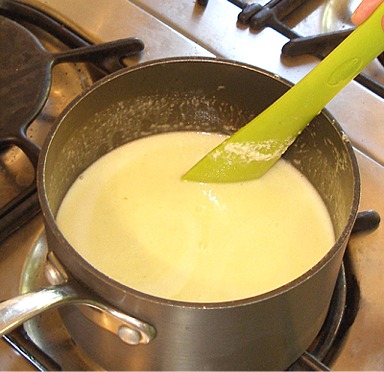
8. The lime curd will thicken at about 175 degrees F, as measured with an Instant Read Thermometer, or just below a simmer. Remove from the heat and set aside.
9. Press a piece of plastic wrap on the surface of the curd and refrigerate until set.
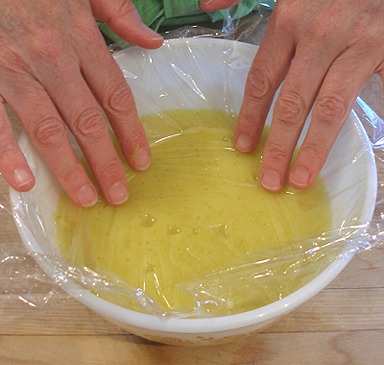
STORAGE
Refrigerate until ready to use or freeze for 2 months.
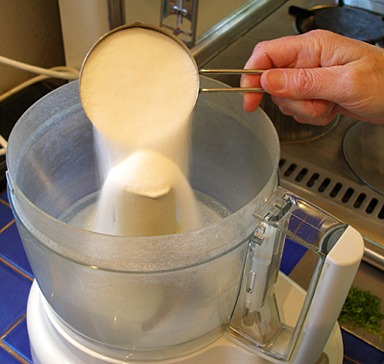
STEP II: MAKE SARAH'S CLASSIC COCONUT LAYER CAKE
CLASSIC COCONUT LAYER CAKE / Recipe alone
For this tutorial: Makes two 5 x 2-inch cakes and about 18 cupcakes. You can use any size pan up to two, 9 x 2-inch pans.
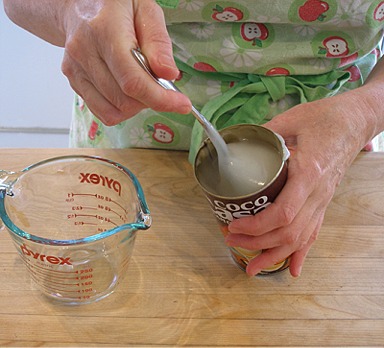
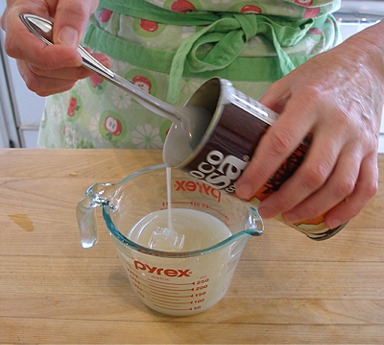
This recipe is as incredible as it is beautiful. To make this recipe, you’ll need to buy one 15-ounce can of sweetened cream of coconut (not coconut milk), typically found in liquor section of most grocery stores.
INGREDIENTS
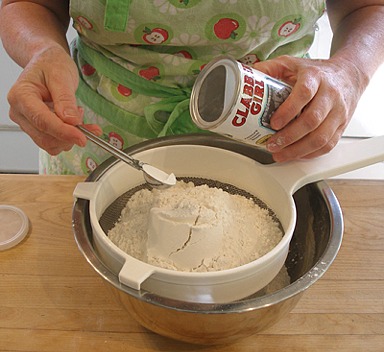
2 3/4 cups unbleached all purpose flour; spoon into measuring cup and level to rim
1 teaspoon baking powder
1/2 teaspoon baking soda
1/2 teaspoon salt
1 3/4 cups sugar
1 cup (2 sticks) unsalted butter
1 cup canned sweetened Cream of Coconut – DO NOT SUBSTITUTE – such as Coco Lopez brand; It can be ordered online.
4 large eggs, separated
1 teaspoon coconut extract
1 teaspoon vanilla extract
1 cup buttermilk, well-shaken
1/8 teaspoon cream of tartar; for egg whites
NOTE: Make sure to stir the Cream of Coconut thoroughly, before measuring in a liquid measuring cup, otherwise the recipe will not turn out.
INSTRUCTIONS
1. Position the oven shelf to the middle and preheat oven to 350 degrees F.
(If using dark baking pans or ovenproof, Pyrex glass pans, be sure to reduce the oven heat by 25 degrees F).
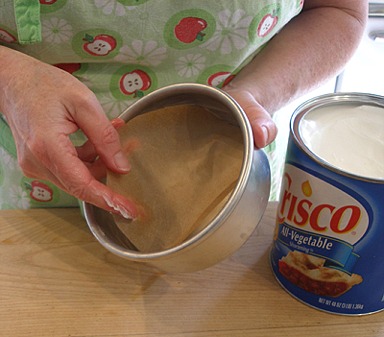
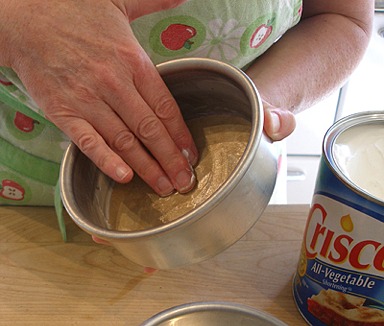
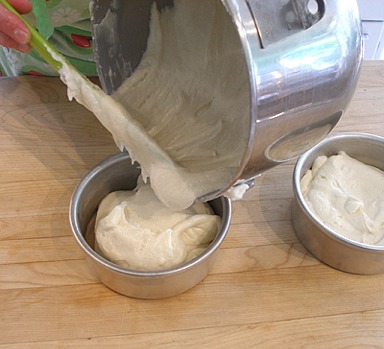
2. Grease two 5 x 2-inch- cake pans. preferably light colored, heavy NOT nonstick pans.
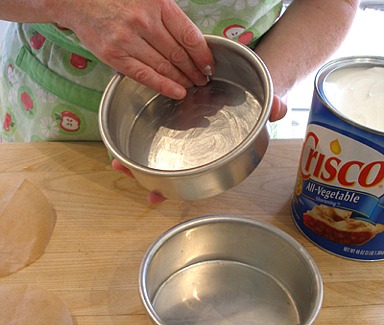
Line with parchment paper and grease, again.
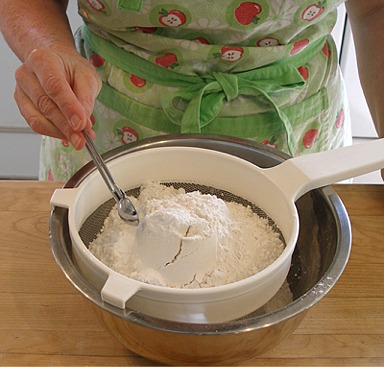
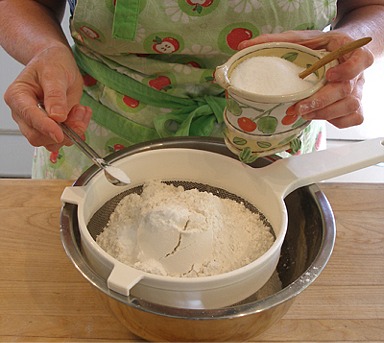
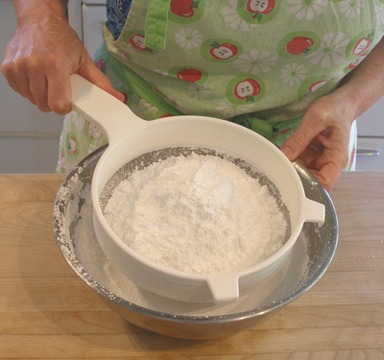
3. Combine flour, baking powder, baking soda and salt in medium bowl. Set aside.
KELLY SAYS: After measuring, I like to sift together the dry ingredients.
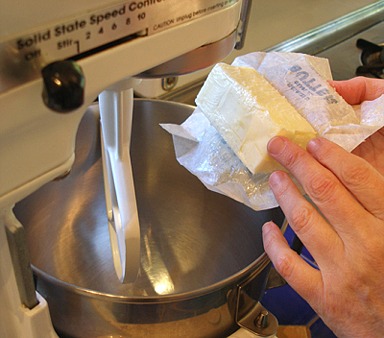
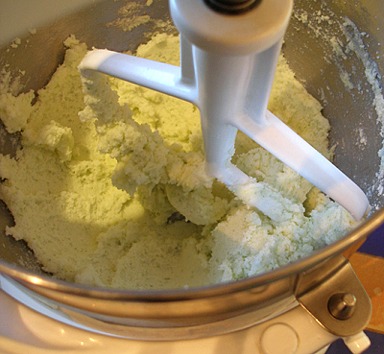
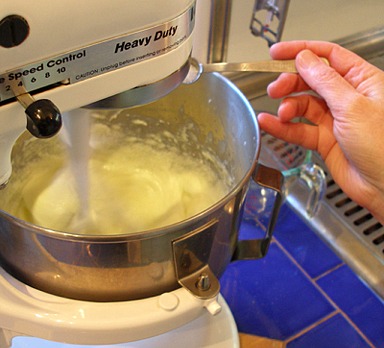
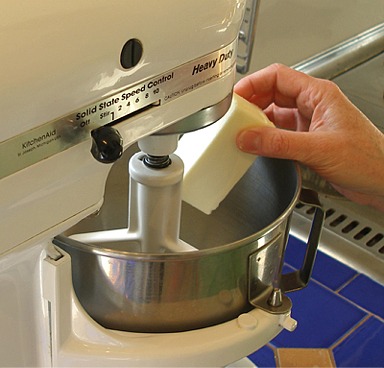
4. Beat the butter in the bowl of a stand mixer, fitted with a paddle attachment, on low until softened. (If the butter is cold, it will warm quickly from the beaters – taking about 60 seconds).
5. Add the sugar, first. Then, add in the cream of coconut. Increase speed to medium and beat for 2 minutes until light yellow and fluffy.
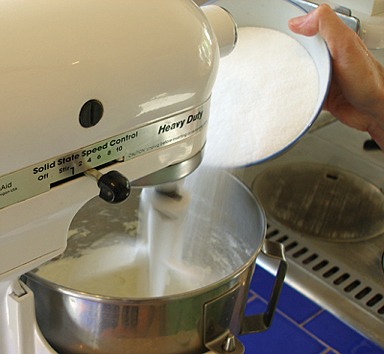
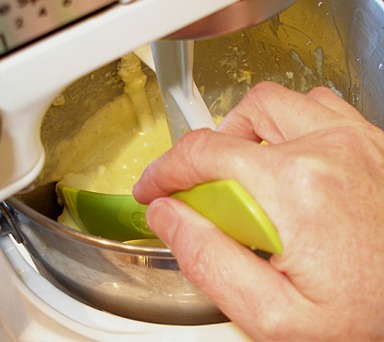
Stop the mixer and scrape the side and bottom of the bowl with a large rubber spatula.
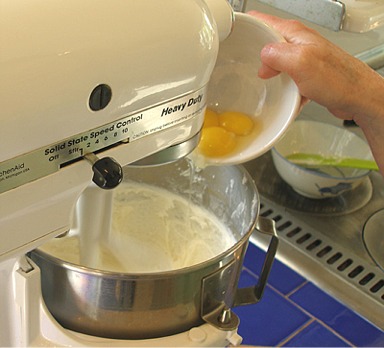
6. With the mixer on low, add the egg yolks one at a time and beat for 20 seconds after each addition. After the egg yolks have been added, increase the mixer speed to medium-low and beat the mixture for 30 seconds.
SARAH SAYS: If the eggs are cold, the batter will curdle slightly. It's ok. It will come together as the batter warms from the beaters.
7. Beat in the vanilla and coconut extracts.

Stop the mixer and scrape the side and bottom of the bowl with a large rubber spatula.
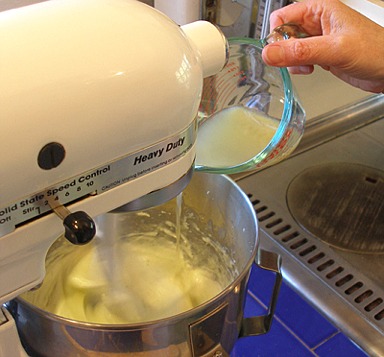
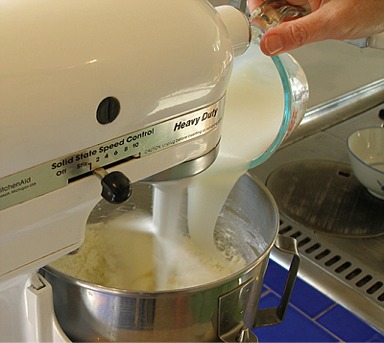
8. With the mixer on low, add the flour mixture in 3 equal portions, alternating with the buttermilk in 2 equal portions, beginning and ending with the flour.
SARAH SAYS: If the milk is cold, the batter will curdle slightly. It's ok. It will come together when you add the flour.
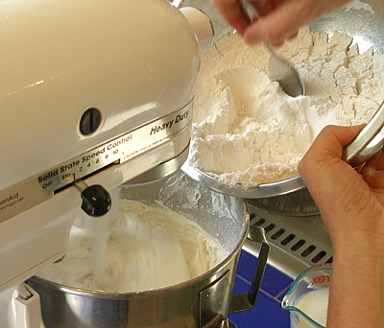
SARAH SAYS: Add the flour and liquid ingredients in increments quickly; do not wait in between additions too long as you don't want to overmix the batter.
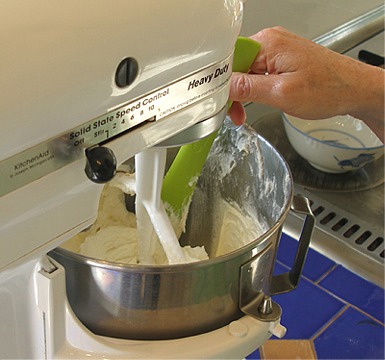
After completing the last addition of flour, stop the mixer, and scrape the side and bottom of the bowl with a large rubber spatula.
Then, let the mixer run for 30 seconds on LOW. The batter will be very thick. STOP the mixer. Do NOT overmix.
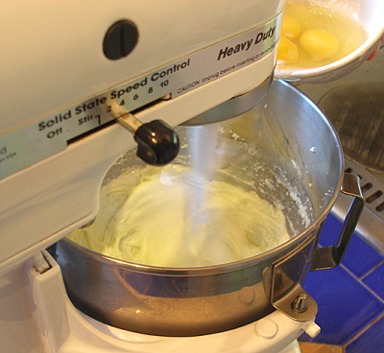
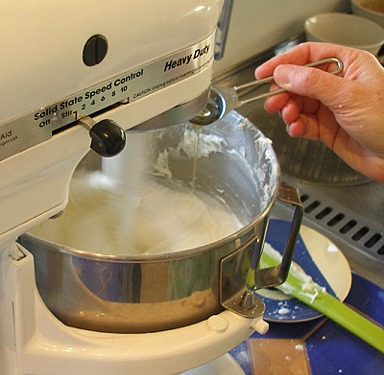
9. In a clean mixing bowl, free from any fat or grease, beat the egg whites: Fit the mixer with the whisk attachment, and beat the egg whites with cream of tartar on low until foamy.
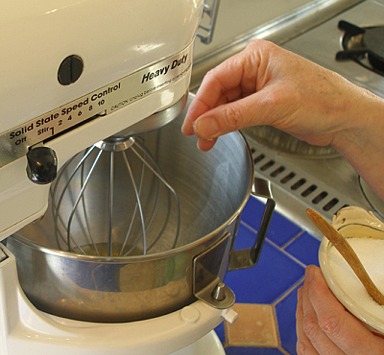
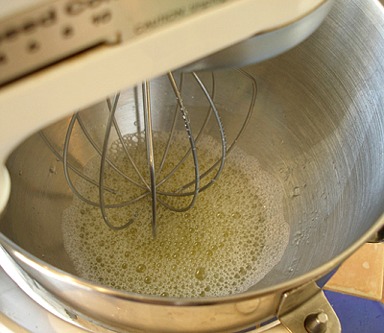
10. Increase the mixer speed to medium-high until the soft peak stage is reached when the peaks of the whites droop slightly, when the beater is turned off and lifted.
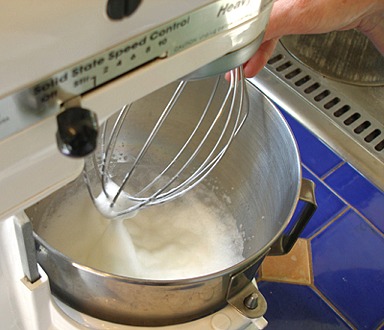
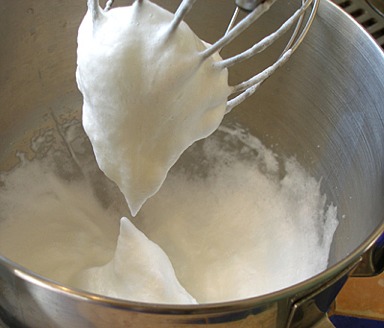
11. Then, increase the mixer speed to HIGH until FIRM peaks just form. DO NOT OVERBEAT. The egg white foam Beat until the egg whites are stiff and glossy. If egg whites are beaten to dry and dull, they are overbeaten — Watch carefully, because egg whites can go from stiff to dry and overbeaten in as little as 30 seconds.
SARAH SAYS: Sugar and salt stabilizes the egg whites and helps them not deflate as readily when folded into the cake batter in the next step. In essence, the overall recipe will fail less. When beating egg whites for a cake recipe, it is important to increase the mixing speeds slowly to get the maximum volume from the whites. The whites do not need to be at room temperature to beat to their fullest. They take longer to beat when cold, but they will reach their eventual goal.
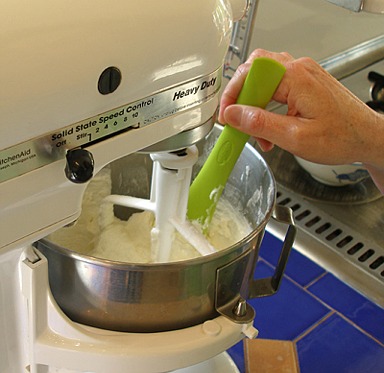
12. Fold the egg whites into the batter: Stir the batter gently right before folding in the beaten egg whites so it is completely mixed. Stir a big spoonful of egg whites into the mixture and gently stir with your whisk to lighten the batter.

13. With a rubber scraper, scoop about 1/3 of the remaining egg whites on top of the batter and fold until the ingredients are combined. Repeat two more times. Stop when the batter looks evenly streaked with beaten egg whites and batter.
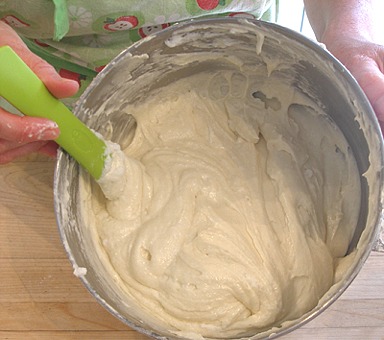
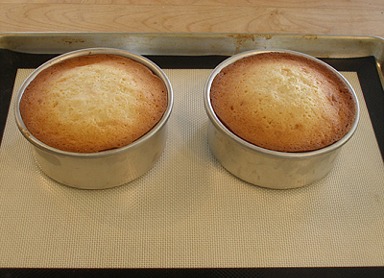
14. Carefully scoop and divide the batter between the prepared baking pans and lightly smooth the tops.
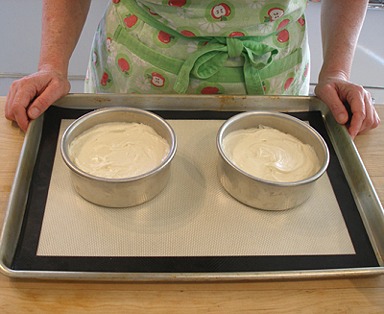
15. Bake for 30 to 35 minutes or until the top feels firm and gives slightly when touched and will shrink slightly from the side of the pan. The cake will be slightly browned. If you insert a toothpick in the middle and remove, there should be a few moist crumbs attached, but not batter.
Remove cakes to cool on wire racks for 10 to 15 minutes. Loosen the sides with a small metal spatula or sharp knife, taking care not to scratch the cake pan. Invert onto cake rack and place upright to cool completely. Be careful, the cakes are delicate when warm.
STORAGE
The cake layers store nicely. They can be stored at room temperature for about 3 or more days. The cake layers freeze well for about a month or more. Keep well wrapped.
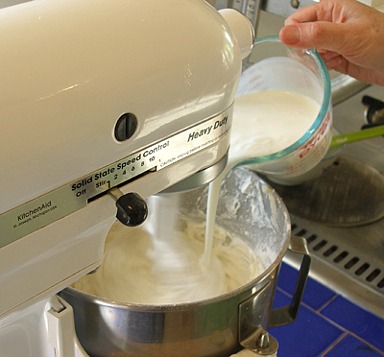
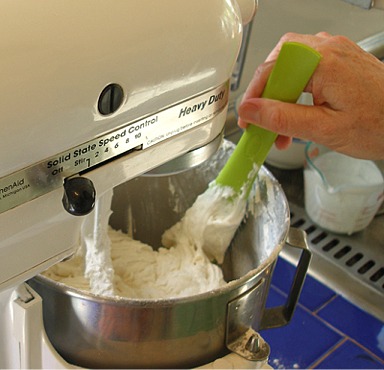
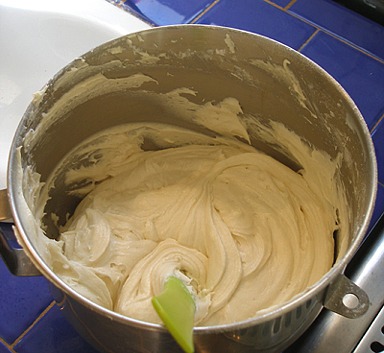
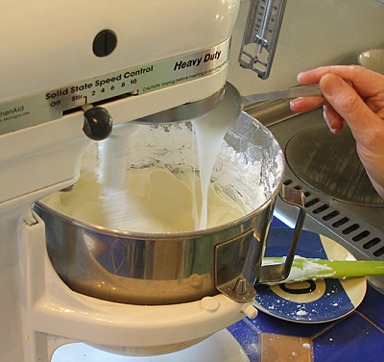
STEP III: MAKE THE CHEESE BUTTERCREAM FROSTING, COCONUT VARIATION
CREAM CHEESE BUTTERCREAM FROSTING, COCONUT VARIATION / Recipe alone
Makes 1 1/4 quarts or enough to generously fill and frost 2, 9-inch layers
INGREDIENTS
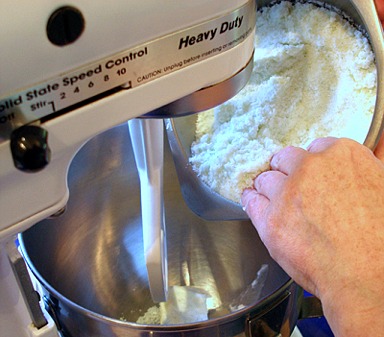
4 ounces high-ratio vegetable shortening or 1/2 stick (4 tablespoons) butter
12 ounces ( 1 1/2, 8 -ounce packages) cream cheese, softened
1 stick (8 tablespoons) unsalted butter, softened
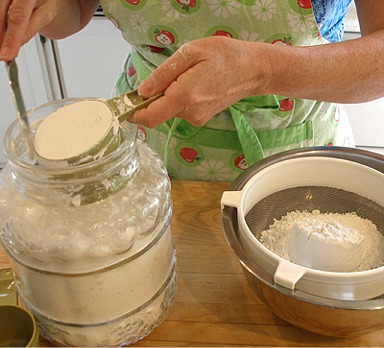
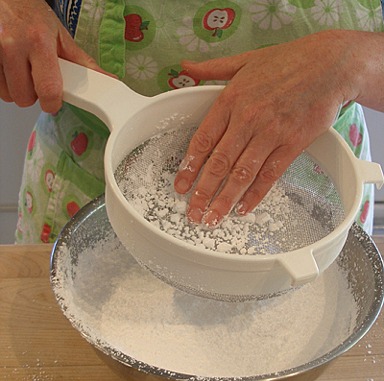
5 to 7 cups (1 to 1 1/2 pounds) powdered sugar, sifted and then, divided; measure and then sift
2 tablespoons meringue powder
2 tablespoons heavy cream, or more, if needed
2 tablespoons Cream of Coconut – DO NOT SUBSTITUTE – such as Coco Lopez brand; It can be ordered online.
2 teaspoons vanilla extract
1 teaspoon coconut extract
NOTE: For best results, sift the powdered sugar after measuring.
INSTRUCTIONS
KELLY SAYS: I prefer to use all butter to make this frosting
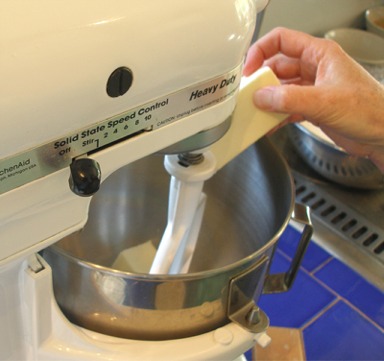
1. With the mixer fitted with a paddle attachment, soften the butter with the mixer on medium.
SARAH SAYS: If using shortening and butter, soften the shortening first, and then, the butter.
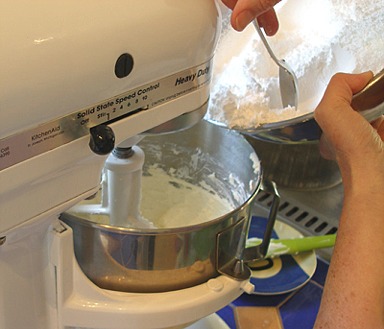
Then, add the cream cheese and beat on low speed until incorporated.
Increase the mixer speed to medium and beat until smooth, about 2 minutes.

2. With the mixer on low, slowly add half of the powdered sugar at the side of the bowl.
3. Add the meringue powder, cream, Coconut of Cream and coconut and vanilla extracts with the mixer on low.
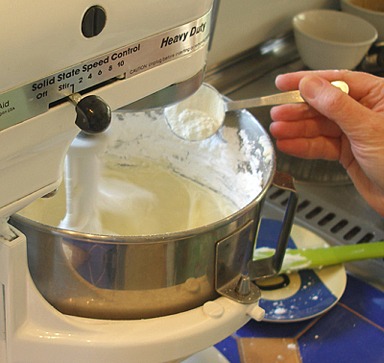
4. Slowly add the other half of the powdered sugar until the frosting reaches a spreadable consistency. You may not need all of it.
Adjust with more powdered sugar or heavy cream, if necessary.

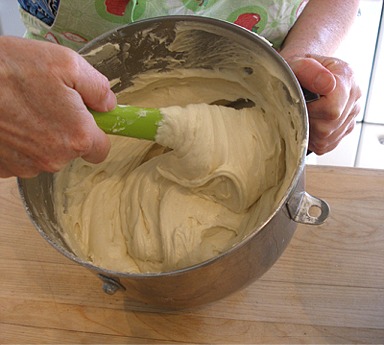
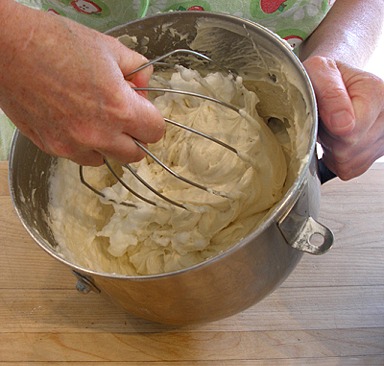
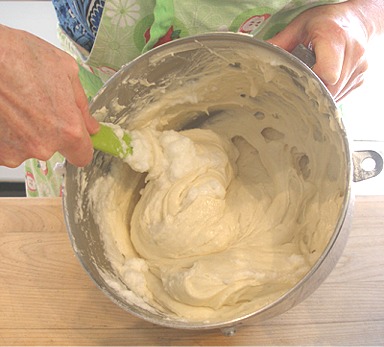
Beat on low for 2 minutes more. The mixture should look light and fluffy. Do NOT overbeat, otherwise the buttercream will become too soft for icing and piping.
5. Place frosting in refrigerator, while you make the kataifi nests.
STORAGE
Store icing in an airtight container in the refrigerator for a week. Icing must be kept refrigerated, but can remain at the cool side of room temperature for 2 hours maximum. Can freeze for up to one month.
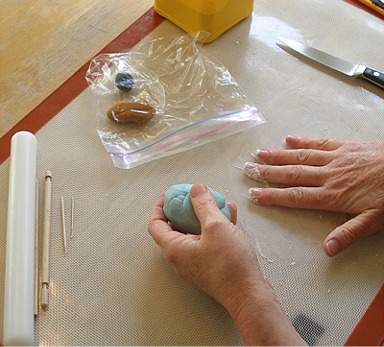
STEP IV: MAKE THE FONDANT MAMA BIRD, FLOWERS AND LEAVES
Make the bird, flowers and leaves at least two days in advance. The bird will be fairly hard in about two days. I like to let them air-dry for a couple of days, to make sure all the moisture is out, then I store them in an airtight container to use for this project.
KELLY SAYS: The bird will be fairly hard in about two days. At that point, you will be able to place her in the nest without fear of sagging.
RECIPE:
1 1/2 cups Marshmallow Fondant or MMF, more if needed; 3/4 cups tinted light blue (bird), 1 teaspoon each: black (eyes), light brown (beak, eyes) and white (eyes); 1/4 cup tinted yellow (roses); 2 tablespoons green (leaves); remainder leave white for extra
Question: How to dry the fondant figurines.
KELLY A: I usually just make a big batch of flowers at a time and set them on a plate to dry.
I leave them out overnight and, if they are small flowers, they should be dry by the morning.
I like to let them air-dry for a couple of days, to make sure all the moisture is out, then I store them in an airtight container to use on later projects.
When I make the leaves, I dry them on the edge of a plate, so they have a bit of shape.
The figures can be made a long time before they are actually needed, really.
The mama bird is actually sitting in a bowl, on my counter right now.
I still have one of the banner birds, from the Wishing Trees Cupcakes, on my kitchen windowsill. It still looks the same. Of course, I wouldn't suggest eating it now. I think it's just cute, and it cheers me up, when I do the dishes. I'll throw it out when it gets dusty.
Question: Should someone cover the mmf they aren't using?
KELLY A: YES! It must be covered when you are not working it. I keep in in a ziplock.
You can see it in the picture, when I am making the bird.
Any left-over colored MMF can be saved and used later…it lasts, in a ziptop bag for a couple fo months. You just have to knead it, till workable, the next time you want to use it.
SUPPLIES:
Silpat mat, to work on
Cornstarch, to prevent sticking
Small fondant rolling pin
Toothpick-for texturing
Large sewing needle-for texturing
Clean Exacto-type knife
Small paring knife
Small bowl, with tissues, for supporting bird while it dries
INSTRUCTIONS
Make the fondant Mama Bird / recipe alone
INGREDIENTS
3/4 cups MMF tinted light blue (bird)
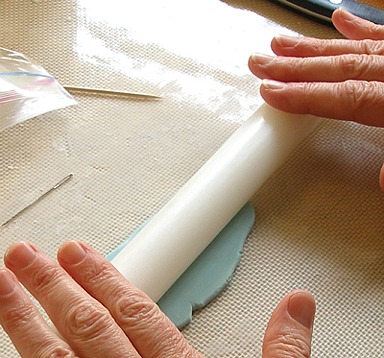
1. Dust your work surface with a little cornstarch, to prevent sticking.
If the fondant begins to stick to your hands, at any time, just rub a little cornstarch between your fingers.
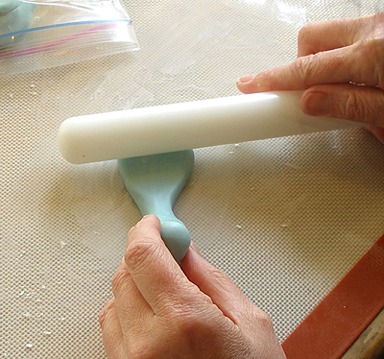
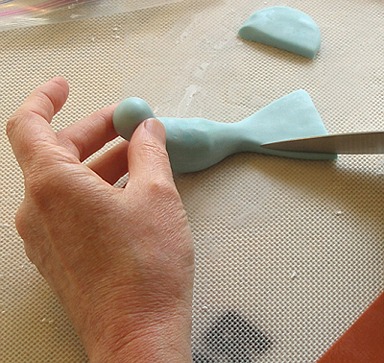
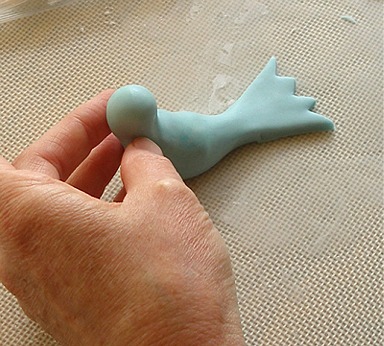
2. Take about 1/4 cup of the blue fondant, and then, elongate it into a thick sausage shape, by rolling it in your hands.
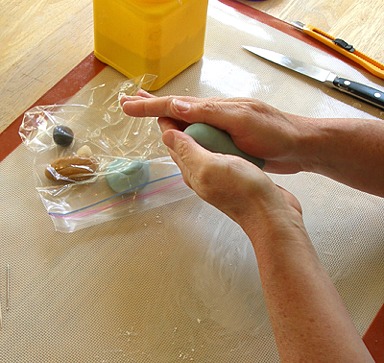
3. With the blue shape, begin to form the bird's head, by gently pinching, around one end of the sausage shape.
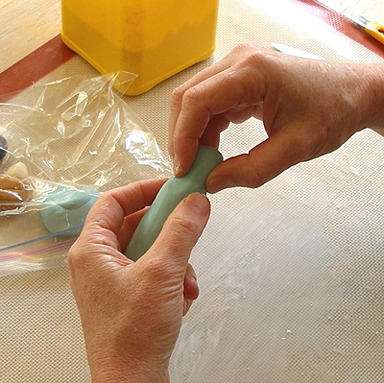
Pinch all the way around, until you have created the “neck” of the bird.
4. Support the head with one hand, and begin to gently pinch about 2/3 of the way down the sausage shape and begin to form the tail of the bird.
KELLY SAYS: Do not worry if there is a large ball of fondant at the end of the tail, we will cut it away later.
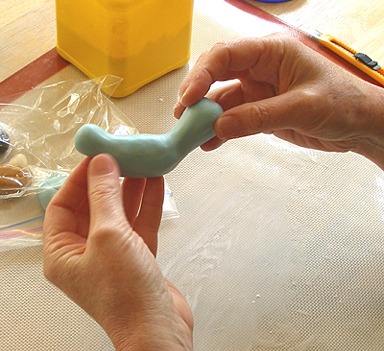
Begin to flatten the tail of the bird by flattening the end of the sausage with your fingers.

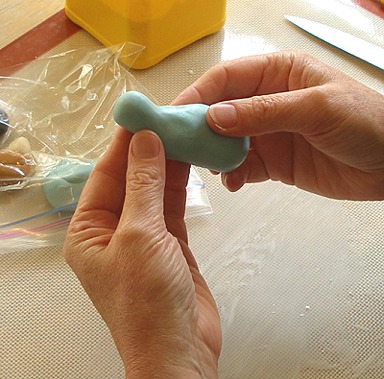
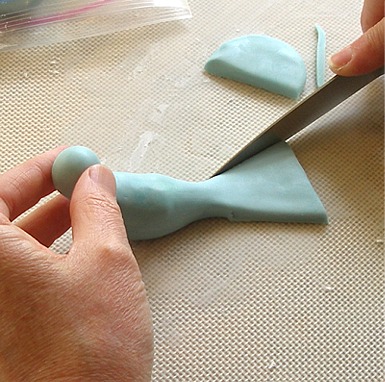
5. Place the tail on the cornstarch dusted silpat mat and continue to flatten, while supporting the head with your other hand.
Pick up the bird and gently pinch the area between the body and the tail of the bird to create a more elegant and narrowed line, supporting head with the other hand.
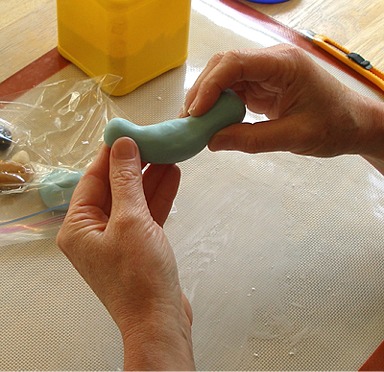
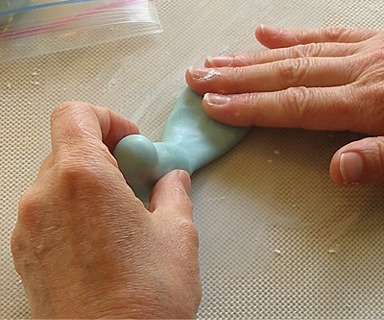
6. Roll the tail with the fondant roller, to remove finger marks and even up the shape. Do not forget to continue to support the head.
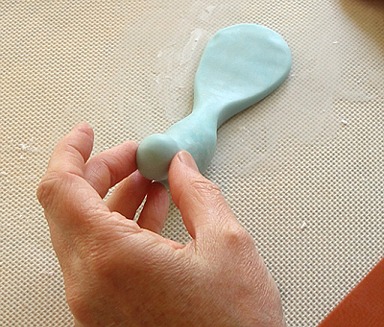
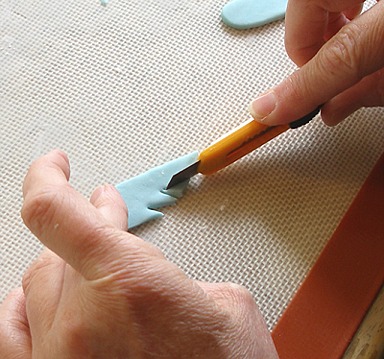
7. Cut off the excess fondant, at the back of the tail, with a sharp paring knife.
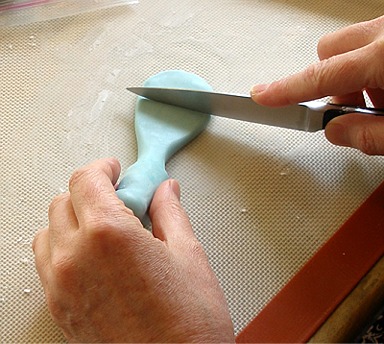
Cut both sides of the tail to refine the shape.
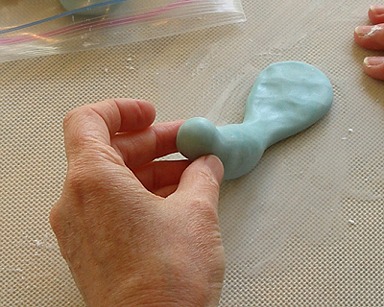
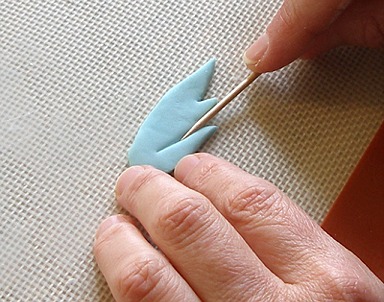
8. Using an exacto knife, cut the tail feathers into the end of the tail.
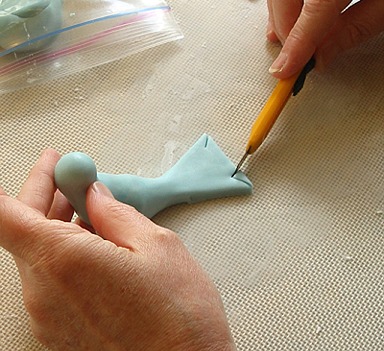
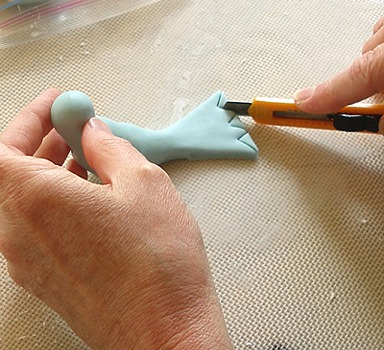
9. Use a toothpick to delineate the feather shapes.
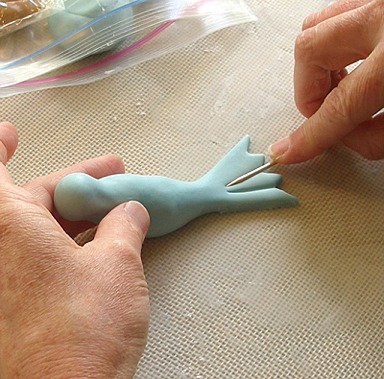

10. Use a large sewing needle to delineate the center rib of each feather.
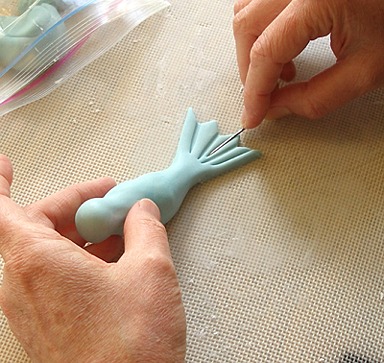

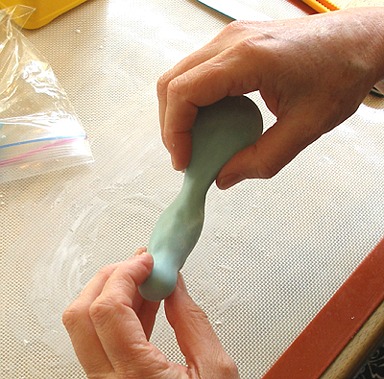
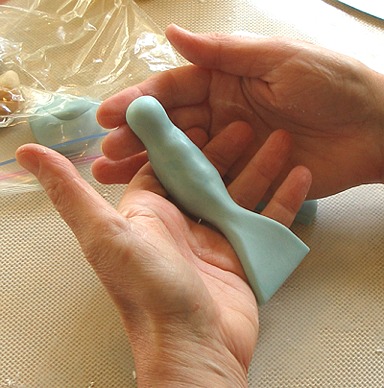
11. Support the front and tail of the bird with wads of fondant, while you make the wings.
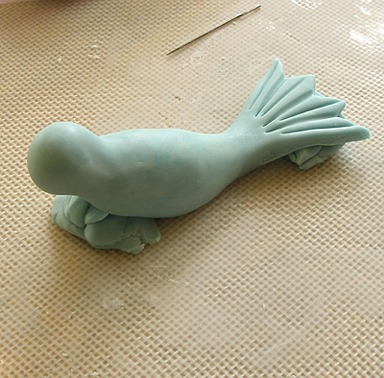
KELLY SAYS: It is much easier to attach the wings to the body after it has set up a little bit.
I let the body dry for two hours, before attempting to attach the wings.
Make the bird's wings:
1. Roll out a small portion of fondant to about 1/8th inch thick on a cornstarch dusted silpat mat.
2. Cut out an elongated tear-drop shape of the wing, using the exacto knife.
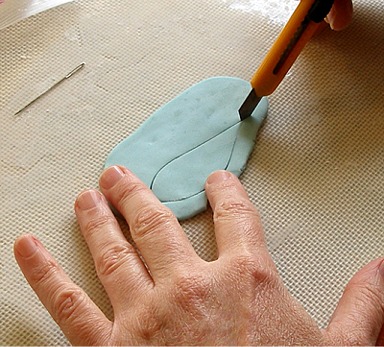
3. Cut out the other wing, by cutting around the first wing. Remember to flip the first wing, so the second wing is its mirror image.
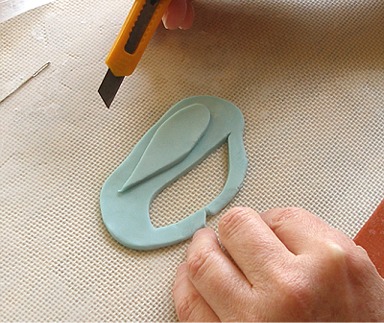
4. Cut several feather tips with the exacto knife.
5. Use the side of the toothpick to delineate the feathers.
6. Use the needle to delineate the center ribs of the wings.
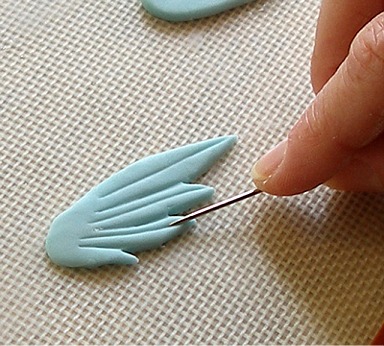
7. Press the needle into the fondant, to create a feather texture on each feather.

KELLY SAYS: It is much easier to attach the wings to the body after they have set up a little bit. I let them dry for two hours, before attempting to attach the wings.
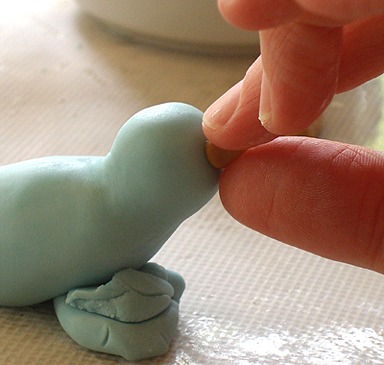
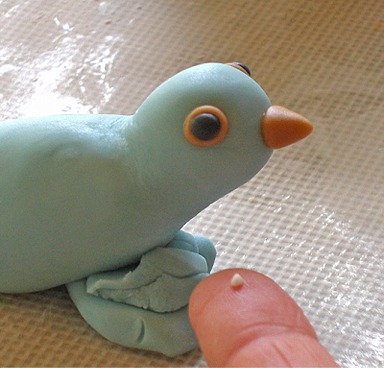
Make the bird's beak:
1. Take a very small portion of the light brown fondant and form it into a triangular beak shape. Flatten the end opposite the point of the triangle. This is where we will attach the beak to the head.
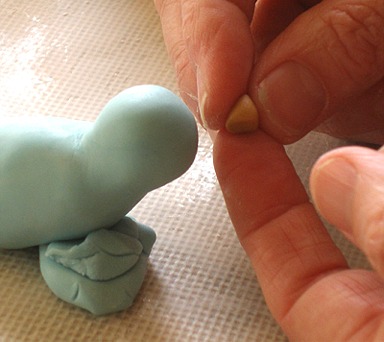
2. Using a very small paint brush, apply a little water to the flat end of the beak and press it onto the head.
Make the bird's eyes:
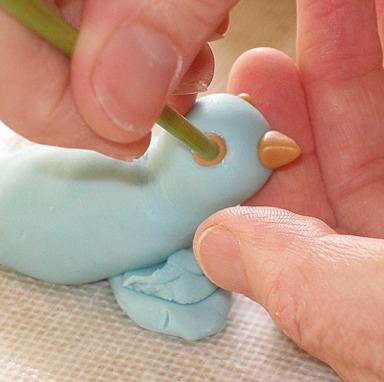
1. Use the rounded end of the paintbrush to create a small impression on each side of the head, where the eyes will be placed.
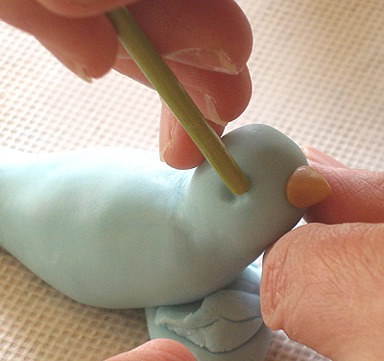
2. Apply a small amount of water to each of the impressions.
3. Make two VERY SMALL balls of light brown fondant. Try to make them the same size.
Place the one of the balls in each of the hollows you created on the sides of the head.
4. Using the end of the paint brush, gently push the center of each ball, creating a hollow.
Paint the center of each hollow with a small amount of water.
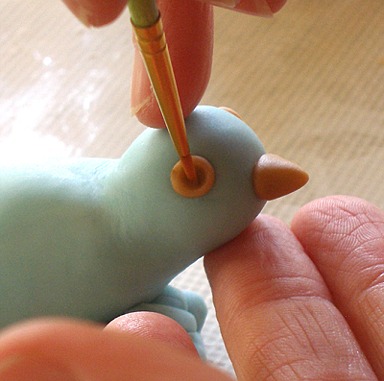
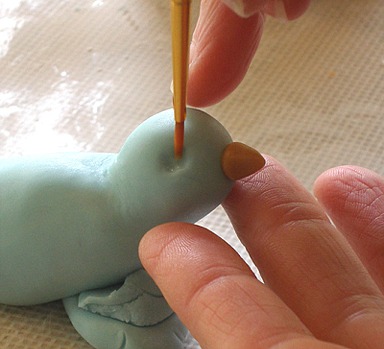
5. Make two equal sized VERY SMALL balls of black fondant and place them in the hollows you created.
Gently press the balls, to flatten.
6. Roll two MINISCULE balls of white fondant. These will create a glint in the bird's eyes and add to its expression.
Paint a small dot of water on the upper and outer part of the eye, and place the white balls in place.
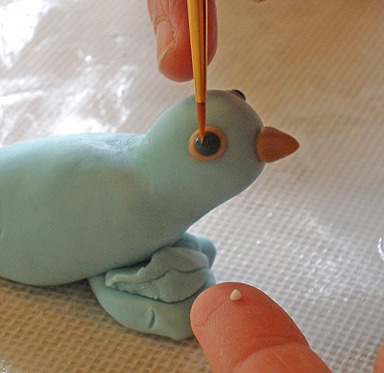
Gently press, to flatten.

7. Use the tip of the needle to make radiating impressions, all the way around the light brown area of fondant.
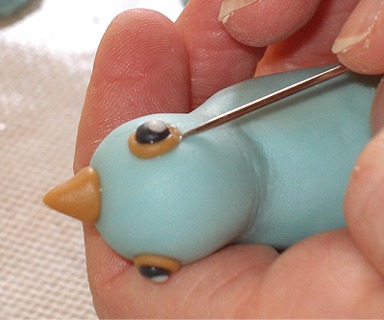
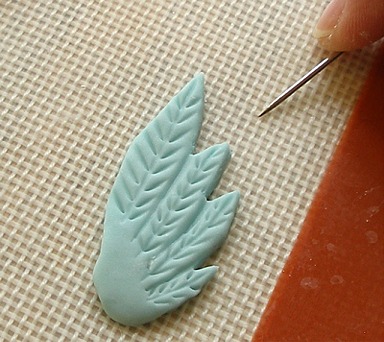
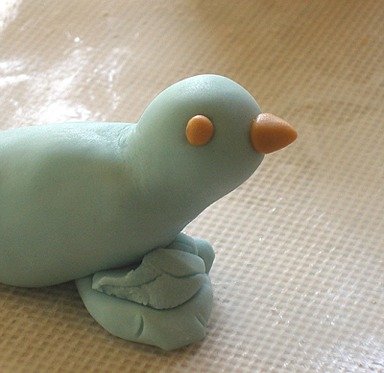
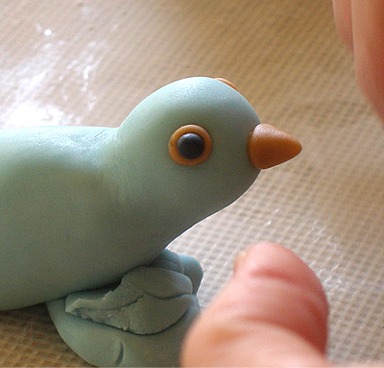
Finishing touches:
1. Use the needle to delineate the top and bottom portions of the beak.
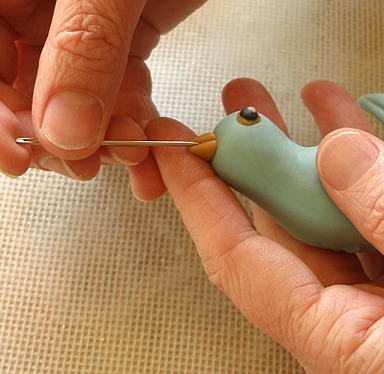
2. Use the tip of the needle to delineate the nostrils.
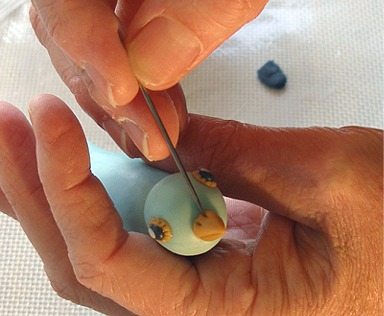
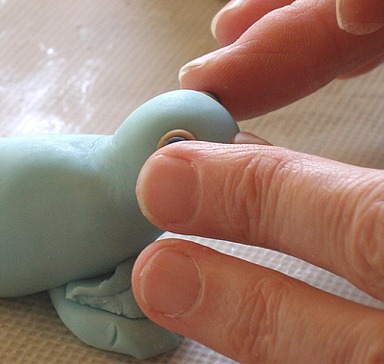
3. Paint the side of the bird with water and attach the wing.
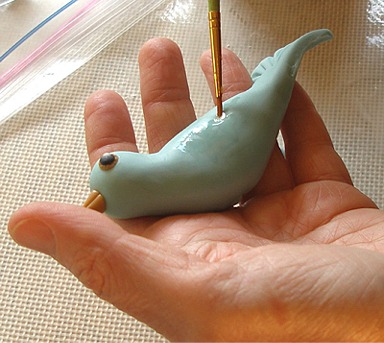

Repeat with the other wing.
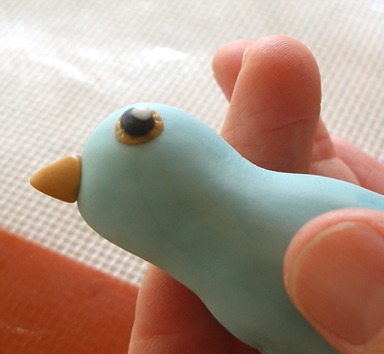
4. Let the bird dry in a bowl lined with tissue. Position the tissue to support the head and tail of the bird, so they won't sag.
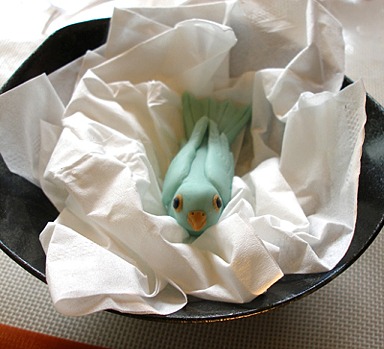
KELLY CA SAYS: The bird will be fairly hard in about two days. At that point, you will be able to place her in the nest without fear of sagging.
STORAGE
If you need to refrigerate your cake, take the bird out of the nest, before you do so. Place her back in, when you are ready to serve the cake.
Make the Fondant Ribbon Roses and Leaves / recipe alone
Fondant ribbon roses are easy to make and look so pretty on cakes and cupcakes. I used homemade Marshmallow Fondant or MMF to make these, but any fondant will do.
INGREDIENTS
1/4 cup tinted yellow (roses); 2 tablespoons green (leaves);
INSTRUCTIONS
Make the roses:
INSTRUCTIONS
Make the roses:
You will need at least 6 roses for this cake, but, you can make as many as you like, and set aside the extras to use later. They are nice to use on other projects, such as cupcakes.
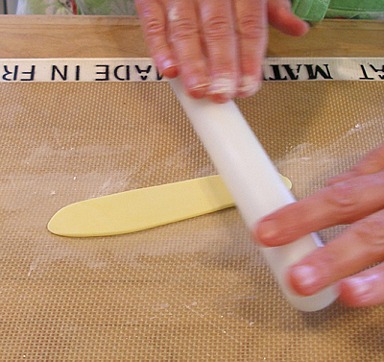
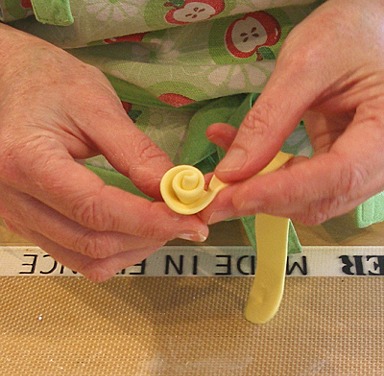
1. Lightly dust a silpat mat with cornstarch and roll out a 1/2-inch thick ribbon of pale yellow MMF.
2. Pick up ribbon and begin to coil the fondant around itself. The center of the ribbon rise should be higher than the outer petals.
3. Pi