
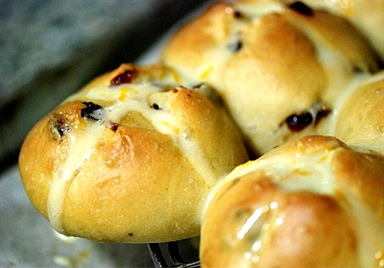
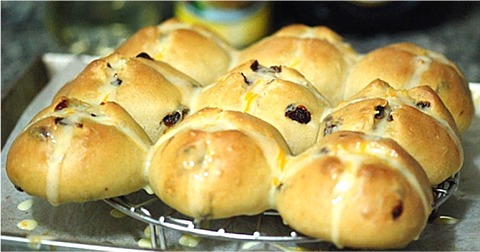
Buns and photo by Orange Piggy, Premium Member © Sarah Phillips
Buns and photo by Orange Piggy, Premium Member © Sarah Phillips
The Hot Cross Bun, traditionally served on Good Friday and Easter, is a yeasted sweet bread dough. It is scented with spices such as ground cinnamon and nutmeg and sometimes with fresh lemon peel. (I've also seen recipes with allspice and cloves) and generously studded with currants and raisins. Before baking, these rich, sweet buns are slashed (cut) with a cross, representing Christ and the Crucifixion, and then baked. Once baked and while still hot from the oven, they are iced with a lemon-scented simple confectioner's glaze and then served right away, hence the moniker “hot”.
BREAD RECIPE HELP
INGREDIENTS
3/4 cup warm water; 100 to 110 degrees F; measured with an instant read thermometer
4 1/2 teaspoons active dry yeast (two packages of Fleischmann's yeast equal 4 1/2 teaspoons); different brands may have different measurements, so read package instructions
1 cup warm milk; 100 to 110 degrees F; measured with an instant read thermometer; can substitute with soy milk
1/3 cup (5 tablespoons plus 1 teaspoon) butter, melted and cooled; can substitute with soy butter
1/4 cup honey, any flavor (I prefer wildflower)
5 to 6 cups unbleached all-purpose flour; spoon into dry measuring cup and level to top
3 large eggs, lightly beaten
1 1/2 teaspoons salt
2 teaspoons lemon peel (from one lemon) or 1 teaspoon lemon extract
1 teaspoon ground cinnamon
1/2 teaspoon ground nutmeg; if using freshly ground nutmeg, reduce the amount to 1/4 teaspoon
3/4 cup currants (do not chop) or raisins, craisins (dried cranberries) or dried red tart cherries, chopped; chop larger dried fruit pieces and then measure
INGREDIENTS FOR BUNS BEFORE BAKING:
1 large egg, slightly beaten or some milk or cream
LEMON GLAZE INGREDIENTS AFTER BAKING:
1 cup confectioners' sugar, sifted; measure – spoon into dry measuring cup and level to top and then sift
1 tablespoon unsalted stick butter, softened
1 teaspoon lemon peel (from 1/2 lemon) or 1/2 teaspoon lemon extract
1/2 teaspoon vanilla extract
1 to 2 tablespoon(s) whole or 2% milk (can use milk on hand)
EQUIPMENT
Instant read thermometer
Need one, 13 x 9 – inch and one, 8- x 8- inch pans
INSTRUCTIONS
1. Mix Dough with a stand mixer: Fit the mixer with a paddle attachment. Rinse the mixer bowl with hot water and dry the bowl in order to warm it. Place the measured water in the mixing bowl. Quickly sprinkle the yeast over the surface of the water. After 1 minute, whisk the yeast until it has fully absorbed the water. Turn the mixer speed on low and add the milk, butter, and honey. Mix to combine.
Add two cups of the flour in 1/2 cup portions and increase the mixer speed to medium. Beat for two minutes. (Set your kitchen timer to help you keep track of the time). This step is very important as you will start to develop the gluten in the bread. Reduce the speed to low and add the eggs and 1/2 cup flour mixed with the salt. Beat a high speed for two minutes. (Set your kitchen timer to help you keep track of the time).
Reduce the mixer speed to low. Add the lemon peel. Slowly add 1 cup of the flour thoroughly blended with the cinnamon and nutmeg at the side of the bowl. Mix until just combined. Switch to dough hook when the mixture is like a thick paste, after adding about 2 to 3 cups.
Continue adding flour, 1/2 cup a a time. When the thick paste starts to become a sticky dough, add the flour 1 or 2 tablespoons at a time. Take your time and don't rush the process; it is critical to get the consistency of the dough right. Stop adding flour when the dough is a solid shape and pulls away from the side of the bowl. The dough should be slightly sticky, not wet or dry. You may end up using more or less flour than called for in the recipe.
2. Knead the dough in the mixer bowl at low speed with the dough hook for 5 minutes or 8 to 10 minutes by hand on a countertop until smooth, satiny and elastic. DO NOT add flour to the countertop unless the dough is really sticky. Shape dough into a ball.
3. First Rise: The dough will rest undisturbed in a warm place to warm place to rise; approximately and hour to 1 1/2 hours until double in size. Transfer the dough to a large, deep oiled mixing bowl and turn the dough to coat all over. Place seam side down. Cover tightly with plastic wrap and set in a warm place.
HELP! My dough started tearing while kneading. What should I do?
SARAH SAYS: If the dough starts to tear while kneading, it is too dry. To fix, I discovered that if you spray the countertop with some canola oil and resume kneading, the tears will get fixed and the dough will get smooth. The oil also helps prevent a thick crust from forming when the bread bakes.
To check to see if the dough has risen enough, press the tip of your moistened index finger lightly and quickly 1/4 inch into the side of the dough. If the impression made stays, the dough is ready. However, if the indent disappears, which sometimes it takes as long as five minutes to fill in, the yeast still has some energy left and needs a little more time to ferment; cover and let rise 10 minutes longer.
SARAH SAYS: Use Sarah's Microwave Bread Proofer – I like to place the dough in a microwave next to a cup of boiling water (close the door, but don’t turn the oven on). In a microwave, bring 1 inch of water in a one-cup glass measuring cup to boil on HIGH for 5 seconds or more; turn off the microwave and place the dough in along with the steaming water and close the door. The inside of the box with stay warm for 35 to 45 minutes, a portion of time needed to raise dough for a loaf of bread (provided you don't open the door too often); Check on the rise and the warmth in the microwave after 35 minutes by opening the door a crack. If the atmosphere isn't noticeably warm or there is no longer steam rising from the water, remove the dough and temporarily put the dough in a warm place while you microwave the water again. Replenish the water before you do. Return the dough to the microwave and close the door.
4. Punch Down, Knead in Currants and Shape Dough:
SARAH SAYS: Many yeast bread recipes have added raisins, dried fruit and nuts. Just be aware that these add-ins will slow the rising time. As a result, its best to add them right after the dough is deflated from its first rise and before shaping the dough. Knead the dough until the add-ins are evenly distributed.
To do:
– Punch Down:
When the dough has doubled in size, gently remove the plastic wrap from the dough; you don't want to tear the dough if it gets caught on the underside. With your closed fist, punch down the dough straight down through the dough in a couple of places to deflate. You will hear a “fisss” as the carbon dioxide is released and the dough deflates. Don't stretch or tear the dough while do so as the motion will release too much needed air from the dough needed for a well risen loaf of bread.
After deflating the dough, tip bowl sideways so the dough falls onto a clean countertop (do not dust countertop with flour). The dough will be covered with oil from the bowl so it won't stick.
– Knead in Currants:
SARAH SAYS: When using dried fruit in a yeast bread recipe, soak them first. If not done, they absorb a lot of water from the bread's ingredients, which results in a dry loaf. To do: it's best to place the dried fruit in bowl of warm water. Then, drain on paper towels before using.
After deflating the dough, remove to a countertop NOT dusted with flour and stretch the dough just a little, delicately with your fingertips, into a thick square–do not press down on the dough. Sprinkle a large pinch of dried fruits or nuts all over the top surface avoiding the edges. Fold the dough in half and knead to incorporate about 1 minute. Don't get discouraged as it takes a little more time to mix in. Repeat a couple of times — don't overdo it !
– Shape dough into equal size buns: I use my kitchen scale. First put a small piece of waxed paper on the scale and then set it to zero. In this recipe, weigh a 3 – ounce piece of dough. You'll get 16 buns.
Portion the dough by starting at on edge of the dough; don't divide the entire piece of dough in half. Cut straight down with a sharp knife or a bench scraper. Don't use a sawing motion and don't pull it apart; you want to avoid tearing the gluten strands Weight each portion to double check. Avoid having to cut or add pieces to come to the right weight of each piece because you create a weak spot in the dough every time you do for a nice even rise when the bread bakes.
Immediately shape each portion of dough in a ball right after weighing: Lightly moisten the countertop; the countertop should not be damp. This provides a tacky surface to roll the dough on and smoothes the surface of the dough. Do not follow with a dusting of flour. Form dough into a ball by rotating in between the palms of your hand. Then place ball on the the countertop. Form the dough into a sphere by rotating the palm of your hand over the top while pushing down.
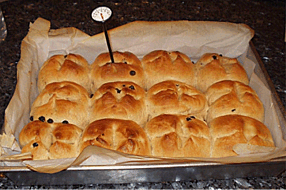
Place each formed ball 1/2 inch from edge and 1/2-inch apart; 12 in a 13- x 9-inch pan and 4 in an 8- x 8-inch pan. Repeat until the baking pan is filled. While working on the dough balls, if any start to rise, cover the pan with plastic wrap and return dough to the refrigerator; the cold will retard the yeast's rise. Do the same with any unformed dough.
5. Second Rise or “Proofing”: Cover pan tightly with plastic wrap sprayed on the side that touches the dough. Set in a warm place to rise; it will take approximately 20 to 40 minutes until double in size.
While the dough is rising, prepare the oven and baking pan: Position one rack on the rung below the middle rung. (Remove the higher racks, if any.) Preheat the oven to 350 degrees F.
Line a 13- x 9-inch baking pan with parchment paper. You can optionally grease the bottom and sides of the pan, but parchment works better for easy removal.
6. Bake: When the dough has risen, take a pair of kitchen shears or sharp scissors and carefully snip buns with a cross.
SARAH SAYS: Do not use a knife to cut the cross in the buns; it really drags across the dough deforming the buns' shape. Scissors work best. Cut 3/4-inch deep into the dough.
Brush lightly with beaten egg for a shiny finish or milk or cream for a dull finish. Immediately place rolls in the preheated oven. Bake for 15 to 25 minutes until each roll is golden brown, sounds hollow when tapped and reaches an internal temperature of 200 degrees F as measured with an instant read thermometer.
While the buns are baking, prepare the Lemon Glaze: In a medium size bowl, add confectioners' sugar, butter, lemon peel and vanilla. With a hand held mixer on low, combine. Add milk and adjust until glaze drizzles when the tines of a fork are dipped in the glaze and lifted an inch above. Set aside.
7. Apply Lemon Glaze After Baking: Remove the rolls from the oven. Let them sit in the pan for 10 minutes.

Position a wire cake rack over a new piece of parchment or waxed paper to catch any drips. Remove to wire cake rack using the parchment paper as a sling. Spoon glaze over buns in a cross pattern. Break individual buns apart right where they touch and serve immediately.
STORAGE
Cool for 1 to 2 hours or more before wrapping. Buns freeze well.