
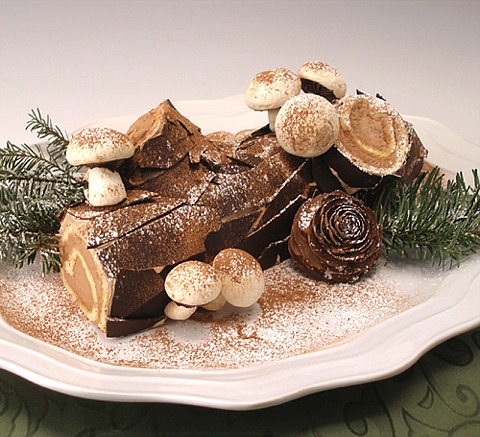
My beautiful traditional holiday gluten free vanilla scented Bûche de Noël or a French Christmas Yule Log Cake is made without wheat flour or any ingredients containing gluten, but you can always make this cake with our regular Vanilla Scented Biscuit Roulade Cake or Chocolate Cake Roll or Biscuit Roulade. I am now creating delicious desserts that can be served to all of my celiac family and friends without their telling it's gluten-free! This sets my achievement bar rather high because once you take away the wheat flour, the major component in baking, the whole recipe has to change in order to still taste great, smell wonderful and look fantastic!
The Bûche de Noël is a classic holiday filled and rolled cake made from a jelly roll cake, also known as a biscuit roulade. We filled, frosted ours with Chocolate Whipped Cream, Optionally Stabilized, frosted it with luscious and fluffy Swiss Meringue Buttercream or SMBC, chocolate variation, and decorated it with thin chocolate shards to look like a log or branch that has fallen to the floor of the forest, instructions included. Meringue mushrooms decorate the completed log to make it look as though it has been on the forest floor for quite awhile. After midnight Mass, the French traditionally eat their cake for dessert, but is also appropriate to serve the cake until New Year's Day.
CAKE RECIPE HELP / GLUTEN-FREE RECIPE HELP
See also:
 Bûche de Noël, Chocolate Cake – Uses a regular Chocolate Cake Roulade (Roll)
Kelly Says: “We just had a piece of this for dessert. O-M-G!!! SO rich and decadent!!!”
I swear, you CANNOT TELL that it's gluten-free!!!”
Tiffany Heidle-Lanza (posted on facebook): “I made your Buche De Noel…best cake I have ever made! I am going to attempt to make it into a cupcake (well kinda) at least with the same ideas with a vanilla cupcake.”
What you need for this tutorial:
1 recipe each:
Gluten-free Vanilla Scented Roulade (Jelly Roll) Cake, STEP I
French Meringue Mushrooms and Shapes, STEP II
Kahlua Simple Syrup, STEP III
Chocolate Whipped Cream, Stabilized STEP IV
Chocolate Swiss Meringue Buttercream, STEP V
Chocolate “Bark”, STEP VI
Garnish:
Powdered sugar in a sifter or fine mesh strainer
1- 2 ounces chocolate chips, melted and cooled
Cocoa powder
STEP I: MAKE THE GLUTEN FREE VANILLA SCENTED ROULADE (JELLY ROLL) CAKE
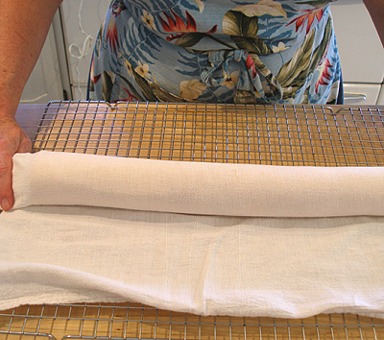
1. Make the Gluten-free Vanilla Scented Roulade (Jelly Roll) Cake, roll it in the towel and place it on a wire rack to cool.
Roll the cake up tightly, towel and all:
SARAH SAYS: Start rolling at the long end.
Question: What is the long end? I am so confused?
Answer: Here's how I think of it. When you look at a rug on the floor, the narrow ends are usually the ones with the fringe on it. The long ends are the sides of the rug.
a. With the cake still on the kitchen towel, fold the edge of the towel onto the top of the cake. Gently begin rolling the cake under.
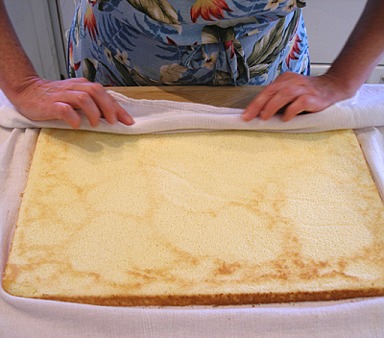
b. Once you get the initial edge of the cake rolled, continue rolling to the other edge of the towel.
Make sure you keep even pressure and roll the cake tightly, but do not force it or press on the cake in any one place.
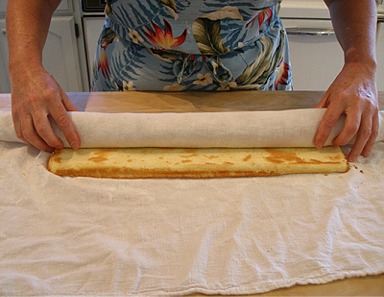
c. Cool the rolled cake, as is, on a wire cake rack.
2. While the cake cools, make the meringue mushrooms.
STORAGE
Do NOT refrigerate the unfilled cake.
It can be stored at room temperature, rolled as is, and wrapped in plastic wrap for day or two.
Freeze as is, wrapped in plastic, for a month or more. Thaw at room temperature
STEP II: MAKE THE MERINGUE MUSHROOMS
FRENCH MERINGUE MUSHROOMS AND SHAPES by Sarah Phillips / Recipe alone
The mushroom-shaped meringue is used to decorate the traditional Christmas cake — the “Bûche de Noel” or Yule Log.
INGREDIENTS
Basic French Meringue:
2 large egg whites, can be cold from the refrigerator
Pinch cream of tartar
1/2 cup sugar
For Mushroom Shapes:
1/4 cup chocolate chips
Cocoa powder for dusting
INSTRUCTIONS
Basic French Meringue:
SARAH SAYS: I recommend using a hand-held electric mixer or a wire whisk for this step since you will be beating 2 egg whites and you
want the beaters to fully reach them.
1. In a medium size deep bowl, with straight sides, beat the egg whites on low until foamy.
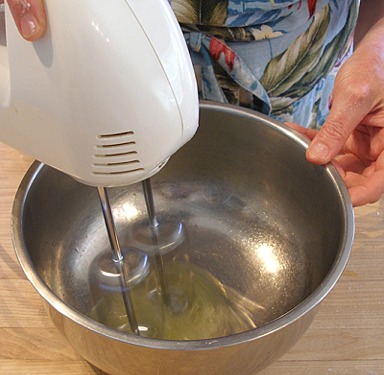
2. Add the cream of tartar.
Increase the mixer speed to high and beat until soft peaks form when the beater is raised.
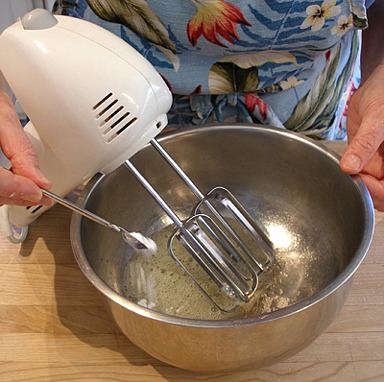
3. Add the sugar slowly at the side of the bowl.
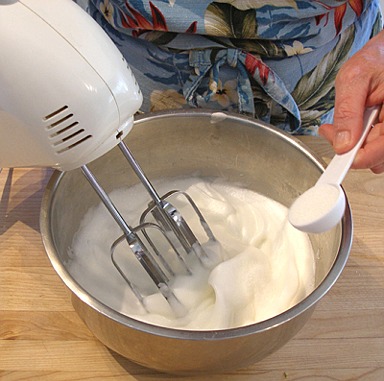
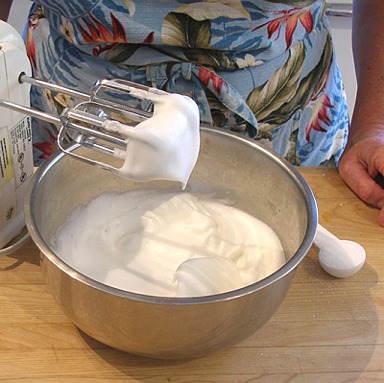
4. Continue to beat on high until stiff peaks form when the beater is raised.
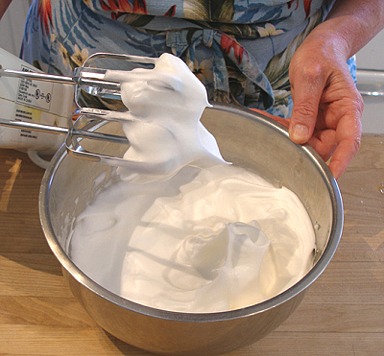
5. Scrape down sides of bowl to make sure all the sugar is incorporated.
Make the meringue mushrooms:
1. Position the oven shelf to the middle of the oven. Preheat the oven to 200 degrees F.
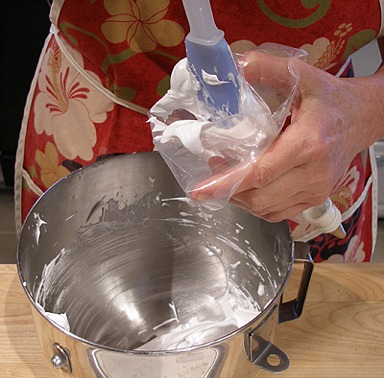
2. Place the meringue in a large zip-lock bag and push the mixture toward one corner, folding the other corner over, then twisting, allowing you to control the meringue. Cut off just the very tip of the exposed corner so the meringue can exit the bag.
You may also use a piping bag, fitted with a plain medium round tip.
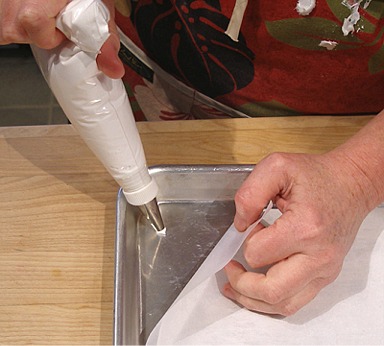
3. Test the meringue by dotting four small beads of meringue at the corners of a cookie sheet. Set a sheet of parchment paper over the top; the meringue beads will provide a bond.
4. Make the mushroom caps by holding the bag over the parchment paper and push until a 1-inch mound of meringue forms.
For the mushroom stems, form peaks on smaller mounds of meringue by pulling the bag up and away from the surface as you push.
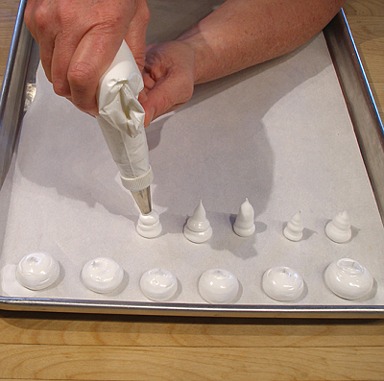
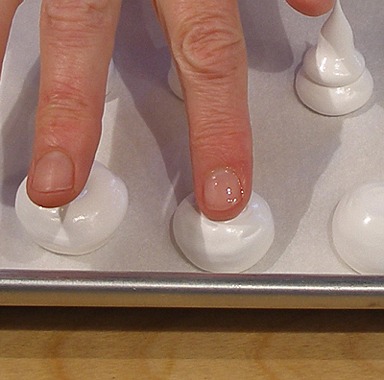
5. Wet the tip of your finger with water and gently round off any peaks to make a smooth surface.
Bake:
1. Bake in a hot, preheated 200 degree F oven for an hour.
Then, turn oven temperature down to 175 degrees F and leave them until they’re completely dry to the touch, taking about an hour.
To construct “mushrooms”:
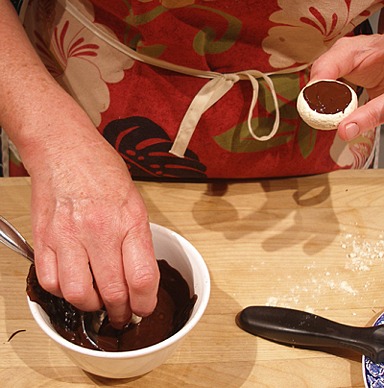
1. Melt the chocolate chips in a microwave-safe dish, in the microwave, at 50% power for about 45 seconds, at a time, until almost melted.
Stir after each session. Remove and stir to fully melt. Let the chocolate cool to tepid or about 100 degrees F before using.
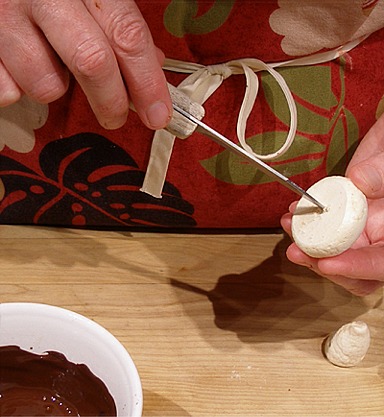
2. Before you put the chocolate on the mushroom, use the tip of a small knife to make a hole in the bottom of the cap for the stem.
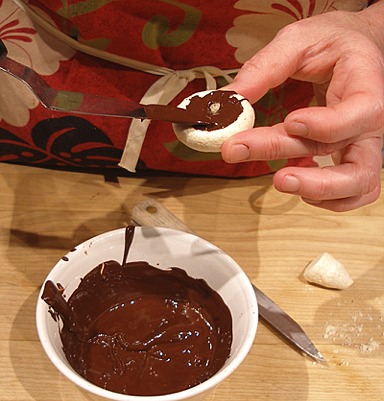
3. Use a small offset spatula to coat the bottom of the mushroom cap with the chocolate.
4. Then, dip the tip of the mushroom stem in the chocolate and gently place it in the hole of the mushroom cap.
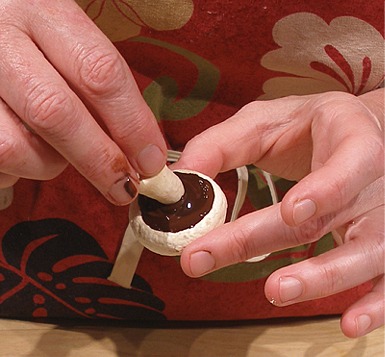
5. Place mushroom on a parchment paper lined baking sheet, stem side up, and allow the chocolate “glue” to harden (it only takes a minute).
Repeat until all the mushrooms are assembled.
STORAGE
Store in an airtight container in a cool, dry place.
STEP III: MAKE THE KAHLUA SIMPLE SYRUP
This will be used to flavor and moisten the cake.
KAHLUA SIMPLE SUGAR SYRUP
Makes about 1/3 cup
“Simple Sugar Syrup”, also known as sugar syrup or simple syrup, is a solution of sugar(s) and water, and then boiled, as granulated sugar does not dissolve easily in cold water.
INGREDIENTS
2 tablespoons sugar
1/4 cup water
1 tablespoon Kahlúa or any flavored liqueur or vanilla extract
INSTRUCTIONS
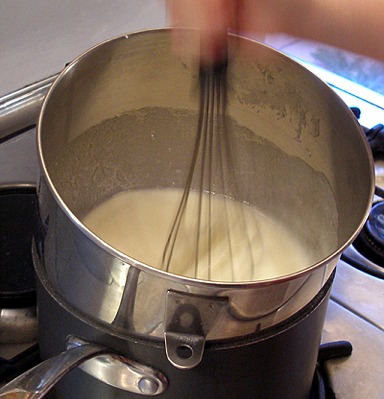
1. Add sugar to a small saucepan.
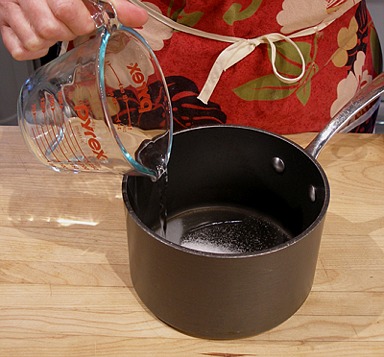
2. Pour in water and stir.
3. With the heat on medium, bring the sugar and water to a rolling boil, stirring constantly. The sugar will dissolve while the water boils.
4. Turn off the heat. Cover immediately and let cool.
5. When the sugar syrup has cooled, stir in the liqueur or any flavorings.
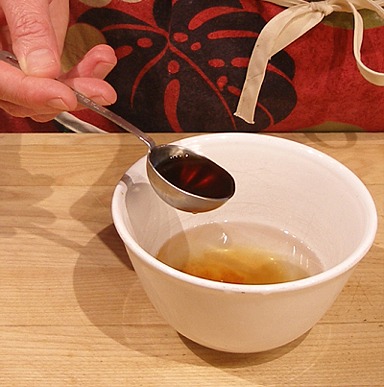
6. Pour the syrup into a measuring cup meant for liquids. If the syrup has evaporated slightly, add enough water to equal 1/3 cup syrup.
STORAGE
Use immediately at room temperature. Long term storage, refrigerate indefinitely in a covered container until needed.
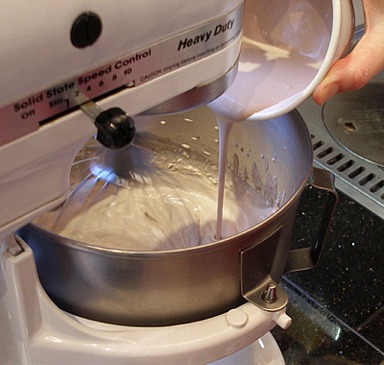
STEP IV: MAKE THE CHOCOLATE WHIPPED CREAM, OPTIONALLY STABILIZED
This will be the filling for the Buche de Noel.
CHOCOLATE WHIPPED CREAM, OPTIONALLY STABILIZED / recipe alone
Makes 2 cups
INGREDIENTS
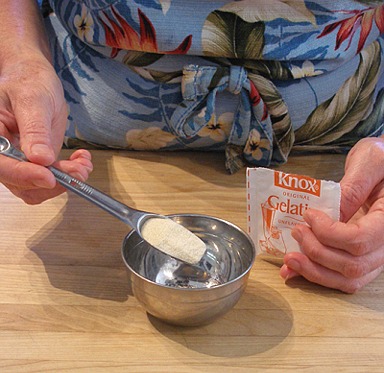
Gelatin:
2 tablespoons cold water
1 teaspoon unflavored gelatin
Whipped cream:
1 cup heavy whipping cream, chilled
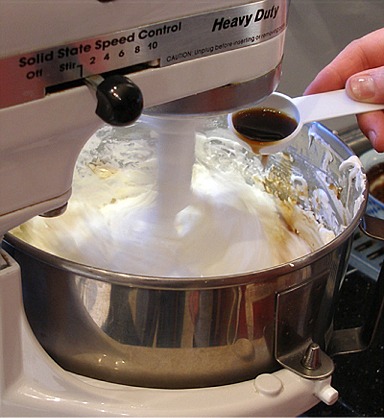
2 teaspoons pure vanilla extract
2 1/2 tablespoon powdered sugar
1 1/2 tablespoons cocoa powder; preferably Natural
INSTRUCTIONS
Prepare the chocolate whipping cream:
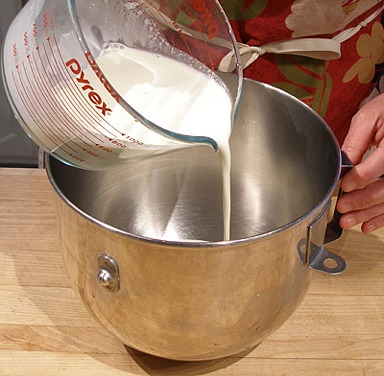
1. In the bowl of a stand mixer, place the whipping cream. Add the vanilla and stir.
2. Sift in the powdered sugar and cocoa powder. Cover and chill for at least one hour so the cocoa powder has time to dissolve.
Prepare gelatin:
1. Place the dry gelatin in a small bowl. Pour cold water over it. Let soak for 5 minutes.

2. Dissolve by placing it in a container over a small pot of simmering water. Set aside to let cool.
NOTE: Alternatively, you may dissolve the gelatin by heating it very briefly in the microwave, under low power. Do not let it overheat.
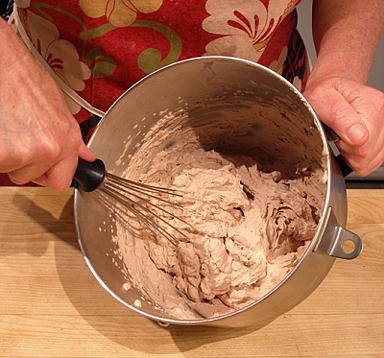
Whip the chilled cream and add the dissolved gelatin:
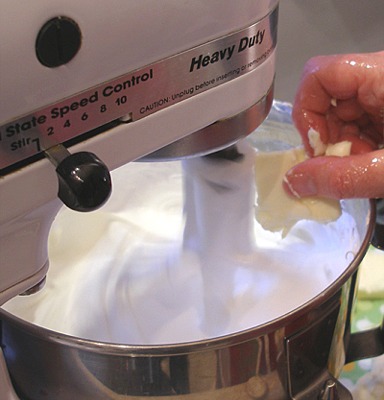
1. Fit an electric mixer with the whisk attachment. Beat the cream on high speed until it is barely stiff, then stop the mixer.
2. Add in the dissolved and cooled gelatin:
Kelly SAYS: I find there is less tendency for the cooled gelatin to for blobs in the finished whipped cream using my method:
a. Add two tablespoon of the cream, to the melted and cooled gelatin.
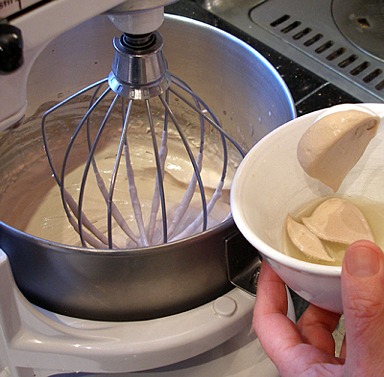
b. Stir it into the cooled gelatin.
c. Return the cream/ gelatin mixture back into the main mixing bowl with the rest of the semi-whipped cream.
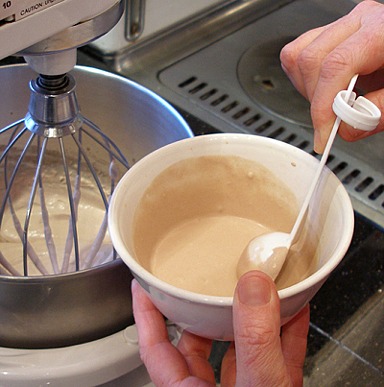
Continue to whip the cream on high until soft peaks form.
3. Finish beating with whisk to adjust consistency, if necessary.
4. Cover and refrigerate chocolate whipped cream, while you make the Chocolate Swiss Meringue Buttercream.
STORAGE
Cover and keep refrigerated for a couple of days. If necessary, rewhip with a wire balloon whisk until fluffy; do not rebeat with an electric mixer.
STEP V: MAKE THE SWISS MERINGUE BUTTERCREAM OR SMBC, CHOCOLATE VARIATION
SWISS MERINGUE BUTTERCREAM OR SMBC, CHOCOLATE VARIATION / Full recipe
Makes 4 cups or enough to fill and crumb coat one, 9 x 2-inch round cake layer
INGREDIENTS
1 1/2 cups less 2 teaspoons sugar; measure 1 1/2 cups and take out 2 teaspoons
1/2 cup + 1/8 (2 tablespoons) cups large egg whites or pasteurized egg whites in liquid form
1 1/4 cups unsalted butter, cubed and softened; it should be malleable, but not greasy and too soft
2 teaspoons vanilla extract
1/4 cup (2 ounces) bittersweet chocolate or chocolate chips, melted and cooled
INSTRUCTIONS
1. In the bowl of a standing mixer, thoroughly whisk together sugar and egg whites.
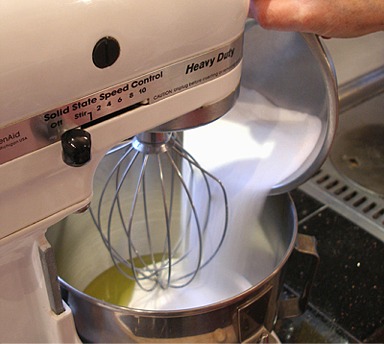
2. Set the bowl over a pot of boiling water. Whisking constantly, heat the mixture until all of the crystals have dissolved and the mixture is hot. Be careful not to cook the eggs.
NOTE: For salmonella safe egg whites, use pasteurized. If using fresh egg whites with sugar, the mixture must reach whites 160 degrees F for a few seconds.
3. Put the bowl back in the mixer fitted with a whisk attachment.
Beat on high speed until the egg whites form stiff peaks when the beater is lifted and the bottom of the bowl comes to room temperature, taking about 10 minutes.

4. Stop the mixer and replace the whip attachment with the paddle attachment.
5. Set the mixer to low speed and add the butter, a few cubes at a time. When the butter is incorporated, turn the mixer to medium speed and beat until fluffy.
6. Set the mixer to low speed and add the vanilla.
7. Once the vanilla is incorporated, scrape the bowl and continue to mix on medium speed until you have a smooth, creamy texture.
If the buttercream is too liquid, refrigerate until completely cold and stiff, then rewhip.
SHORT CUT TRICK: If the buttercream being too soupy, run ice cubes around the base of the mixer bowl.
keep the ice cubes moving and, like magic, the buttercream starts to come together.

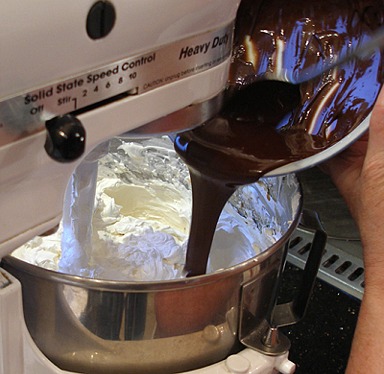
8. Add the melted and cooled chocolate and mix until combined. The chocolate must be cooled to about 100 degrees F, otherwise the buttercream mixture will melt.
9. Cover and set the Chocolate SMBC aside in a cool place until needed.
STORAGE
You can use the buttercream immediately, store in an airtight container at room temperature for up to two days, or refrigerate it in an airtight container for up to ten days.
SARAH SAYS: I recommend refrigerating the Swiss Meringue Buttercream at all times.
STEP VI: FILL THE GLUTEN FREE VANILLA SCENTED ROULADE (JELLY ROLL) CAKE. MAKE THE “CHOCOLATE BARK”.
Fill the Vanilla Scented Gluten free Roulade:
You will need:
Gluten-free Vanilla Scented Roulade (Jelly Roll) Cake, STEP I, well cooled
Kahlua Simple Syrup, STEP III, room temperature
Stabilized Chocolate Whipped Cream, STEP IV, well chilled
Chocolate Bark Recipe, Below
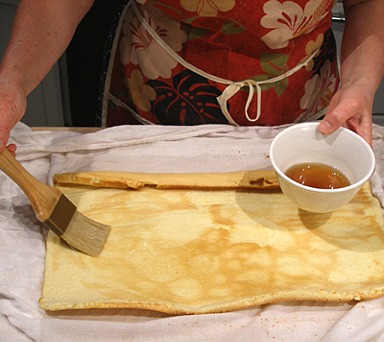
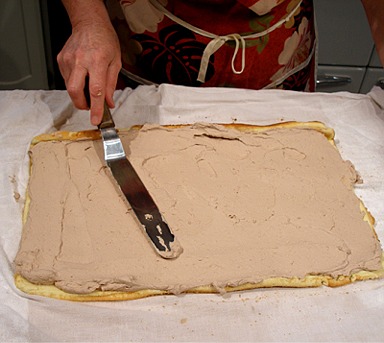
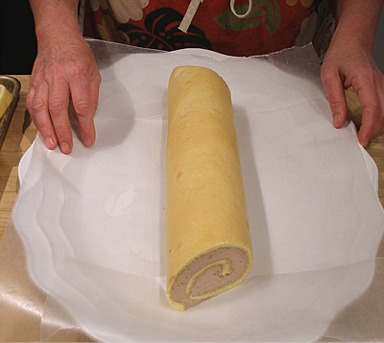
1. Remove the wrapper from the cooled Gluten-free Vanilla Scented Roulade (Jelly Roll) Cake, STEP I. Unroll it.
2. Brush the surface of the cake with some of the Kahlua Simple Syrup, STEP III.
3. Spoon ALL of the Stabilized Chocolate Whipped Cream, STEP IV, on the cake.

4. Spread it evenly with a large offset spatula to the edges of the cake.
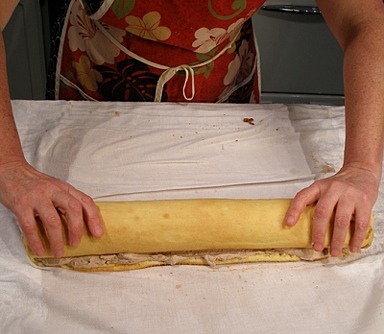
5. Roll cake up tightly, starting on the long side. You will end up with a Filled Gluten-free Vanilla Scented Roulade (Jelly Roll) Cake
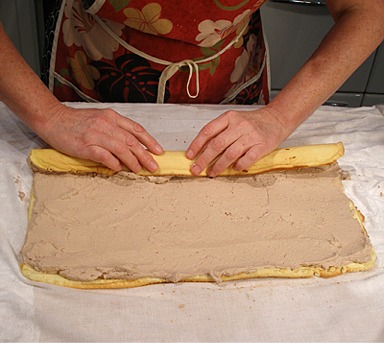
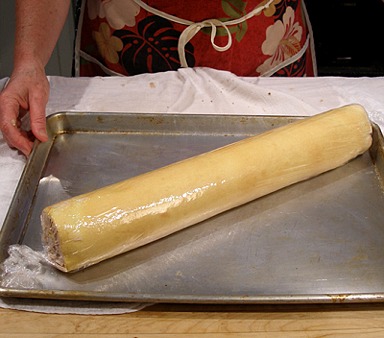
6. Place the roll, seam side down, on a piece of plastic wrap and wrap it tightly. Place the wrapped cake on a baking sheet and refrigerate for about a half hour.
7. While the Filled Gluten-free Vanilla Scented Roulade (Jelly Roll) Cake refrigerates, make the “Chocolate Bark”.
“CHOCOLATE BARK”
INGREDIENTS
5 ounces bittersweet chocolate, chopped finely or chocolate chips (not milk chocolate)
INSTRUCTIONS
1. Place a piece of parchment paper on the backside of a large rimmed baking sheet. Set aside.
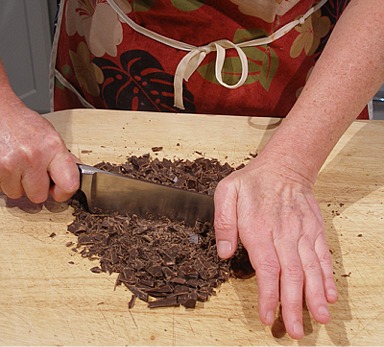
2. Chop chocolate finely with a large chef's knife.
3. Place chocolate in a medium size microwave-safe bowl. Microwave, at 50% power, for about 40 seconds. Stir.
Return to microwave and continue to heat at 50% power for another 30 seconds or until the chocolate is almost .
Remove bowl and stir the chocolate thoroughly until melted and smooth.
NO NOT overheat the chocolate!
4. Pour chocolate onto the parchment paper and immediately spread it out, in a thin even layer, with a large offset spatula.

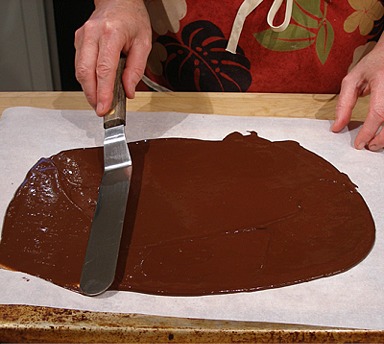
NOTE: If the chocolate stiffens before you finish spreading it, warm the cookie tray over already simmered water.
5. Place baking sheet, with the chocolate, into the refrigerator to set, about a 1/2 hour.
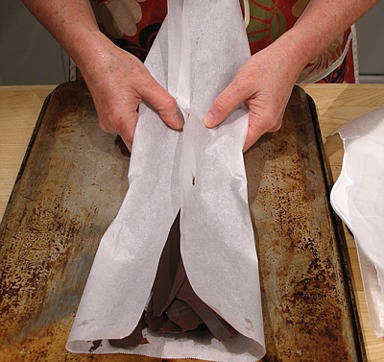
6. Remove the chocolate “bark” from the refrigerator, and break it up into long shards, by crunching up the parchment paper.
The chocolate is very thin so all it takes is one or two times. Do not break the chocolate up with your hands because the heat of your fingers will melt the chocolate.
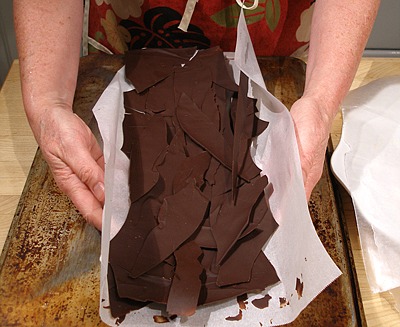
7. Return to the refrigerator to assemble the Buche de Noel.
STORAGE
Do not store the chocolate in the refrigerator. Cover and store in a cool, dry place for a few days until needed.
STEP VII: ASSEMBLE THE FROSTED AND CHOCOLATE BARK COVERED GLUTEN FREE BUCHE DE NOEL
Make sure the room is on the cool side of room temperature went you are assembling the buche!
You will need:
Filled Gluten-free Vanilla Scented Roulade (Jelly Roll) Cake, STEP VI, well chilled
Chocolate Swiss Meringue Buttercream, STEP V, room temperature
Chocolate Bark, STEP VI, take from refrigerator in Step 8, below.
1. Remove the Filled Gluten-free Vanilla Scented Roulade (Jelly Roll) Cake, STEP VI, from the refrigerator and unwrap.
Place the cake roll seam-side down.
2. Using a large sharp serrated knife, trim a little from both ends of the cake so there is a nice neat edge.
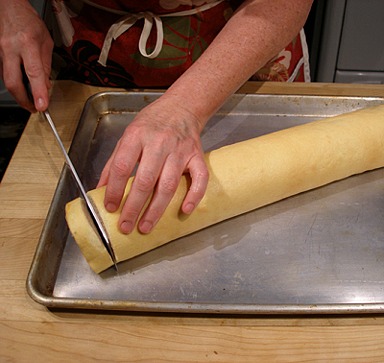
3. Cut each end of the roll at an angle, leaving a Main Cake Log.
Cut one about 1 1/2-inches from the end at a 45 degree angle relative to the countertop. Cut the other about 2-inches from the opposite end at a 45 degree angle relative to the countertop.
Do not cut any longer. This will leave two Smaller Cake Sections. Set both aside. These will become the cut branches of the buche.
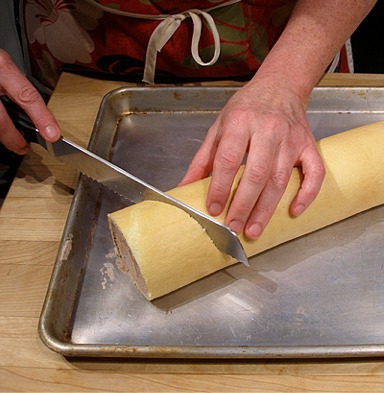
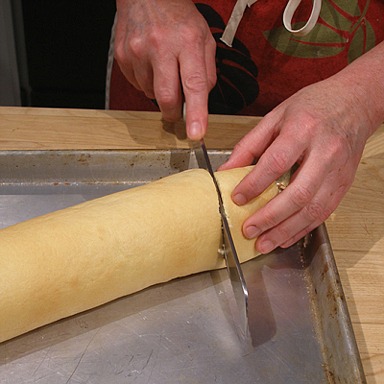
NOTE: Both ends of the Main Cake Log will be angled. Do not worry if the ends are pointed in the same direction.

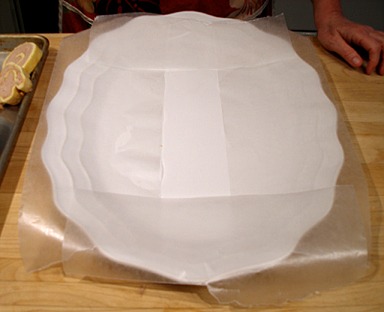
4. Choose a long serving platter and place strips of waxed paper on the edges, to protect it from excess frosting.
Place the Main Cake Log in the center of the platter.
5. Spoon a generous amount of the Chocolate Swiss Meringue Buttercream, STEP V, on the Main Cake Log.
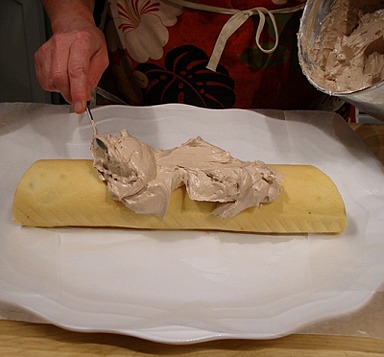
Spread it all over with a small offset icing spatula.
6. Take the two Smaller Cake Sections. Press each one along its diagonal cut against the frosted Main Cake Log. The straight cuts of the Smaller Cake Sections should be pointing
away from the Main Cake Log. The aim is to make it look like they were branches that have been cut off by a saw. Think about the way a tree naturally grows. This will help you with the placement.
This will make a Gluten Free Buche de Noel with Branches.
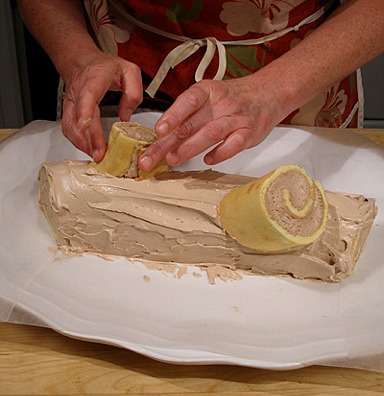
NOTE: If a section does not stay in place, insert a couple of toothpicks into the Main Cake Log where the Smaller Cake Section will be attached. Place the section on top of toothpicks and gently press to secure. (Don't forget to remove them when cutting and serving the cake.) Also, sometimes if the frosting is getting too warm, the Smaller Cake Sections will start to slide from the cake, especially if they are heavy and cut too long.
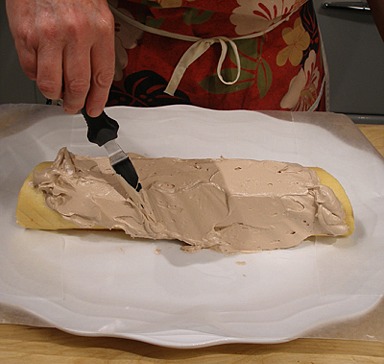
7. Cover the surface of the Gluten Free Buche de Noel with Branches with the Chocolate Swiss Meringue Buttercream, STEP V, using a small offset icing spatula.

NOTE: If the buttercream on the cake starts to get too warm, place the cake as is in the refrigerator to chill for about 10 minutes. Do not let the buttercream get hard.
8. Take the Chocolate Bark, STEP VI, from the refrigerator, still on its parchment paper and set it on your worksurface.
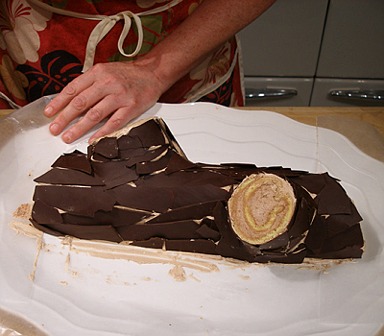
Begin placing the Chocolate Bark pieces on the surface of the Frosted Gluten Free Buche de Noel with Branches. Press them gently into the Chocolate Swiss Meringue Buttercream, so they adhere to the cake. They will crack if too cold or if you press too hard.
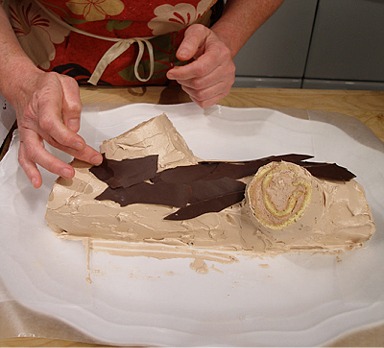
Try to overlap them, and align them in one direction, so they look more natural. Cover the cake's surface all over, including the branches.
You will end up with a Frosted and Chocolate Bark Covered Gluten Free Buche de Noel.
GARNISH
You will need:
Frosted and Chocolate Bark Covered Gluten Free Buche de Noel, Step VII
Powdered sugar in a sifter or fine mesh strainer
French Meringue Mushrooms, STEP II
1- 2 ounces chocolate chips, melted and cooled
Cocoa powder
1. Remove the waxed paper from the serving platter and clean up any stray icing or chocolate.
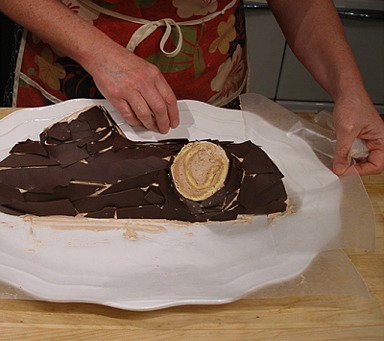
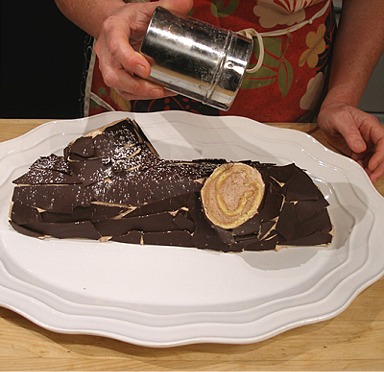
2. Lightly sprinkle the Frosted and Chocolate Bark Covered Gluten Free Buche de Noel all over with powdered sugar, so it looks like it is dusted with freshly fallen snow.
3. Attach the French Meringue Mushrooms, STEP II to the Frosted and Chocolate Bark Covered Gluten Free Buche de Noel: Place a dab of melted and cooled chocolate on the platter and/ or the
Frosted and Chocolate Bark Covered Gluten Free Buche de Noel where you want to place the meringue mushroom. Place the end of the French Meringue Mushroom on the melted chocolate dab, and hold it in place for a second, until the chocolate sets.
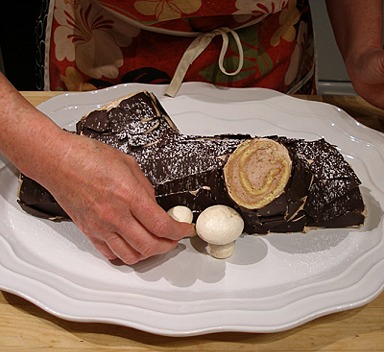
4. Continue adding mushrooms to the roll until you are satisfied with the way the cake looks, then dust the mushrooms and cake with cocoa (put it in a small strainer and shake it over the cake), to give it a more “natural” appearance.
SERVE
Use a sharp serrated knife.
STORAGE
The cake must remained refrigerated because it contains both Stabilized Chocolate Whipped Cream and Chocolate Swiss Meringue Buttercream. It will keep for a few days.
The French Meringue Mushrooms will not refrigerate very well because of the condensation. The cake cannot be frozen because of the whipped cream.
NOTE: I used a few pine branches and a real pinecone to dress up my platter.
If you do the same, make sure to wash them thoroughly first, to remove dirt and bugs, and don't let them actually come in contact with the cake.