
GINGERBREAD TAKEAWAY BOXES, VOTIVES AND WREATH
Projects and text excerpted (with permission) from Cookie Swap: Creative Treats to Share Throughout the Year by Julia M. Usher


My friend, cookie designer Julie Usher, has just written a book called Cookie Swap: Creative Treats to Share Throughout the Year!, with photos by Steve Adams. I thought it would be fun to share some of her gingerbread projects with you this holiday season!
If the thought of constructing a 3-D gingerbread house causes your heart to skip a beat, no worries. Here are some smaller 3-D and 2-D project ideas that will add cheer to your holiday season and with a lot less work.
COOKIE RECIPE HELP
HOW TO MAKE GINGERBREAD TAKEAWAY BOXES AND VOTIVE CANDLE HOLDERS
For more information about Cookie Swap, visit www.juliausher.com

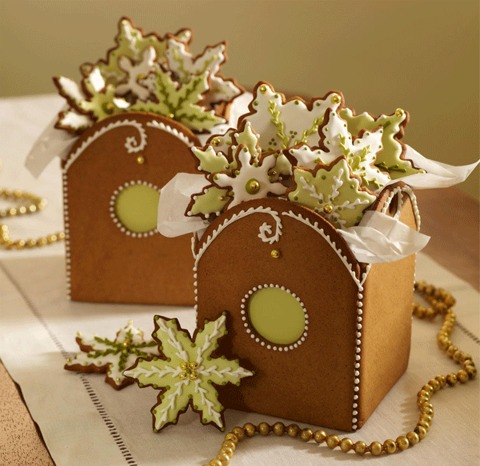
• For 3D gingerbread projects intended for display, such as the boxes and votive candle holders pictured above, and large 2-D projects such as Welcome Wreath, use Construction Gingerbread. Packed with protein-rich bread flour, it is sturdier than regular cut-out gingerbread and less prone to breaking or sagging under humid conditions.
• Start by creating templates for the pieces that will comprise the sides and bottom of your project. Draw the desired shapes onto cardstock or 3-ply cardboard and cut them out. Double-check to make sure your templates fit together as you envisioned. Adjust any templates, as needed.
• Roll, cut, and bake the gingerbread pieces as described in Steps 5 – 8 in the recipe below.
• Before decorating or assembling any pieces, check to be sure they fit snugly together in 3-D. If they do not, straighten any bumpy or misshapen edges by gently shaving them with a paring knife.
• Box and basket sides can look beautiful undecorated, but feel free to top coat them with thinned Royal Icing (recipe, below) or to further embellish them with piped royal icing or other decorative techniques. Dry all decorations thoroughly before proceeding to the next step.
• Spread Royal Icing, thinned to top coating consistency (by adding 3 – 5 tablespoons water to a single batch), on the back of each piece. The added icing reinforces the cookies and seals them so that humidity is less likely to affect them in any way.
• Once this icing has dried, fill a parchment pastry cone with thick Royal Icing and “glue” the pieces together at the seams. If the pieces slip or have difficulty standing up on their own, try thickening the icing with powdered sugar. (The icing can almost never be too thick for this step.) And, of course, prop any pieces if needed. Wadded paper towels often provide enough support, though almost any small object will do.
• Let the “glue” dry thoroughly, ideally overnight, before picking up or moving your creation.
HOW TO MAKE THE WELCOME WREATH
Projects and text excerpted (with permission) from Cookie Swap: Creative Treats to Share Throughout the Year by Julia M. Usher, with photos by Steve Adams. For more information about Cookie Swap, visit www.juliausher.com
To reproduce this holiday welcome wreath, start by cutting a large (9 1/2 x 13-inch) oval from Construction Gingerbread (recipe, below) for the structural support. (I used the bottom of an oval cake pan as my cutting guide, or you can cut a template from 3-ply cardboard if you don’t have a pan.) Before baking, use a 3/8 – 1/2-inch round pastry tip to cut two holes at the top of the oval, about 6 – 7 inches apart. Bake and cool the gingerbread as directed below. Use thick Royal Icing (recipe, below) to attach decorated snowflake cookies around the edge and a yuletide message, spelled out with cookie letters, in the middle. Once the icing is dry, thread the holes with ribbon and hang your creation on the front door, over the mantel, or in some other spot where it will be widely enjoyed. Avoid hanging with wire or string, as they can sometimes cut through the cookie. (For more tips on cutting and baking large gingerbread pieces and working with Royal Icing, see below.)
RECIPES
CONSTRUCTIONS GINGERBREAD
Makes about 6 dozen 2 3/4-inch cookies, or the equivalent of 3, 4 1/2 x 4 1/2 x 6-inch Gingerbread Takeaway Boxes, pictured above.
Here, bread flour is substituted for all-purpose flour to make a gingerbread dough that is sturdier and less prone to spreading than standard cut-out cookie dough. This protein-rich recipe is an ideal building block for 3-D and large 2-D construction projects intended primarily for display, such as Gingerbread Takeaway Boxes and Welcome Wreath. (Though wonderfully spicy, the dough needs to be rolled rather thin – about 1/8-inch – to be tender enough for eating.)
Key:
Complexity: Easy
Active Time: About 1 1/2 hours, excluding construction time, which varies by project
Prep Talk: Though not essential, a candy thermometer is helpful in Step 2.
Chill the dough several hours, or until it is easily rolled without sticking. Due to its high bread flour content, the dough is naturally quite stiff. If you find it too difficult to roll straight from the fridge, let it soften at room temperature about 1/2 hour.
The dough can be frozen up to 1 month with minimal loss of flavor if wrapped tightly in plastic and then foil. Once baked, cookies will stay crisp and construction-ready for several months in airtight containers, stored at room temperature. Flavor will dissipate over time, so if you intend to eat your construction project, bake the cookie pieces no more than 1 week ahead.
INGREDIENTS
5 cups bread flour
2 tablespoons ground cinnamon
1 tablespoon ground cloves
1 tablespoon ground ginger
1 1/4 teaspoons baking soda
1/4 teaspoon salt
1 cup plus 2 tablespoons granulated sugar
1/2 cup (1 stick) plus 7 tablespoons unsalted butter or margarine, cut into tablespoon-size pieces
3/4 cup corn syrup
1/4 cup plus 2 tablespoons whole milk
INSTRUCTIONS
1. Stir the bread flour, spices, baking soda, and salt together in a large bowl. Reserve for use in Step 3.
2. Combine the sugar, margarine, corn syrup, and milk in a large (6 1/2-quart) non-reactive (stainless steel or coated) saucepan. Place the pan over medium to medium-high heat. Cook, stirring frequently, until the butter has completely melted and the mixture is the consistency of thick syrup. (The syrup should look cloudy, with minimal oil separation from the margarine, and feel slightly warm to the touch. When ready, it will register 115ºF – 125ºF on a candy thermometer.)
3. Remove the pan from the heat and add half of the reserved dry ingredients. Mix until lump-free. Add the remaining dry ingredients and mix until the flour is just incorporated. The dough will be shiny and somewhat sticky at this point, but do not add more flour. (Excess flour and handling will only toughen the dough.) Cover the surface of the dough lightly with plastic wrap and cool to room temperature. (If left uncovered, the dough can dry out.)
4. Divide the dough into two equal portions and flatten each portion into a disk. Wrap tightly in plastic and refrigerate several hours, or until firm enough to roll without sticking.
5. Position a rack in the center of the oven and preheat the oven to 375°F. Line two or more cookie sheets with parchment paper and set aside.
6. Work with one disk of dough at a time. For construction projects larger than Gingerbread Takeaway Boxes (about 4 1/2 x 4 1/2 x 6-inches), roll the dough on a lightly floured surface to a 3/16 – 1/4-inch thickness. For smaller projects, roll the dough thinner, but no less than 1/8-inch thick. Cut out assorted shapes using your favorite cookie cutters. Alternatively, cut out cardboard templates for your project pieces, set them atop the rolled gingerbread, and cut around them with a sharp paring knife. Using an offset spatula, carefully transfer your cookie cut-outs to the prepared cookie sheets, leaving about 1 inch between each piece. If your pieces are very large, or difficult to handle with a spatula, cut them directly on the cookie sheet. (Note: Place cookies of similar size on the same cookie sheet to ensure that all cookies bake at roughly the same rate.)
7. Bake 10 – 12 minutes for small (2 1/2 – 3-inch) cookies and closer to 15 minutes for large (5 – 6-inch) cookies. Baking time will vary significantly with cookie size and thickness. When done, the cookies should be firm to the touch and well-browned. For large-scale support pieces, it is especially important to bake the cookies all the way through. While the cookies are still warm from the oven, trim any uneven or misshapen edges, as desired.
8. Let the cookies cool 1 – 2 minutes on the cookie sheet before transferring to wire racks. Cool completely before assembling with thick Royal Icing or storing. (The cookies will harden considerably as they cool.)
ROYAL ICING
Makes about 4 1/2 cups, enough to top coat 4 – 5 dozen 3-inch cookies
Royal icing is, hands down, my favorite frosting for cut-out cookies. Because it contains protein-rich egg whites, it dries much more quickly than confectioners’ icing (a mixture of powdered sugar and usually milk or water.) Speedy drying means royal icing spreads less, which is important for very precise decorating such as outlining. It also holds food coloring better with reduced chance of bleeding. Use this thick formulation as edible glue for adhering sugar dragées and fondant appliqué to cookie tops, or for piecing together large gingerbread structures. For outlining, top coating, and other cookie decorating techniques, thin with water until the desired consistency is reached. See Cookie Swap for these icing adjustments (www.juliausher.com).
Note: Since the egg whites in this recipe are not heated, it is best to use pasteurized whites to minimize the risk of food-borne illness associated with raw eggs. Take particular caution when serving the very young or old, or those with compromised immune systems.
Key:
Complexity: Easy
Active Time: ¼ hour
Prep Talk: Tinted icing is best used the day it is mixed. (The color will dry more uniformly this way.) Otherwise, the icing can be made 1 – 2 days ahead and stored in the fridge. Bring the icing to room temperature when ready to use and stir vigorously to restore its original consistency. Once applied to cookies, the icing should remain at room temperature so it sets into a crunchy candy-like coating. Important: Unless you’re using the icing, always cover the surface flush with plastic wrap to prevent a crust from forming.
INGREDIENTS
2 pounds powdered sugar
1/2 teaspoon cream of tartar
About 11 tablespoons pasteurized whites (or 5 large egg whites)
Flavoring, to taste
Liqua-gel food coloring of your choice, to desired shade (optional)
INSTRUCTIONS
1. Mix the powdered sugar and cream of tartar together in the bowl of an electric mixer. Stir in the egg whites by hand to moisten the sugar.
Fit the electric mixer with a whip attachment and beat the mixture on low speed to evenly distribute the egg whites.
Turn the mixer to medium-high speed and continue to beat about 2 minutes, until the icing is silky and very white. (The icing will lighten and thicken as you beat it.)
2. Beat in flavoring and/or coloring, as desired. Mix well before using.