
photo by J604, Premium Member © Sarah Phillips
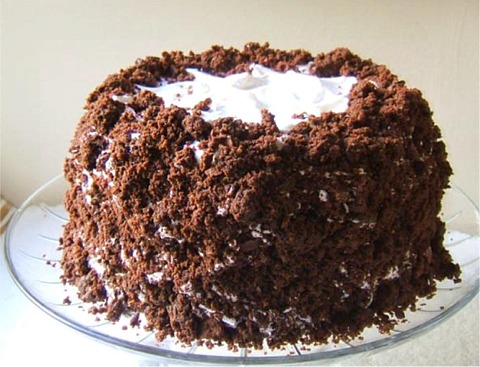
This cake makes three luscious layers of dark chocolate cake filled and frosted with a billowy frosting. One of the layers is crushed and then the crumbs are pressed into the frosting, making a grand celebration cake! ~ The cake is best served at room temperature! This one is adapted from Dorie Greenspan.
CAKE RECIPE HELP
NY Times blog post: http://www.nytimes.com/info/cake/
Sept. 16, 2010 10:33 AM ET With Halloween approaching, what could be better to make than that American classic, a rich devil’'s food cake? Though it might spook your guests, with its ample and sinful inclusion of chocolate (cocoa and fat). There’'s lots of speculation about where the name “devil’s food” comes from; it is thought to have arisen amidst the cake's original appearance at the turn of the 20th century, when its reddish-mahogany color caused by the baking soda acting on the cocoa, was first observed. — Sarah Phillips, founder, CraftyBaking.com, a baking advice and recipe site
INGREDIENTS
Cake:
1 1/3 cups unbleached all-purpose flour; spoon into dry measuring cup and level to rim
1/2 cup unsweetened cocoa powder
3/4 teaspoon baking soda
1/2 teaspoon baking powder
1/2 teaspoon salt
1/2 cup buttermilk or whole or 2% milk, at room temperature (SARAH SAYS: This is one of the rare instances where you can interchange buttermilk with milk in a recipe)
1 teaspoon pure vanilla extract
1 1/4 sticks (10 tablespoons) unsalted butter, at room temperature
1/2 cup light brown sugar, packed (SARAH SAYS: If you don't have light brown sugar, you can use 1/4 cup dark brown sugar, packed and 1/4 cup sugar, instead)
1/2 cup sugar
3 large eggs
2 ounces bittersweet chocolate, melted and cooled
1/2 cup boiling water
4 ounces semisweet or milk chocolate, finely chopped (measure and then, chop), or 2/3 cup store-bought mini chocolate chips
Filling and frosting:
4 large egg whites
1 cup sugar
3/4 teaspoon cream of tartar
1 cup water
1 tablespoon pure vanilla extract
INSTRUCTIONS
STEP I: MAKE THE CAKE LAYERS
1. Center a rack in the oven and preheat the oven to 350 degrees F. Grease and flour two 8- or 9 x-2-inch round cake pans, and line the bottoms with greased parchment paper. Put the pans on a baking sheet and set aside.
2. Sift together the flour, cocoa, baking soda, baking powder and salt. Combine the buttermilk and vanilla and set aside.
3. With a stand mixer fitted with a paddle attachment (or with a hand mixer in a large bowl) beat the butter on low speed until softened. (If the butter is cold, it will warm quickly from the beaters). Add the white sugar in a steady stream at the side of the bowl, and the brown sugar in small clumps. Increase speed to medium and beat for 2 minutes until the mixture is lightened in color (will be a light brown color from the brown sugar) and fluffy. Stop the mixer and scrape the side and bottom of the bowl with a large rubber spatula.
4. Add the eggs one by one, beating for 20 seconds after each addition. After the eggs have been added, increase the mixer speed to medium and beat the mixture for 2 minutes. (If the eggs are cold, the batter will curdle slightly. It's ok. It will come together as the batter warms from the beaters. ) Set the kitchen timer to help you keep track of the time. The mixture will become fluffy and aerated.
5. Add melted and cooled chocolate: Temper the chocolate by adding a teaspoonful of the butter/sugar/egg mixture at a time to the cooled chocolate and mix thoroughly after each addition. You can increase the amount added to the chocolate after the initial first few teaspoons to tablespoons, Add about 1/2 cup or more of butter/sugar/egg mixture to the melted chocolate before returning it to the main mixing bowl. Mix all the ingredients on low speed until combined and creamy.
SARAH SAYS: Tempering the chocolate properly is a very important step. If the chocolate is too warm, and added to the colder batter, it will seize, creating small bits of hardened chocolate in the batter. These bits will never melt and incorporate into the batter when the cake bakes; they will remain as hardened pieces of chocolate in the final cake.
6. When the chocolate is fully incorporated, and with the mixer on low speed, add the flour mixture in 3 equal portions, alternating with the buttermilk mixture in 2 equal portions, beginning and ending with the flour. (If the milk is cold, the batter will curdle slightly. It's ok. It will come together when you add the flour.) Scrape down the sides of the bowl as needed and mix only until the ingredients disappear into the batter. At this point, the batter will be thick, like frosting.
SARAH SAYS: Add the flour and liquid ingredients in increments quickly; do not wait in between additions too long as you don't want to overmix the batter.
7. Still working on low speed, mix in the boiling water, which will thin the batter considerably. After completing the last addition of flour, let the mixer run for 30 seconds on LOW. The batter should look mixed. STOP the mixer. Do NOT overmix. Switch to a large rubber spatula and fold in the chopped chocolate. While you do, make sure you incorporate any stray flour or milk left at the sides and bottom of the bowl. Then, STOP!
Divide the batter evenly between the two pans and if necessary, smooth the tops with the rubber spatula.
8. Bake for 25 to 30 minutes, or until the top feels firm and gives slightly when touched on the top with a cupped hand (will not spring back when touched with a fingertip) and shrinks a little from the sides of the pan – it should also smell done. The cake may develop cracks on its top.
Take cakes immediately from the oven to a wire cake rack and let sit for 10 to 15 minutes. Run a knife around the sides of the cakes and then unmold onto wire cake racks – the cakes are fragile and will crack easily if you unmold too early.
Peel off the parchment paper liners. Invert and cool to room temperature right side up. The cake's top will flatten more as it cools.
STEP II: MAKE THE FILLING AND FROSTING
1. In a spotless and clean, dry mixer bowl, place the egg whites. Make sure there is not a speck of egg yolk or grease, otherwise they will not beat. Fit the mixer with a whisk attachment. Have a candy thermometer at hand.
2. Put the sugar, cream of tartar and water in a small saucepan and stir to combine. Bring the mixture to a boil over medium-high heat. Cover the pan with a top that fits exactly and boil for 3 minutes. Uncover and allow the syrup to boil undisturbed. The ultimate goal is to have it reach 242° F on the candy thermometer.
3. While the syrup is cooking, start beating the egg whites when the syrup is about 235° F medium speed until they form firm, shiny peaks.
With the mixer still at medium speed, and standing back slightly, carefully and slowly pour in the hot syrup, pouring it between the beater(s) and the side of the bowl. Splatters are inevitable – don’t try to scrape them into the whites, just carry on.
Add the vanilla extract and keep beating the whites at medium speed until they reach room temperature, about 5 to 10 minutes. You should have a smooth, shiny, marshmallow-like frosting.
If the whites form firm, shiny peaks before the syrup reaches 242 degrees F on the candy thermometer, reduce the mixer speed to low and keep mixing the whites until the syrup catches up.
NOTE: Frosting is best used right after it is made. I have covered it with plastic wrap and stored it in the refrigerator for about a day before using, but that's pushing it.
STEP III: ASSEMBLE THE CAKE
1. Allow cake layers to cool completely before assembling.
2. If the cakes have crowned, use a long serrated knife and a gentle sawing motion to even them. With the same knife, slice each layer horizontally in half (torting). Set 3 layers aside and crumble the fourth layer to decorate the outside of the cake with; set the crumbs aside.
3. Put a bottom layer cut side up on a cardboard cake round or on a cake plate protected by strips of wax or parchment paper. Using a long metal icing spatula, cover the layer generously with frosting. Top with a second layer, cut side up, and frost it. Finish with the third layer, cut side down, and frost the sides and top of the cake. No need to smooth the frosting. Cover the entire cake with the chocolate cake crumbs, gently pressing the crumbs in to the filling with your fingers.
4. Refrigerate the cake for about 1 hour before serving. (If its more convenient, you can chill the cake for 8 hours or more; cover it loosely and keep it away from foods with strong odors.)
STORAGE
The untorted and unfrosted cake layers can be frozen for two months, well wrapped or stored at room temperature for about 3 to 5 days.
Because of the type of frosting used, it does not store well because the frosting becomes somewhat spongy and sticky. It will keep for about two days, covered in the refrigerator. It is best served right away after assembling.