
Bread by Sarah Phillips; Photos by Tara Korde © Sarah Phillips
This is my favorite loaf to make as an everyday one, especially when the kids' were young, for the school lunch sandwiches. The bread slices beautifully because of the eggs, milk and butter, and it is great for toast. If you are lactose intolerant, substitute the milk with the lactose-free or soy milk varieties, and the butter with soy butter, and the recipe will turn out perfectly. You can completely eliminate the eggs, if desired. As with all yeast bread recipes, on any given day, you may not use all of the flour specified in the recipe, or you may need more; just add the flour until you get the right dough consistency, which I show you, and then, stop adding in flour.
All of the step-by-step techniques you will learn in this lesson can be applied to any yeasted bread recipe; so many of our Premium Members have reported learned how to bake bread from this very recipe. It makes a wonderfully moist bread, with subtle wheaty notes, high in fiber. I use lavender honey in the recipe, which I can smell in the finished bread, which is heavenly!
BREAD RECIPE HELP
chefcandy, Premium Member, Says: “I have used the recipe from sarah for classic white WW sand bread with much success. i didnt make loaves in a pan i did battards instead. i threw a couple of ice cubes onto bottom of my oven (it doesn't hurt it, it's just loud!) to form a nice crust. it came out perfect. it's a great go to bread! Happy baking!!”
msbreez, Premium Member, Says: “I also love Sarah's recipe!! It's the best bread recipe ever!”
basementrockstar, Premium Member, Says: “Ok my new attempts at bread are PILES better! …So I made the classic White Whole Wheat Sandwich bread…and did the microwave proof box idea and my bread is AMAZING. It rose so well and is still soft and tasty today (made it on the 2nd)! I'm really pleased with it. I also was able to knead my pizza dough a lot better and it actually stretched out properly!! I was so excited LOL. I'm going to try pie crust tomorrow. I've NEVER been good at pie crust but if the tutorials on that are as awesome as the bread ones I'm in business!!!!!”
INGREDIENTS
warm water, 100 to 110 degrees F; measured with an instant read thermometer: 3/4 liquid cup / 6.25 ounces / 177 grams /
active dry yeast: 4 1/2 teaspoons / 1/2 ounce / 14 grams /
honey: 1/3 cup / 4 ounces / 112 grams
whole or 2% milk, 100 to 110 degrees F; measured with an instant read thermometer: 1 liquid cup / 8.5 ounces / 242 grams /
unsalted butter, melted and cooled: 1/2 cup (1 stick) / 4 ounces / 113 grams /
unbleached all-purpose flour: 2 cups, spoon into measuring cup and level to rim / 8.82 ounces / 250 grams
eggs, lightly beaten: 2 large / 3.5 ounces / 100 grams /
white whole wheat flour, plus more if needed : 4 cups, spoon into measuring cup and level to rim / 19 ounces / 536 grams/
SARAH SAYS: I use white whole wheat King Arthur Flour Brand. You can use whole wheat flour, instead, but the loaf will be slightly denser.
table salt: 1 1/2 teaspoons / approx 10.5 grams /; do not lessen the amount
Optional toppings:
1 large egg, lightly beaten: 1.75 ounces / 50 grams
poppy or caraway seeds: sprinkling
The recipe bakes at 350 degrees F for 45 minutes to an hour for one 9 x 5 x 3-inch loaf or two 8 x 4 x 2-inch loaves, (15 to 25 minutes for 24 rolls) until the bread loaf (or each roll) reaches an internal temperature of 190 to 210 degrees F measured with an instant read thermometer placed through its underside.
INSTRUCTIONS
STEP I. PREPARE THE PANS AND MIX THE DOUGH
1. Spray the bread pan with vegetable oil spray. Set aside.
SARAH SAYS: I like to use heavy, and light colored, dull metal bread pans. I find that I get the best results – a beautifully lightly browned crust as opposed to a dark one.
To mix with a stand mixer: SARAH SAYS: I use a KitchenAid 600 Professional Mixer. I find that it is just the right size and has the right power for this recipe.
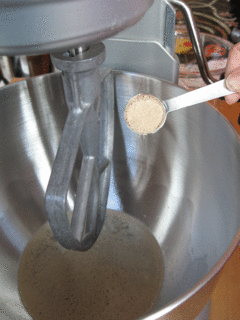
2.A. Rinse the mixing bowl with hot water to warm it. Clamp it on the stand mixer. Fit the mixer with a paddle attachment. Place the measured warm water in the bowl. Sprinkle the yeast over its surface and let stand for a few minutes. Whisk the yeast until it has fully absorbed the water.
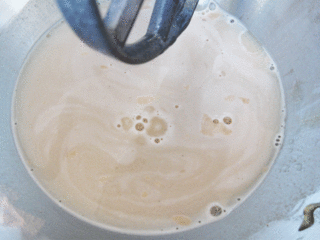
2.B. Add the honey to the yeast and stir. It will start to bubble a little.
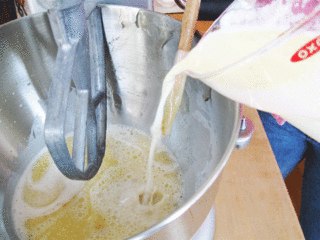
3.A. Combine the milk and butter and immediately add it to yeast mixture.
3.B. Turn on the mixer to low, and add in 2 cups all-purpose flour in 1/2 cup increments. Increase the mixer speed to medium and beat for 2 minutes.
SARAH SAYS: This step is very important as you will start to develop the gluten in the bread. For a well-risen dough, I start with all-purpose or bread flour, to start a strong structure, as any whole wheat flour has bran in it; bran acts as little scissors, and will cut the gluten strands and help prevent their early formation.
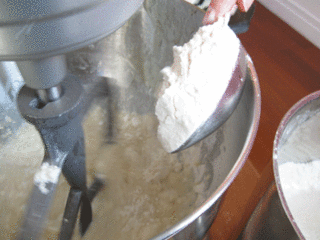
3.C. With the mixer on low, add in the eggs, and then add in 1/2 cup white whole wheat flour mixed with the salt. Increase the mixer speed to medium and beat for 2 minutes.
SARAH SAYS: Salt kills yeast; do not add it in sooner than this step.
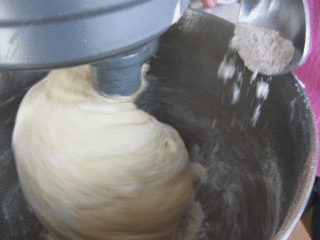
4. Turn the mixer to low, and continue adding the white whole wheat flour, 1/2 cup at a time. Switch to the dough hook when the mixture is like a very thick paste.
5. Continue adding the flour, with the mixer on low, 1/2 cup at a time. Let the flour incorporate into the dough before deciding to add more. The dough will become thicker and thicker as you do. Take your time and do not rush the process.
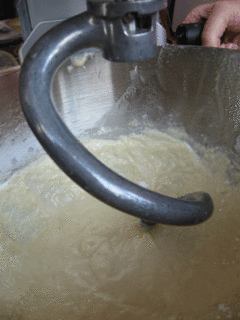
As flour is added and the dough thickens, it starts to ride up the dough hook.
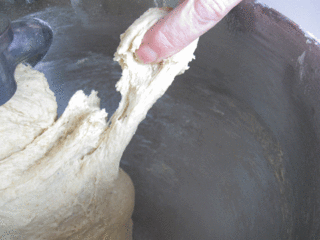
SARAH SAYS: I stopped the mixer to test how stiff the dough was becoming and to estimate how much more flour was needed! The dough began to stretch, and then it…
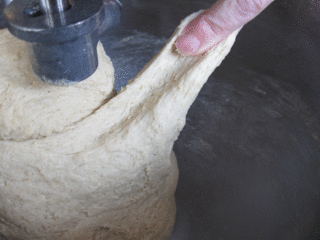
…breaks! It needs a little more flour so the dough stretches better!
6. Continue to add flour only 1 to 2 tablespoons at a time.
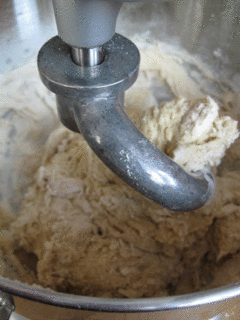
STOP adding flour when the dough pulls away from the side of the bowl and all the ingredients are incorporated. The dough should feel slightly tacky or sticky. Do not worry if you have added less or more flour specified in the recipe. Flour amounts vary according to the gluten protein percent and, what I have observed, the ambient humidity at the time.

Take the dough from the dough hook without pulling at it so it tears. Do not break it into small pieces, either.
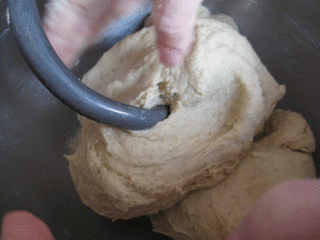
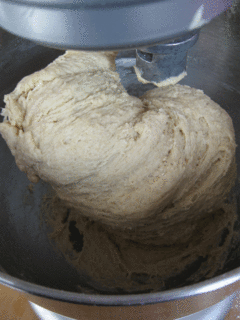
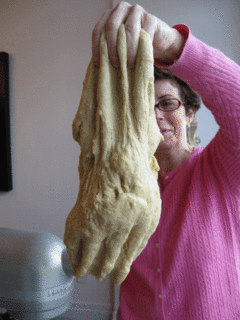
SARAH SAYS: This dough has good stretch to it, meaning it is mixed properly! HA! When I hold the dough mass up high, it stretches downward nicely and will not tear! You can tell that I am having fun!
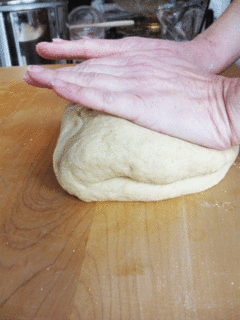
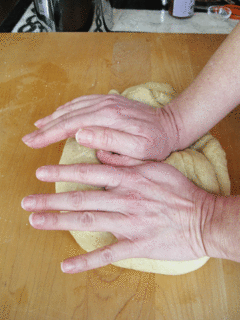
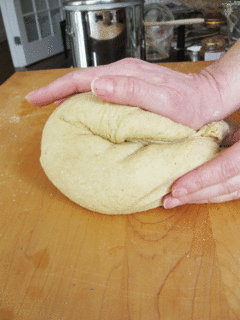
STEP II. KNEAD THE BREAD DOUGH
Kneading is the process of working the dough with a pushing, folding and turning technique. Bread dough can be kneaded with a stand mixer fitted with a dough hook for 5 minutes or by hand, for 8 to 10 minutes, until smooth and elastic. I prefer to knead by hand. Underkneading creates dough that won't hold its shape, is dense and cracks when baked. Overkneading creates too much gluten, causing dry and tough bread that doesn't rise as high as it should.
SARAH SAYS: It dawned on me one day to use a kitchen timer to help me keep track of the kneading time.
1. Knead on a clean, smooth surface, at a comfortable height. Avoid sprinkling flour on the kneading surface; if the dough is mixed correctly, you should not need any. The dough will stick to the kneading surface very little. Sprinkle pinches of flour, not handfuls, on the work surface. If making a loaf with whole wheat flour, use all-purpose flour for kneading.
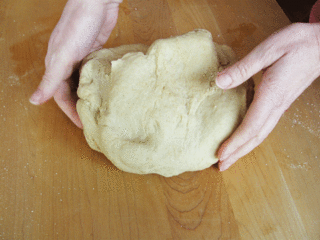
Start with the dough in a rough ball shape.
SARAH SAYS: I did not need any flour on my countertop, as I mixed the dough a little on the dry side. I will have to correct it later with vegetable oil.
2. Pick up the dough edge furthest away from you and fold it towards yourself.
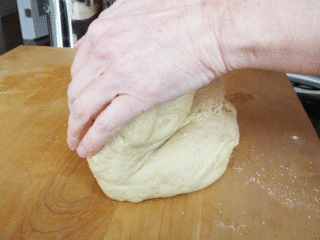
3. Use the heels of your hands to push the dough away. Do not tear or pull on the dough. You want to stretch the gluten strands gently rather than forcing them to lengthen. If you do, they'll eventually snap right back into place and your bread won't rise as high or will shrink when baked.
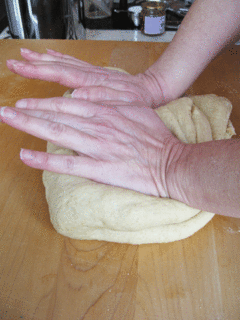
4. Give the dough a quarter-turn.

5. Pick up the dough edge furthest away from you and fold it towards yourself.
6. Use the heels of your hands to push the dough away.
7. Give the dough a quarter-turn.
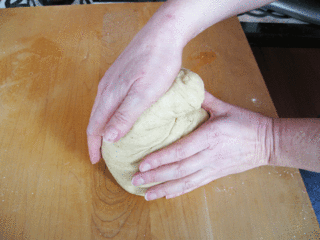
Hold the just pushed dough in front of you…
…and, then give it a quarter turn.

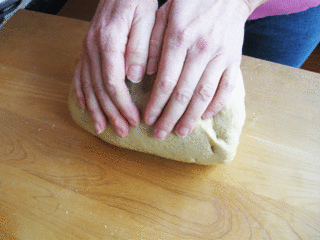
8. Pick up the dough edge furthest away from you and fold it towards yourself.
9. Use the heels of your hands to push the dough away.
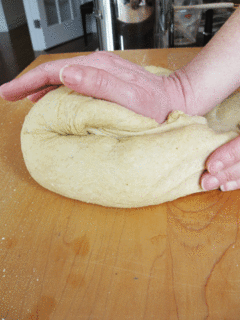
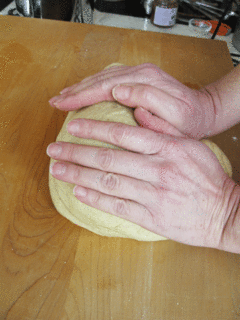
10. Repeat Step 2, 3 and 4 until you have kneaded the dough for a total of 8 to 10 minutes.
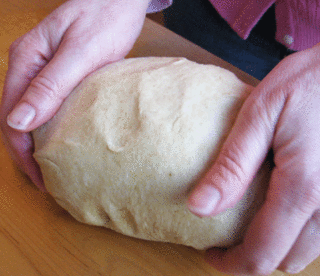
Form the dough into a ball. It should be smooth and how I describe as “feel like a baby's bottom” – silky smooth and soft – without small lumps of flour on its surface or its surface tearing that indicates its too dry. Dough flecked with bran because it has whole wheat flour in it, will show some small tears on the surface; bran acts like little scissors and cuts into the dough.
STEP III. FIRST RISING, CALLED PRIMARY FERMENTATION
My recipe uses Active Dry Yeast, which requires two rises, a first one after mixing, and a second one after shaping.
SARAH SAYS: If you have used instant active dry yeast, simply let the dough rest for 10 minutes after kneading. It isn't required to go through a formal first rising, but rather a rest period and a rising after shaping and before baking. But, this recipe uses active dry yeast, and requires two risings, a first one after kneading and a second one after shaping and before baking.
During rising you will see a magical transformation. On the outside you will see the dough rising like a balloon. But, on the inside, where it is invisible to the eye, lots of things are happening.
Recipes typically instruct you to “place dough in a warm place until doubled in size.” Because these instructions are vague, baker's have problems with this step. It normally takes about an hour to 1 1/2 hours for the yeast to accumulate a volume of carbon dioxide gas strong enough to stretch the gluten strands that hold in and make the dough rise. The amount of time or success with this step is determined on a number of variables: Dough rests, rises and ferments best with warmth (about 75 to 85 degrees F) AND humidity, often forgotten by the home baker. The ball of dough must be smooth and rounded. The dough ball must be well greased and the rising container tightly covered. Rising time is also influenced by the amount of kneading (if too little or too much, dough will not rise well.)
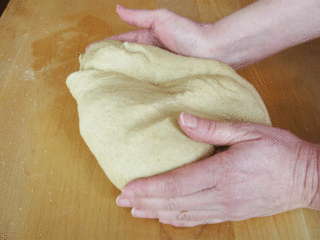
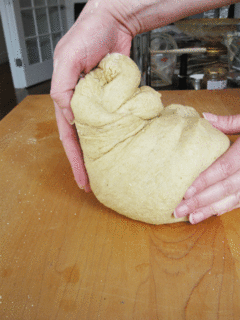
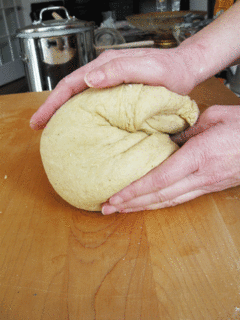
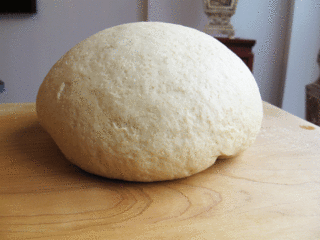
1. Dough rises best when it has been rounded and smoothed. The smoothness comes from proper kneading while the roundness comes from proper formation. There are several ways to form a ball. I like to:
1.A. While lightly pressing down on a flour-free countertop, form the dough into a sphere by rotating your hand over the top. Stretch the top tightly with opposing thumbs across the dough to bring the top underneath the ball.
1.B. Keep turning, stretching the sides and tucking the bottom into itself until you have a ball whose bottom looks like the underside of a jellyfish. Seal the underside folds by pinching them.
Or, just roll the dough into a tight ball shape! LOL!
2. When the dough is formed, turn the ball around in a large, well greased bowl – vegetable oil works best! Cover the bowl tightly with plastic wrap; don't use aluminum foil. The plastic wrap stretches when the dough rises and retains moisture better.
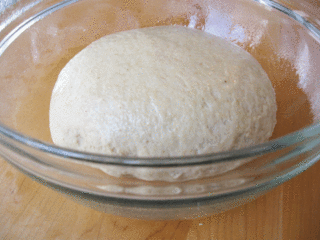
SARAH SAYS I spray mine with nonstick vegetable oil. I like use a glass heat proof bowl so I can more easily see if the dough has risen to double its volume or you can use a KitchenAid 4.5-quart mixing bowl. Make sure it is large and deep enough to accommodate the risen dough. The oil keeps the dough from forming a hard outside crust that will not brown correctly and may even separate from the rest of the bread when baked.
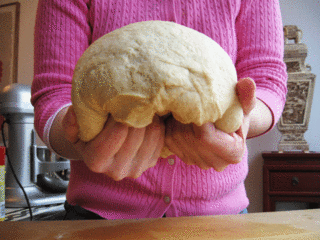
3. The bread is ready to rise, called proofing.
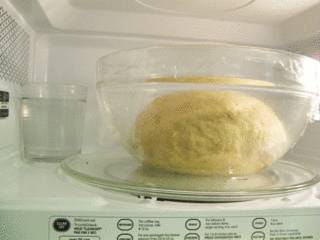
SARAH'S MICROWAVE BREAD PROOFER, I invented and wrote about in my Baking 9-1-1 Book, Simon and Schuster, 2003, is my rising place of choice because it works well and fast every time.
SARAH SAYS: Professional bakers use atmosphere-controlled “proof boxes” to keep the dough at the right temperature and humidity for the best possible rise. I devised a way to have a proof box in my own home, without the great expense: the microwave proofer.
SARAH SAYS: With heavy breads with lots of sugar, whole wheat flour (except for white whole wheat flour), and add-ins won't grow so dramatically. That doesn't mean you've done anything wrong; it's just the ingredients working together in the right way.
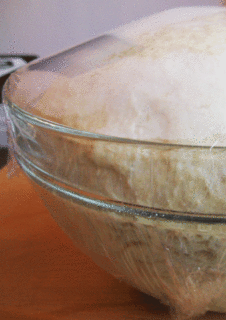
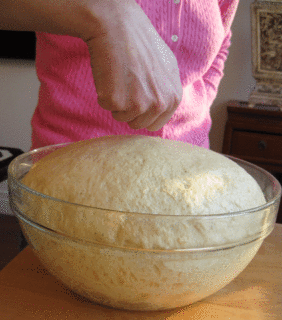
To determine if your dough has doubled in size or has sufficiently risen, press the tips of your two fingers lightly and quickly about 1/2-inch into the dough. If the impression you made stays, the dough is ready – which sometimes takes as long as 5 minutes – the yeast still has some energy left and needs a little more time; cover and let it rise longer.
Note the beads of moisture inside the bowl. That's what you want to see if the dough has risen in a proper, moist environment. The moist environment helps you get a better and moist bread texture, after baking.
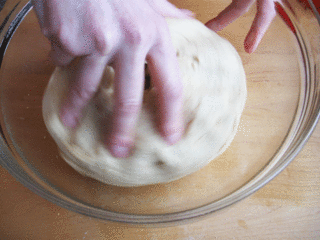
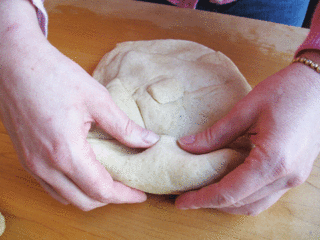
STEP IV. PUNCHING DOWN (DEGASSING) DOUGH
Punching down the dough after it has doubled in size gives it a fresh start. Deflating also expels some of the carbon dioxide – too much chokes the yeast – and helps to redistribute the yeast cells more evenly throughout the dough to be able to feed on a new source of food. When dough is punched down, it helps to equalize the temperature throughout the dough – the inside is warmer than the outside – so when shaped in the next step, the dough can rise evenly. It also allows the gluten in wheat flour to relax, making the dough easier to shape and divides the air pockets in the dough, making them smaller and more numerous, ultimately contributing to the fine texture of the finished bread.
1. To punch down the dough:
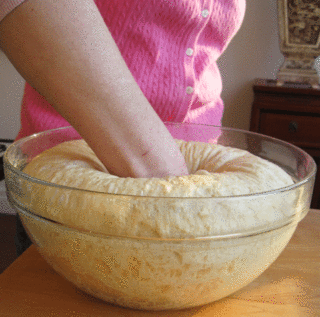
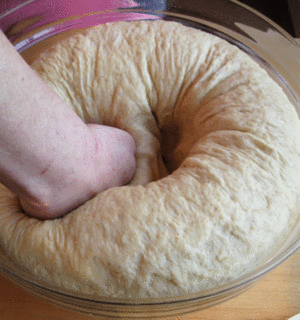
A. When the dough has reached a sufficient volume, gently take off the plastic wrap. It should not stick to the dough resulting in its tearing if it has not over-risen and the dough was properly greased in the steps before.
SARAH SAYS: Note in the first photo, below, how there is no tearing on my nicely risen dough after I removed the plastic wrap! If you tear at the dough, you lose precious air bubbles, resulting in a dense bread loaf. It also breaks and tears at the gluten strands, resulting in a denser loaf, as well.
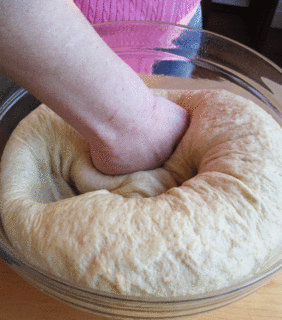
B. Then, deflate the dough with a couple of pushes – not hard punches – with your fist straight down through the dough and then lift straight out. Don't beat the dough. You will hear a “fisss” as the carbon dioxide is released and the dough deflates. Don't tear or pull on the dough while doing so, or you will tear the gluten strands.
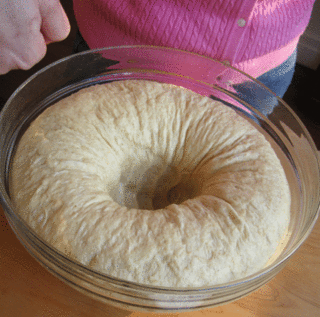
SARAH SAYS: Note when I start to punch down my dough, it does not collapse all over. It holds its shape in places where I have not punched it down; that's because the dough has not over-risen and has excellent gluten-strength.
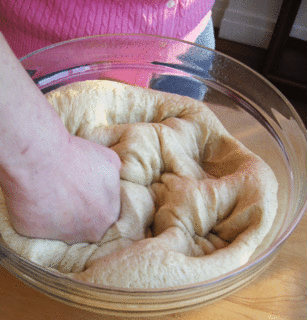
C. Continue to push – not punch – down the dough all over!
![]()
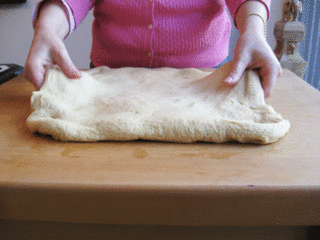
D. After deflating the dough, tip the bowl sideways so it falls out onto the clean countertop. The dough should have enough oil on it so it won't stick. Sometimes you have to use your fingertips to ease the dough out, as it may be slightly sticky.
SARAH SAYS: This is really beautiful dough. I can really smell the yeast and the wheaty notes. It is supple, moist and I can already tell in advance will stretch and shape easily, the next step.
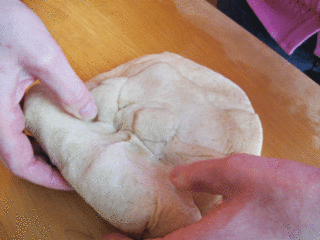
STEP V. SHAPING, PANNING, AND FINISHING TOUCHES
Shaping is about more than appearance. It forms the dough for optimal rise and containment. Make sure you use the pan size specified in the recipe; if too small the bread will rise over the sides; if too large the bread won't seem to have risen very much. The goal is to shape the dough with popping the air bubbles, losing carbon dioxide or tearing the gluten strands in it.
1. A. Gently stretch each dough pieces with your fingertips in an opposing motion only enough to stretch – not force – the dough with your fingertips into a rough rectangle about five to six inches wide and six to eight inches long.
SARAH SAYS: The dough should stretch easily. You do not need ANY flour on the countertop.
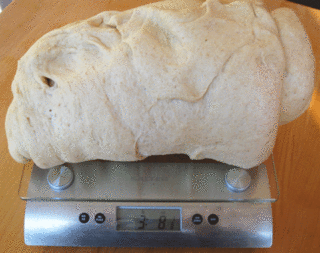
1. I am baking my bread dough in two 8 x 4 x 2-inch pans! I need to divide my dough evenly in half.
A. Roll up the flattened dough. Weigh the dough and get the total = 3 pounds 8 1/8 ounces. Divide the dough by the number of servings, in my case two, to get what each piece should weigh = 1 pound 9 1/16 ounces.
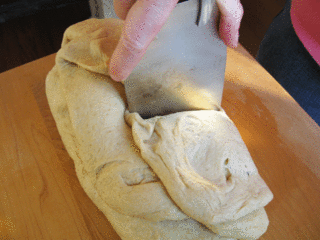
B. Portion the dough by cutting straight down with a sharp knife or a bench scraper, across the dough, so you end up with two rectangular pieces when unfolded. I gave an estimate as to what half was. Do not use a sawing motion and don't pull it apart; you want to avoid tearing the gluten strands.
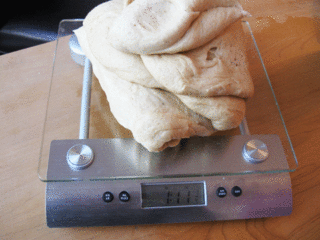
C. Weigh each dough half to make sure they are evenly sized. This dough piece weighs 1 pound 11 1/4 ounces, which is too much. So, I cut-off a small portion of dough on the larger piece, and pressed it onto the smaller piece, so the two pieces weighed the same. I reweighed both dough portions and the weighed approximately 1 pound 9 1/16 ounces each.
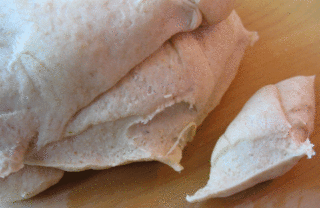
SARAH SAYS: Cut a small piece off the dough by cutting straight down with a sharp knife or bench scraper; do not tear off a piece of dough. Do not knead the smaller piece onto the second portion of dough; simply press it in. If the dough portions are not exact within 1/4 or 1/8 of an ounce, its ok; try not to fuss and fiddle with the dough too much.
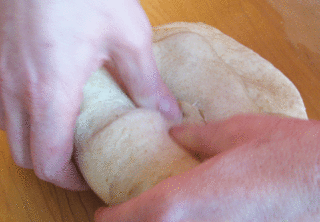
2. Shape each dough portion:
A. Uncoil the dough. You want each shaped dough portion to fit the length of the pan. Since the pans I am using are 8-inches in length, take each dough piece and make sure each even-sided rectangular piece is about 4 to 5-inches wide and about 6- to 8-inches long. Do not worry too much if the rectangular piece dimensions are not exact. Working from the short side of the dough, roll the length of the dough towards or away from you, one section at a time, pinching the crease with your thumbs, with each rotation. This will help to increase the surface tension on the bread loaf.
SARAH SAYS: You can see the small dough piece I cut from the larger portion in Step 1C and pressed the middle of the rectangle, so both portions were equal in weight.
B. Continue rolling the dough towards you, pinching the crease with your thumbs, with each rotation until the end. Pinch the final seam closed with your thumbs and turn the dough seam side down. Rock the loaf to even it out keeping the surface of the loaf even across the top; take care not to taper the ends.
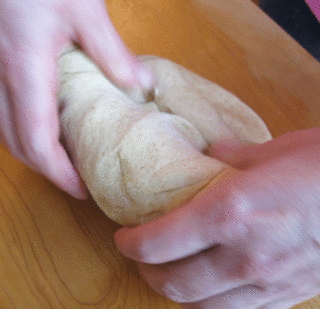
C. Place the dough log in a lightly oiled pan; I spray my pans with nonstick spray. The ends of the load should touch the ends of the pan and be centered between the long sides of the pan for an even rise. If the pan is the proper size, the dough should fill it one-half to three-quarters full and rise accordingly. Make sure the dough loaf is greased all over and ends up seam side down in the pan.
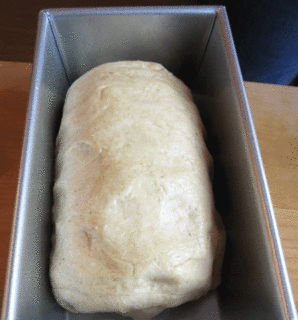
SARAH SAYS: I roll the loaf in the greased pan so the loaf becomes oiled all over. I make sure the dough roll is placed seam side down.
D. Repeat Step #s 2 A – D with the second portion of the dough.
STEP VI. SECOND RISE OR PROOFING / BAKING AND COOLING / STORING
SECOND RISING OR PROOFING
The second rise is an extension of fermentation and is the final step before baking. It is shorter than the first rising; usually taking only about 45 minutes for a bread loaf or shorter if you have two smaller loaves, because the yeast cells are now highly active. Among professional chefs, fermentation is referred to as primary fermentation, while the second one is called proofing. You'll also hear proofing used to refer to the process of testing the yeast to see if it is still active, which is different.
1. Preheat the oven to 350 degrees F:
A. Before preheating, PLACE AN OVEN SHELF TO THE MIDDLE, and remove the other higher shelves so the bread has a chance to rise, sometimes 3-inches above the pan's rim.
B. Preheat the oven.
SARAH SAYS: Unless the recipe tells you otherwise, always preheat your oven for 30 to 40 minutes to the recommended temperature before placing the loaves in for baking – the longer the better.
2. Let the shaped dough rise:
A. Make sure the dough loaf is well-greased all over and seam side-down when placed in the pan. Cover tightly with plastic wrap.
SARAH SAYS: If the dough is well greased when it rises, and when the plastic wrap is removed before baking, the dough will not stick to it and tear or deflate or become misshapen as a result.
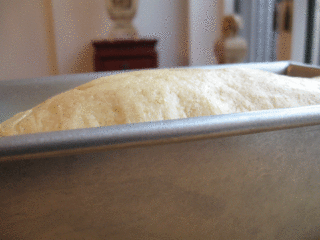
B. Let dough rise until the middle reaches the rim of the pan; do not allow it rise any further.
SARAH SAYS: The final rise called “oven spring” will take place in the hot oven, so don't allow shaped loaves to over-rise before baking or they will fail to rise as they should in the oven and may even collapse.
SARAH SAYS: I use Sarah's Microwave Bread Proofer as my rising place of choice, but anywhere between 75 and 85 degrees and there's humidity is ideal.
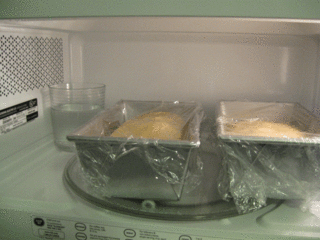
SARAH SAYS: Looking inside my microwave oven, the loaf on the left was shaped first and placed in the microwave proofer before the second one; you can already see that it has begun to rise slightly.
BAKING
1. Remove the plastic wrap from the risen loaf; it should come off easily.
For a glossy finish, beat one large egg and with a pastry brush or a dry paper towel dipped in the egg, lightly brush the tops of dough with it. Try not to let the egg drip down the sides of the pan, otherwise you will be eventually gluing the bread to the pan, and you do not want to do so; you want the bread to be free to rise in their pans.
Place the loaf or loaves in the middle of the middle shelf. If you have two loaves, place them on the same shelf with at least 1 inch between them, and between them and the oven walls. Immediately shut the oven door.
2. Bake in a well-preheated oven at 350 degrees F for 45 minutes to an hour for one 9 x 5 x 3-inch loaf or two 8 x 4 x 2-inch loaves, (15 to 25 minutes for 24 rolls) until the bread loaf (or each roll) reaches an internal temperature of 190 to 210 degrees F measured with an instant read thermometer placed through its underside. Check your loaves about 10 minutes before the recipe says they should be done.
SARAH SAYS: Loaf appearance can be deceiving; the bread may look nicely browned on the outside and sound hollow when tapped – two traditional tests for doneness – but still not be done in the middle. To be sure, use the ever reliable instant read thermometer.
If your bread is browning unevenly, rotate the pan once the bread's structure is et, otherwise keep the oven door shut at all times. If the loaf is browning excessively, make an aluminum foil “tent” and rest it over the top of the bread. Don't remove the loaf to do so.
3. When done, remove the loaf from the oven and unmold it onto a wire cake rack onto its side. Insert the thermometer through the bottom of the loaf to its middle to measure the bread's internal temperature; if it's between 190 and 210 degrees F, it is done. If not, place the loaf back in the pan and return it to the oven. Check it again in 5 to 10 minutes.
COOLING
1. Take the finished loaf or loaves out of the oven and let it sit in the pan(s) for 10 minutes on a wire cake rack. If necessary, release the bread from the sides of the pan by running a thin knife between it and the sides of the pan.
2. Unmold by turning the loaf pan on its side; the bread should fall out.
SARAH SAYS: Cool freshly baked loaves on their sides on wire racks so air can circulate – the bottom of the loaf is the hottest part. Make sure there is plenty of room between the loaves; they take about an hour or two to cool.
I use one cake rack per loaf of bread. My cake racks are elevated 3 inches from the countertop to prevent condensation from forming between the countertop and the bread, lest the side get soggy. To elevate yours, place an upside-down glass under each corner of the rack.
The bread is still actually baking, so resist the temptation to cut into the loaf immediately. If you do, the bread will fall apart or mush together. Also, you won't experience its full flavor until the bread has cooled adequately.
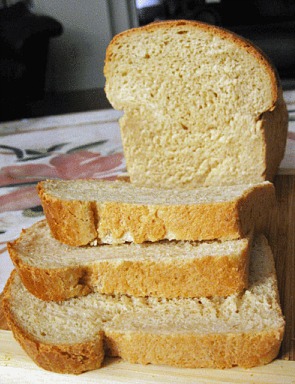
SARAH SAYS: I cut my bread into slices with a large serrated knife or electric knife. For the best slicing results, I turn my bread loaf on its side to slice.
STORAGE
Wait until the bread cools completely before wrapping the loaf in plastic wrap or a few times in foil and storing it in an airtight plastic bag or in a bread box. Bread is best stored at room temperature in a cool, dry place for 2 to 3 days or kept frozen, where it will keep fresh for 2 to 3 months. Pre-slice it, if you want to, so you can take out one or two slices at a time.