
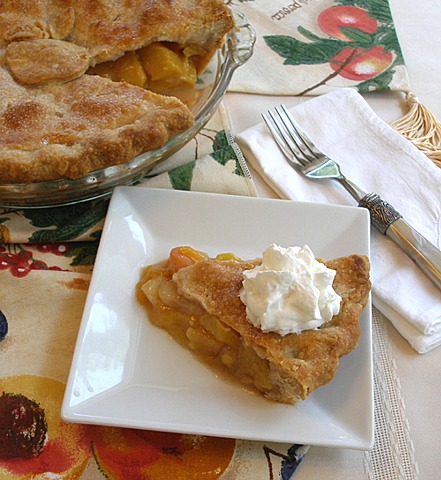
My, oh my, what a wonderful pie! A little dollop of lightly sweetened whipped cream and you're in Pie Heaven!
Peaches are at their full glory in early summer and nothing says “summer” like a fresh peach pie. When I make pie, I like it to be a simple one that celebrates the fruit, and this recipe will not disappoint. We show you how to make the entire pie, including how to blanch and peel the peaches.
PIE RECIPE HELP
KELLY SAYS: “Sarah's recipe for Fresh Peach Pie is spectacular!”
INGREDIENTS
KELLY'S PERFECT FOOD PROCESSOR PIE CRUST by Kelly CA / Recipe alone
Makes a double crust for a 9-inch standard or 9 1/2-inch deep-dish pie
INGREDIENTS
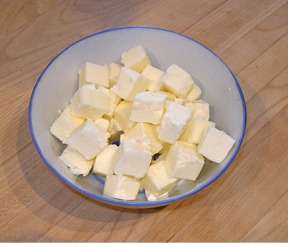
1 cup (2 sticks) unsalted butter, cold
2 1/2 cups unbleached all-purpose flour; spoon into measuring cup and level to rim
1 teaspoon sugar
1 teaspoon salt
1/2 teaspoon cinnamon, optional
1/4- 1/2 cup ice water; make with water and ice cubes
For finishing pie crust before baking:
1/8 to 1/4 cup milk
Some sugar for sprinkling
PEACH PIE FILLING by Sarah Phillips
Fills a 9-inch standard or 9 1/2-inch deep-dish pie
INGREDIENTS
8 ripe fresh peaches, medium to large size
3 tablespoons instant (quick-cooking) Tapioca
1/2 cup to 3/4 cup sugar; depending on the sweetness of the peaches
1/2 teaspoon salt
1 tablespoon cornstarch
2 teaspoon ground cinnamon
Freshly grated nutmeg
STEP I: MAKE THE PIE CRUST
INSTRUCTIONS
1. Cut butter into cubes and place in a bowl and place in the refrigerator to chill.
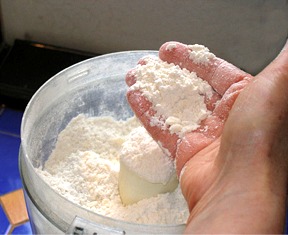
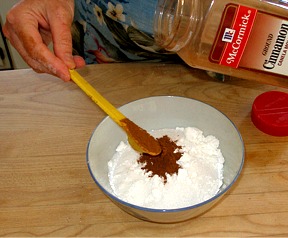
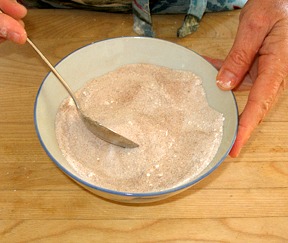
2. A. Place dry ingredients into the bowl of your food processor, fitted with the metal blade. Pulse a few times to mix.
B. Add the well-chilled butter cubes on top of the dry ingredients, in the food processor.
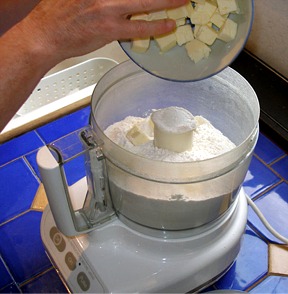
C. PULSE the butter and flour mixture together till the butter is no longer in large chunks. You should be able to still see small chunks of butter in the mixture. This helps form the flaky texture you are looking for in your pie crust.
3. Add the water to the dry ingredients.
KELLY SAYS: This is where you must proceed with caution. Too little water and your dough will be crumbly and impossible to roll out. Too much water and your crust will be sticky to roll and tough, when baked. You must use a gentle hand with pie dough and proceed slowly!
A. START with 1/4 cup of water, adding it to the flour mixture, through the feed tube in the food processor, while pulsing the machine until the dough starts clumping together. DO NOT just turn the processor on – use the PULSE button.
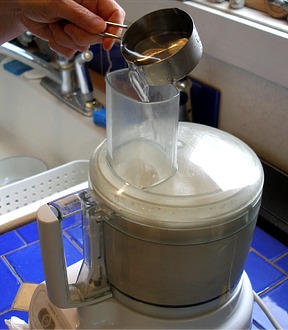
B. Open the processor to check the condition of the dough. It should still be a bit crumbly, but it should start to clump together. To test the dough, squeeze it between your fingertips and it should just stick together. If it does, the dough is done – do NOT add any more water.

KELLY SAYS: If the dough is too dry, add more water, a few drops at a time, up to a teaspoon, and hit the pulse button for a second. Open the food processor and check the dough after each addition. Most of the time, I find that 1/4 cup water total is plenty. Of course, the moisture content of flour can vary, and you MAY have to add more than 1/4 cup, but do so, about 1 teaspoon at a time.
If the dough is too wet, add a teaspoon of flour at a time, and pulse the food processor to combine.
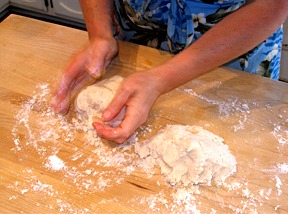
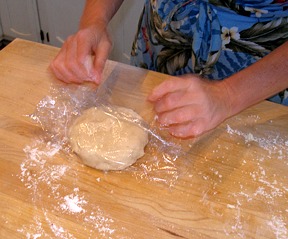
4. A. Empty the food processor contents out onto your work surface and gather the dough into two evenly-sized mounds. Flatten the disks, and make them as round as possible, so it is easier to roll them out, when the time comes.
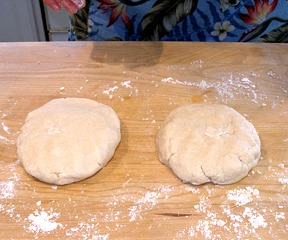
B. Wrap each disk in plastic wrap and place them in the refrigerator, to chill for at least 1/2 hour.
KELLY SAYS: It is important that your pie dough is well chilled before you go to roll it out.
STEP II: ROLL OUT THE PIE DOUGH: BOTTOM CRUST
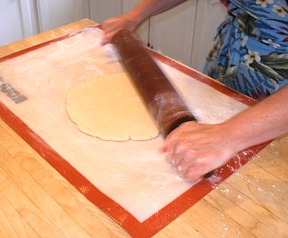
Roll until the pie dough is 3-4″ larger than the pan you will be using for your pie (at least 12″ wide, for a 9″ pie). Your dough should be about 1/8″ thick.
SARAH SAYS: I like to use a Pyrex ovenproof glass pie pan for baking my pie in. I can easily see if the pie crust is done baking on the bottom so I do not take it from the oven too soon.
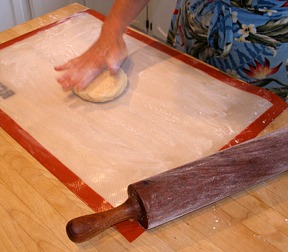
1. Remove one disk of dough from the refrigerator and unwrap it. Place dough on lightly floured work surface or silpat rolling mat (a.k.a. bakers best friend!).
KELLY SAYS: It is important to add as little flour to your dough as possible, during the rolling process. LIGHTLY flour your pin and rolling surface. Use only enough flour to keep the dough from sticking. Before rolling, if necessary, flatten dough slightly by hitting it a few times in different spots, on the side of your rolling pin, if it is very cold. Otherwise, pat it down with your fingertips.This helps to get you started with your rolling.
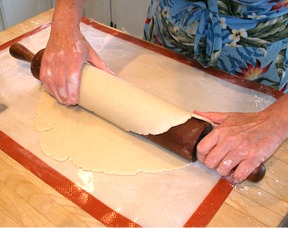
2. A. To start, begin in the center of the dough and roll outward. Stop the rolling pin as it nears 1/4 inch from the edge of the dough; don't roll over the edges as they crack or become too thin. Do not roll backwards; simply lift the rolling pin when done.
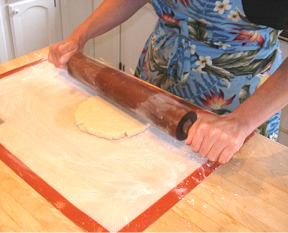
B. Lift and rotate the dough by a quarter before resuming again, tossing a light dusting of flour beneath, only if necessary. This is to ensure that it is not sticking to your rolling surface and that is is being evenly rolled. If your dough is cold enough, it should not stick.
KELLY SAYS: If your dough sticks, you may loosen it with a knife or long off-set spatula, dusting underneath with a small amount of flour.
3. Fit the rolled out pie dough into the bottom of the pie pan.
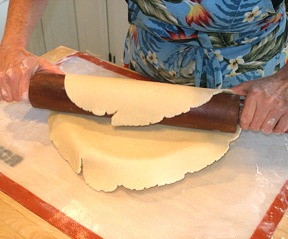
A. To transfer the dough to the pie pan, roll the dough onto the rolling pin. First place a floured rolling pin, centered on the edge away you. Roll towards you and, at the same time, pick up the edge (use a bench scraper or spatula if dough sticks to the countertop) and support the dough as you wrap it around the pin. Be careful not to press it. Keep rolling until all of the dough is rolled onto the pin.
B. Position dough over the pie pan and begin unrolling the dough, starting from one edge, lowering it into the 9-inch pie pan, Leave a 2-inch overhang on all sides
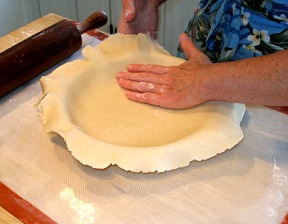
C. After getting the dough in the pan, lift up the edges of the dough and carefully ease it down into the corners of the pan. It is important to handle the dough lightly, as it will later shrink during baking if you do it too hard or stretch it.
Gently press the dough around the side of the pie pan with your fingertips so the dough adheres to the corner of the pan; do not press too hard. It is important to press lightly, as the dough will later shrink during baking if you do it too hard or stretch it.
D. Trim the excess dough around the edge of the pie with a sharp knife or with kitchen shears, which I find the easiest to use. Leave about an inch overhang for fluting purposes.
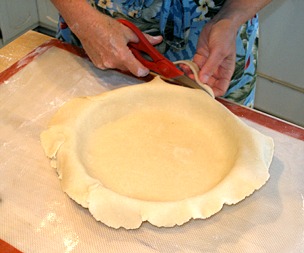
KELLY SAYS: I like to use kitchen scissors for this task.
E. After you trim the edge, place pan on a cookie sheet in the refrigerator to chill, while you prepare your peach filling.
STEP III: PREPARE THE PEACH FILLING AND FILL THE PIE PAN
INSTRUCTIONS
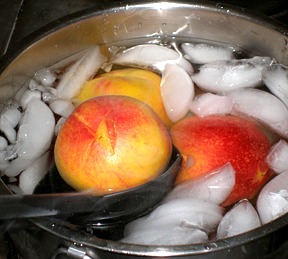
1. Blanch and Peel Peaches: You must remove the skins on the peaches before you slice them. The easiest way to do this, is by quickly plunging them in boiling water, called blanching, and, then cooling them in an ice water bath to stop the cooking.
A. Bring water to boil in large saucepan. Water should be at least 4-inches deep. Prepare an ice waterbath in a large large bowl.
B. Cut a shallow “X” in the bottom of the peaches with a paring knife. You do not need to cut deeply…just a little “X” will do.

C. Place peaches, a few at a time, into the boiling water. Have your ice water bath standing by.
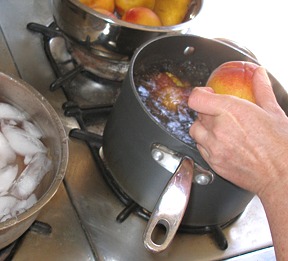
D. After a few moments in the boiling water, you will see the skin start to pull away from the peach, where you marked it with an “X”. This is when you know to remove the peach and immediately place it in the ice water bath.
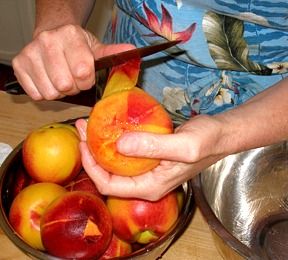
E. When all peaches are blanched and cooled. It is time to peel them. Starting at the “X”, and using a small paring knife, start removing the peach skin. Set aside.
2. Prepare the peach filling:
A. Optionally, pulverize the instant tapioca in a food processor.
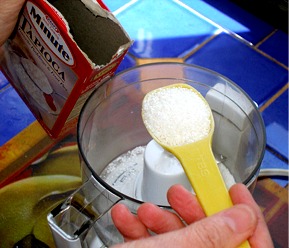
KELLY SAYS: Because I had never used tapioca as a fruit pie thickener before, I followed Sarah's suggestion to pulverize the tapioca in a mini food processor before proceeding. It works really well.
B. Place sugar, salt, tapioca, cornstarch, and cinnamon in a medium size bowl and stir with a large spoon until well combined.
KELLY SAYS: I used 3/4 cup sugar because my peaches were a little tart!
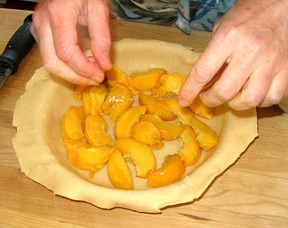
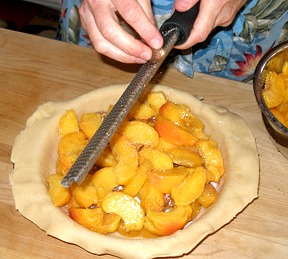
3. Fill the pie pan with sliced peaches:
A. Remove your pie pan, fitted with the bottom crust, out of the refrigerator and begin slicing the peach wedges into the pie pan. Discard the peach pit.
KELLY SAYS: You may slice all your peach wedges ahead of time, and keep them in ice water, if you prefer.
B. After you covered the pie dough with a layer of peaches in the pie pan, sprinkle them all over with 1/3 of the sugar/tapioca mixture.
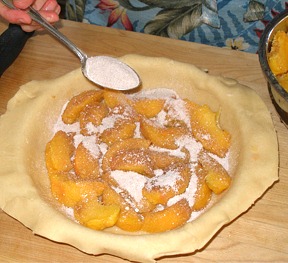
C. Repeat with another layer of peach wedges, grate some nutmeg over them, and then sprinkle with another even layer of 1/3 of of the sugar/tapioca mixture.
D. Finish with layering the pie crust with the last peach wedges, add another sprinkling/grating of fresh nutmeg and sprinkle with them evenly with the remaining 1/3 sugar/tapioca mixture.
Place in the refrigerator while you roll out the top pie dough.
STEP IV: ROLL OUT THE PIE DOUGH: TOP CRUST
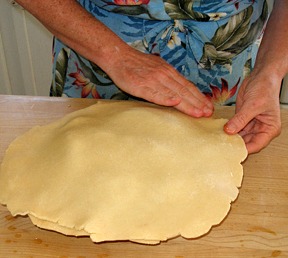
Roll out the top pie dough to about 1/8-inch thick and about 12-inches in diameter:
1. Roll out the top crust:
A. Remove your other disk of pie dough from the refrigerator. Unwrap dough and place it on your lightly floured work surface. Lightly flour your rolling pin as well.
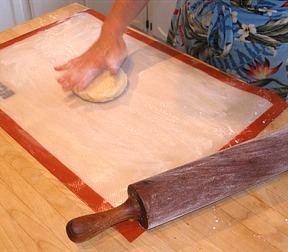
KELLY SAYS: I like to use a silpat mat to roll out my dough on.
B. If you dough is cold, give it a few whacks with the side your rolling pin to help soften it; do not hit it more than once in one place.
C. Begin rolling your dough from center to edge, being careful not to exert a lot of pressure near the edge of the dough, so it won't get too thin.

D. Turn the dough a quarter-turn each time before you roll, again. This is to ensure that it is not sticking to your rolling surface and that is is being evenly rolled. If your dough is cold enough, it should not stick.
KELLY SAYS: If your dough sticks, you may loosen it with a knife or long off-set spatula, dusting underneath with a small amount of flour.
2. Place the top rolled-out dough to the bottom part of the pie and adhere together:
A. When the top dough is about 1/8-inch thick and about 12-inches in diameter, remove your filled pie from the fridge, and lightly brush the edge of the bottom crust with water. This will help the top crust adhere to it.
B. Loosely wrap it your rolled out dough around your rolling pin.
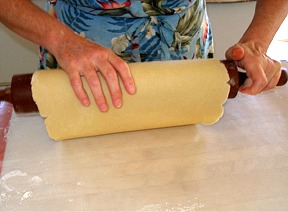
C. Starting from the edge closest to you, unroll your top crust over your pie filling.
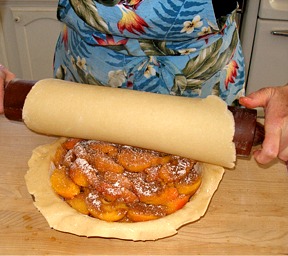
D. When the dough has been placed over the filled pie shell, lightly press the edge of your pie dough, to seal it to the lower crust.
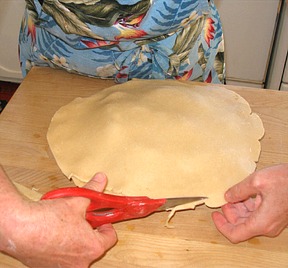
E. Trim the edges of your dough with kitchen shears. You should leave about 1 1/2″ of overhang, to insure that there is enough dough to make a pretty fluted edge.
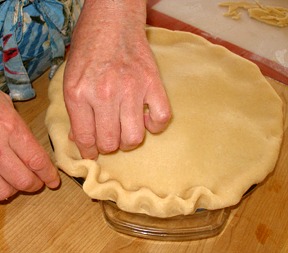
3. Crimp (Flute) the pie crust edge.
A. Fold the top crust under the bottom crust, all the way around your pie.

B. Crimp the edge.
KELLY SAYS: Every baker has their own crimping style, so to speak. I usually push the dough with my index finger and gently pinch with the index finger and thumb of my other hand.
4. Finishing touches:
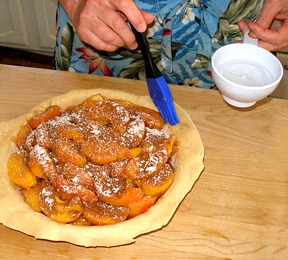
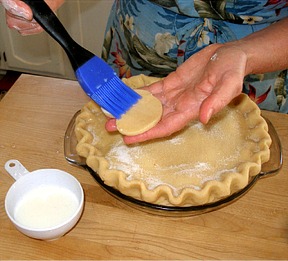
A. Brush the center of your dough, lightly, with milk and sprinkle it with granulated sugar.

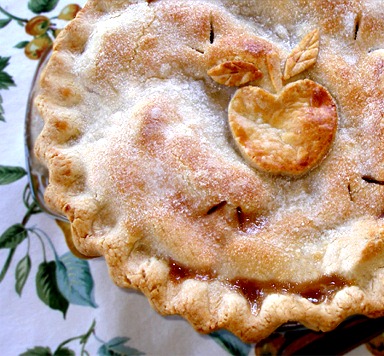
KELLY SAYS: I am a “gild the lily” type of gal, so I usually like to decorate my pie crusts. Since this is a peach pie, I cut out a little peach shape from my left-over pie dough trimmings. It ended up looking like a cross between and peach and an apple but nobody complained.
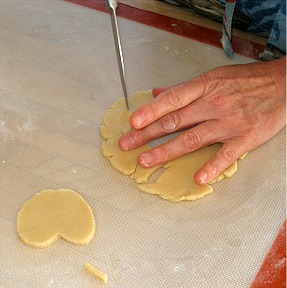
After your decorations are cut out, you must brush the back with a little milk, so it will adhere to your crust. Since the dough is already sugared, you should gently press the decorations onto the dough, to insure that they have adhered well.
Don't forget to cut steam vents in your dough!! A double crust pie is like a sealed bag . When steam starts to be created, as your pie bakes, it needs to have a way to escape. If you do not cut steam vents in your top crust, the steam will find its own way out. This is almost always a BAD thing.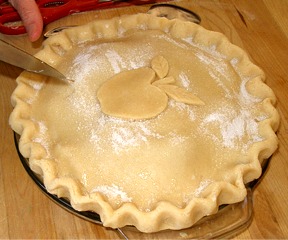
B. After pie is assembled, place it in the refrigerator and chill it for about 30 minutes.
5. Bake the pie:
A. While pie is chilling, place your oven rack to the lowest rung and preheat your oven to 450 degrees.
B. After 30 minutes, remove pie from the fridge. and place it on a silpat- or foil-lined baking sheet. Fruit pies are notorious for boiling over and you DO NOT want this mess on the bottom of your oven!
KELLY SAYS: A silpat mat makes clean-up really easy. The smell of burning pie boil-overs is awful and it will most certainly end up making all of your smoke alarms start screaming, which IS NOT fun at all.
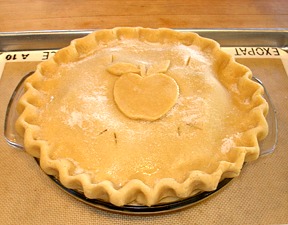
C. Place the pie in the preheated oven and immediately lower the oven temperature to 350 degrees F. Bake for 45 to 60 minutes. When pie is delightfully golden brown and you can see little bubbles of pie juices coming through your steam vents, remove your pie from the oven to cool.
SARAH SAYS: To check for doneness, a pie like this needs it's filling to boil to thicken. Be sure it's boiling for several minutes before removing it from the oven. A Pyrex pie pan makes it easy to look at the bottom and check to see if it's brown.
During baking, you may have to cover the edge of your crust with a pie shield, if it is browning too quickly.
SERVE
Let the pie cool on a wire cake rack before serving. DO NOT cut into the pie till it has cooled or the juices will run out and your slices will be messy.
KELLY SAYS: This is where you have to restrain yourself.
KELLY SAYS: I do not sugar the decorations on my pies because I like to see the contrast between the sugared crust and the decoration. See how the little peach/apple stands out?!