Kelly wanted to do a Challah tutorial, and asked me for my favorite recipe. Of course I had one!
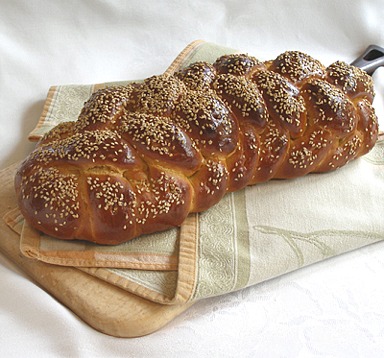
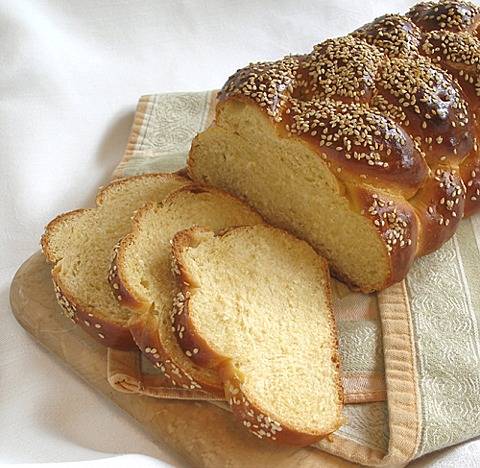
Having grown-up eating Challah bread as part of my heritage, I think I have tried and/or baked just about every recipe there is – much to my disappointment – until now! There are tons of recipes available, but so few had detailed steps to get the recipe right! And, so often the end result was dry and not rich enough with egg yolks, the braiding was hard to do, the baked color never turned a deep mahogany, or the braids rose too much during baking, revealing too much white bread beneath the dark crust, ruining the overall look. Many loaves became misshapen as a result – when they should have remained football-shaped. I am very particular about my Challah because my mother, an exceptional baker, used to make what I think was the very best, and I can remember it vividly! From her, I knew that making a great Challah bread takes a great recipe and a lot of techniques to get right!
My mother had what was the perfect recipe, and of course I failed to write it down before I had a chance – it's been over 25 years now. I baked so many at her side – during which she taught me how to make the perfect Challah – learning to her was serious business. She was very precise with her instructions, except she made the recipe by heart, like so many friends of hers. My mother's used a sourdough starter, instead of cake yeast (dehydrated was not available, yet) – all challah was made from a starter before packaged yeast was invented – and it set her bread apart – it was exceptionally moist, flavorful, easy to braid, kept well, and had a wonderful tender texture. I now wished I had urged her to slow down so I could record the recipe – but at that age, I thought my mom would be live for a long time and be around when I needed her, so I failed to do so. Famous last words, right? Unfortunately, she passed away, and the recipe was lost, before I could start my own family, when Challah became important to me. But, I did remember her techniques.
So, I had to develop my own Challah recipe, which is actually a brioche – with more egg and less liquid and fat.
I kept on doing research and finally found a Challah recipe made from a sourdough starter from Maggie Glezer's book, A Blessing of Bread, published in 2000 – it worked beautifully, but it was time consuming. In my own recipe writing, I liked the idea of a sponge starter, which I used in my Whole Grain Wheat Bread From a Starter by Sarah Phillips, published in my Baking 9-1-1 Book, in 2003; the starter helped tone down the normally harsh flavor-edge from my whole wheat flour bread recipe – and evoked varied and more subtle flavor notes, with a more tender and moist texture. I tried a similar starter with my Challah recipe, and found great results.
Later, in 2008, Maggie Glezer wrote a Challah recipe with a similar quick starter technique, which I adapted, altering her ingredients and adding in my own techniques to get the best results I desire in a classic Challah bread – In all, I fixed many of the problems that go wrong in a classic recipe, making Challah difficult to master. In addition, I created a new and better way to make dough snakes for the braids, often an issue, and a braid weaving coded color chart tutorial to help you with the task of braiding six strands, which can get really confusing. Kelly brings the whole tutorial to life with her stunning photos and baking skills – I swear – it seems as though she has been baking Challah all her life! She does a stunning job at braiding the loaf, too – which the starter helps make the job easier – important to the overall look and texture! Besides, the deep mahogany color to her crust is perfect!
BREAD RECIPE HELP
INGREDIENTS
Sponge:
1/4 cup warm water, 120 – 130 degrees F measured with an Instant Read Thermometer
2 teaspoons instant active dry yeast
1/2 cup unbleached all purpose flour; spoon into measuring cup and level to rim
2 large eggs
3 large egg yolks: I prefer my bread rich with egg yolks – the lecithin in them adds moistness
1/4 cup vegetable oil
1/4 cup mild honey; extends shelf life and adds moistness
1 1/2 teaspoons salt
Bread:
3 cups unbleached all-purpose flour or more as needed; spoon into measuring cup and level to rim
Glaze:
1 egg, lightly beaten
Sesame or poppy seeds for sprinkling (optional)
INSTRUCTIONS
STEP I: MAKE THE SPONGE STARTER
SARAH SAYS: Gluten begins to form as soon as flour is moistened and stirred.
Indirect dough, the other type, is built in two or more stages, utilizing dough fermented in advance and added to other dough as part of the building process.
The pre-fermented dough can be called a sponge (wet preferment, whether made with commercial or wild yeast) or sourdough (firm starter leavened by wild yeast).
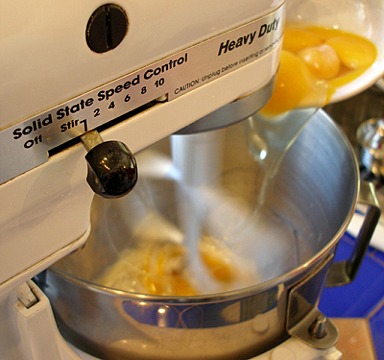
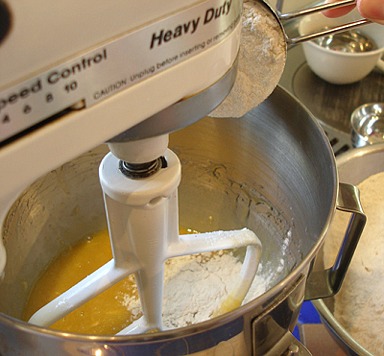
1. In the bowl of a stand mixer fitted with a paddle attachment, mix the yeast with 1/2 cup flour on low.

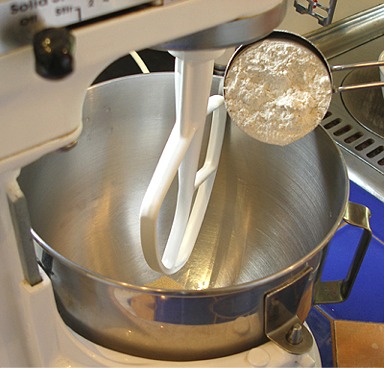
2. Add the warm water, mix on low so the yeast dissolves and is incorporated.
3. Cover the bowl with a dish towel and let the mixture sit until it starts to puff up, about 15 to 20 minutes.
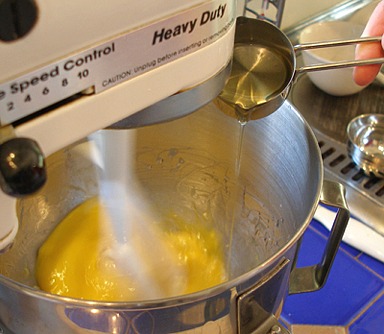
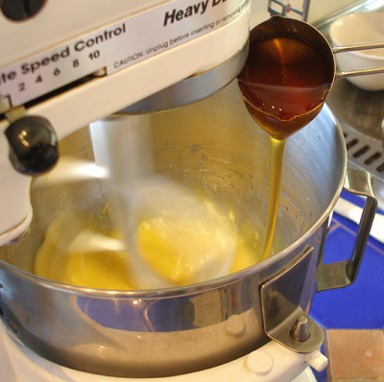
4. With the mixer on low, one at a time, add the eggs, egg yolks, oil, honey, and salt. At the end, mix until well combined.
The sponge will be lumpy; leave as is.

STEP II: MAKE THE BREAD DOUGH
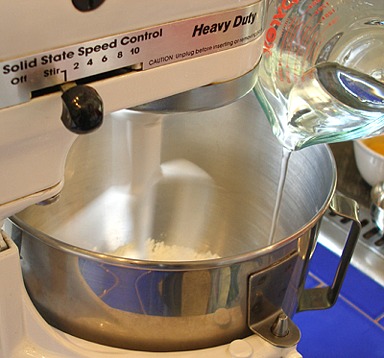
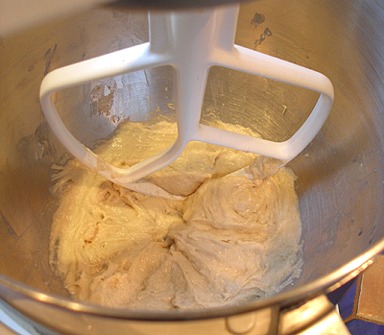
1. Start to slowly add 3 cups flour with the mixer on low.
NOTE: Change to the dough hook when the dough becomes stiffer.
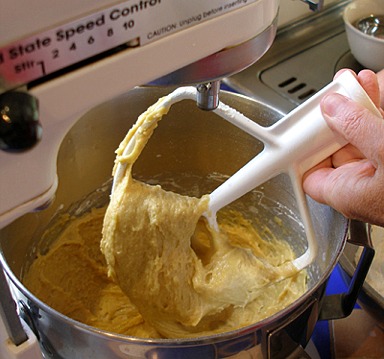

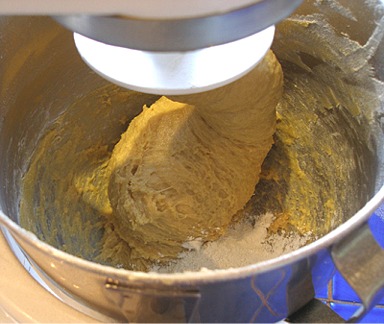
2. Mix the dough until it is on the firm side. It will still be slightly sticky, but not wet or loose, as you can see in the photo.
STEP III: KNEAD THE DOUGH
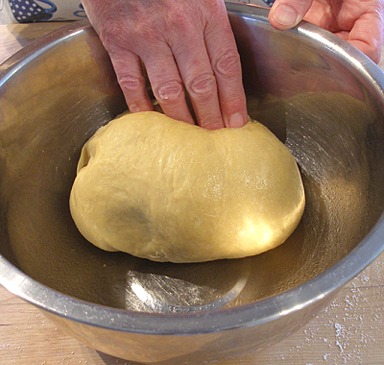
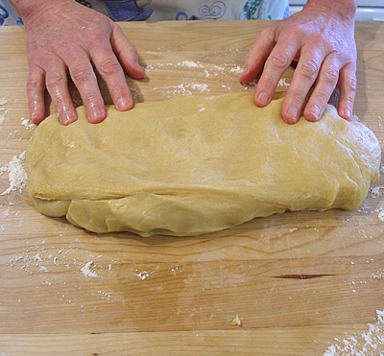
1. Turn the dough out onto a lightly floured work surface. It will feel stiff and firm, though, and be hard to knead.
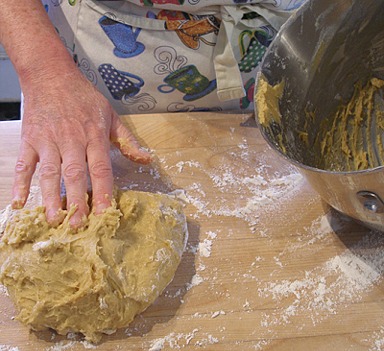
Do not add a lot of flour to the work surface at one time.
Knead until fairly smooth, about 2 minutes, adding a light coating of flour as you go.
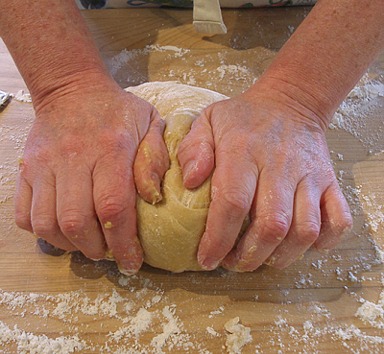
The final dough should MODERATELY STIFF and slightly tacky, but not be sticky.
Gently shape the dough into a ball.
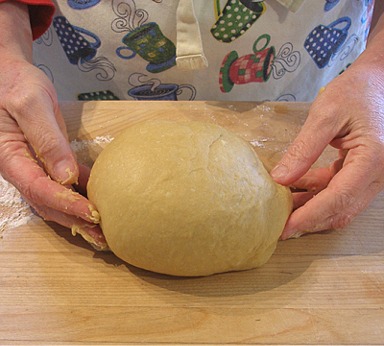
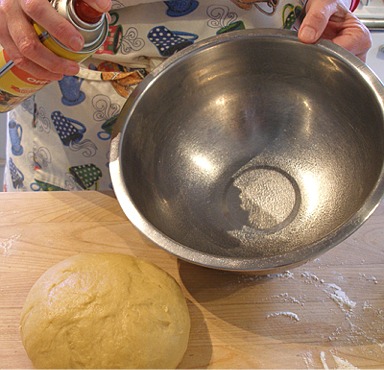
STEP IV: RISE OR PROOF THE DOUGH
1. Lightly oil a large mixing bowl, put the kneaded dough ball into the bowl and then turn it all over, so the entire surface is oiled.
Cover bowl tightly with plastic wrap.
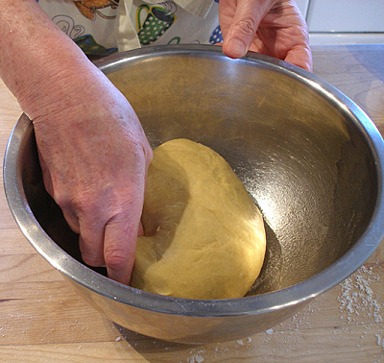
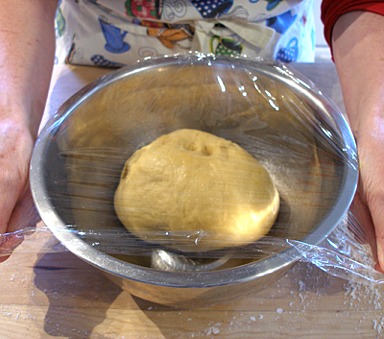
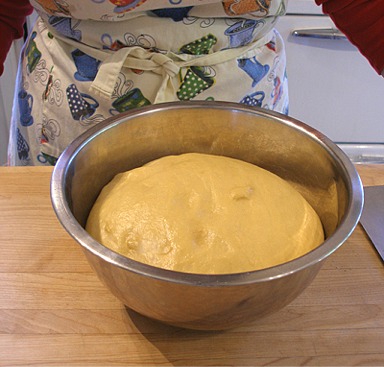
2. Let it rise in a warm place until ALMOST doubled in bulk and very soft to the touch, about 2 hours, depending on the room's temperature.
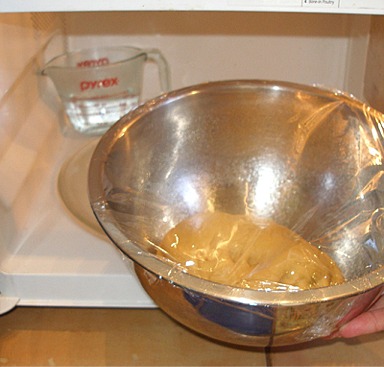
SARAH SAYS: You can use my microwave proofer to speed the process. It works really well.
SARAH'S MICROWAVE BREAD PROOFER
I use what I call Sarah's Microwave Bread Proofer, I invented and wrote about in my Baking 9-1-1 Book, Simon and Schuster, 2003. It is my rising place of choice because it works well and fast every time, and it includes both warmth AND moisture. Wetter dough is more tolerant (ability to be handled without breaking down) and extensible (stretchable) while drier dough is more elastic (snaps back) and less tolerant) and the temperature of the dough (warmer dough is more extensible but loses some of its tolerance).
SARAH SAYS: Professional bakers use atmosphere-controlled “proof boxes” to keep the dough at the right temperature and humidity for the best possible rise and a moister bread texture. I devised a way to have a proof box in my own home, without the great expense: the microwave proofer.
Here's how to create a Microwave Proofer in your home:
In the microwave, bring 1-inch or a cup of water in a heat-proof glass to a boil on HIGH.
Turn off the microwave, place the dough in along with the steaming water, and close the door. The inside of the box will stay warm for 35 to 45 minutes; a portion of the time needed to raise dough for a loaf of bread (provided you don't open the door too often.)
Check on the rise and the warmth of the microwave after 35 minutes by opening the door a crack. If the atmosphere isn't noticeably warm, remove the dough and temporarily put it in a warm place while you microwave the water again. Replenish the water before you do, if necessary. Return the dough to the microwave and close the door.
STEP V: BRAID THE DOUGH
SARAH SAYS: Traditional punching down is done a different way when using Instant Active Dry Yeast – it's called degassing. After the rising period, the dough is divided and shaped.
Also, the action of flattening dough by gently pressing down on it, does not activate the gluten, makes it stretchy and easier to braid.
Degass the dough:
1. Turn the dough out onto a lightly floured work surface and sprinkle a little more flour over it.
2. Gently stretch and as you do, the dough will flatten, but take care not to punch it down and cause it to lose air bubbles.
Form six dough strands – the rolling and rolling up the strands technique:
Instead of forming dough snakes for the braids, this technique ensures a more compact strand, a tighter braid, and as a result, as better bread that
keeps its football shape during baking. The strands also do not puff up as much, preventing the white part of the bread
peaking from beneath the braid, as it rises (ovenspring) and bakes, in sharp color contrast to the dark brown crust.
It is similar to a technique used when making filled bread.
1. Cut the dough into six equal pieces. Set them aside and cover loosely with plastic wrap so the bread dough's surface will not dry.
SARAH SAYS: You can use a kitchen scale to make sure every dough piece is even in weight.
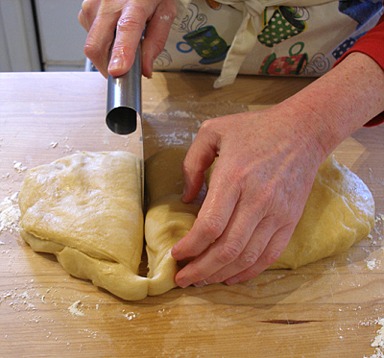
2. Brush the flour off the work surface. Have a small bowl of room temperature tap water handy.
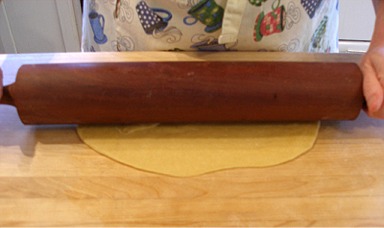
3. Without using ANY flour, roll a piece of dough with a rolling pin into a very thin sheet, between 1/8 and 1/4-inch thick.
Don't worry about making a rectangle; an amoeba-type shape is fine.
The dough may stick to the work surface; if it does, just nudge it gently with a dough scraper.
4. Tightly roll up the sheet like a carpet to form a strand.
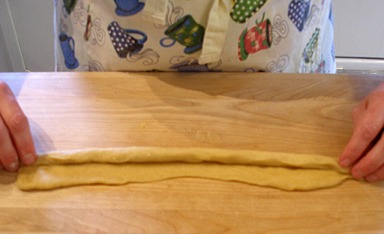
5. Roll the strand back and forth between your hands until it's thin, very even, snake shape, about and 12 to 15-inches long.
At the ends of the strand, angle the outer edge of your hands into the work surface as you're rolling to make the ends pointy and the strand thicker in the middle.
(This will help you get a football-shaped loaf).
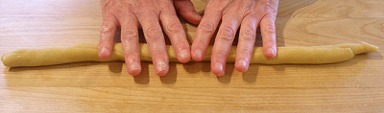
NOTE: The strand needs to grip the work surface slightly during this rolling; the grab will help as you roll. If the strand is too slick, very lightly dampen it with
water to help it grip the work surface better.
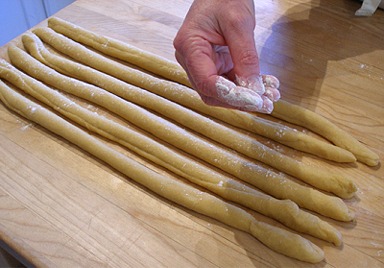
6. Set the finished strand aside and cover loosely with plastic wrap.
7. Repeat the rolling out, rolling up, and elongating steps with the remaining five pieces of dough, rolling them out to the same length.
Cover loosely with plastic wrap
Pinch the strands together:
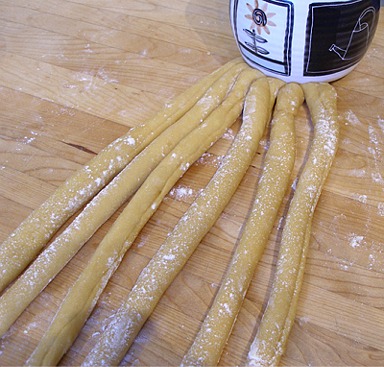
1. Lightly sprinkle all the strands with flour to prevent them from sticking to one another during braiding. Arrange the strands parallel to one another.
2. At one end, gather and pinch the strands very tightly together.
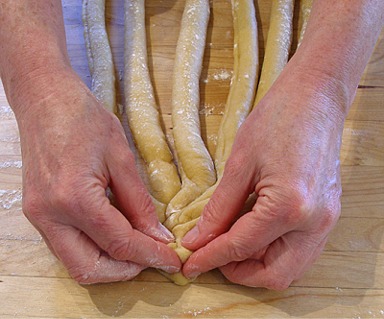
3. Weigh down the end with a heavy canister to keep the braid from moving and to leave your hands free to braid.
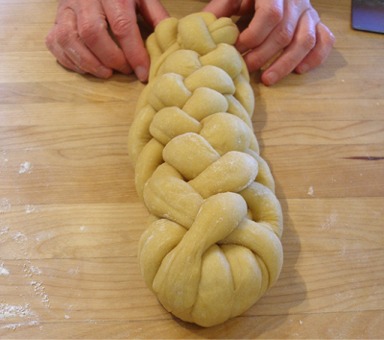
Braid the strands:
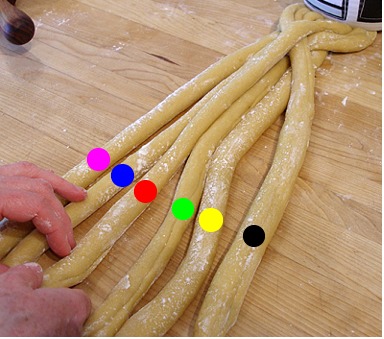
SARAH SAYS: I created a braid weaving coded color chart to help you with the task of braiding six strands, which can get really confusing.
I indicated colored dots on the strands in the photos so you can see them more readily as Kelly braids the loaf and then, continued
with a chart.
On the actual dough, I mark each strand so it is easy to follow the colors on the chart in the tutorial.
Gently lay each strand on top of one another; do not squish or stretch a strand as you braid.
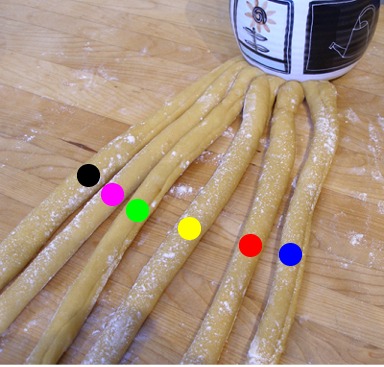
FIRST BRAID SEQUENCE:
Start dot colors lined up as: black, pink, green, yellow, red, blue
1. Step one:
Red dot: Move the second-to-the-right strand to the far-left position.
After the move:
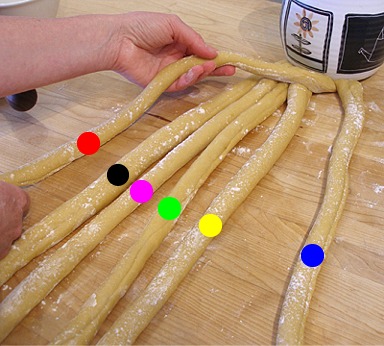
2. Steps two and three:
Green and yellow dots: Move them over to the right to make room.
Blue dot: Move the far-right blue strand left over the green and yellow strands, to the new fourth position.
After the moves:
3. Step four:
Black dot: Move the new second-to-the-left strand over to the far right position.
After the move:
4. Step five:
Red dot: Move the far-left strand (the same strand you moved in step 1) over two strands to the right to the new third position.
After the move:
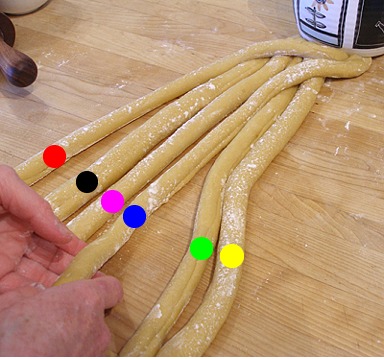
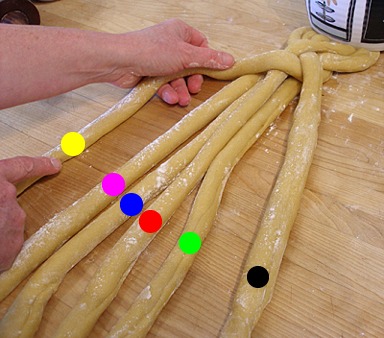
SECOND BRAID SEQUENCE:
Start dot colors lined up as: pink, blue, red, green, yellow, black
1. Step one:
Yellow dot: After the first braid sequence, whatever color ends up as the second-to-the-right strand, move it to the far-left position.
After the move:
2. Steps two and three:
Red and green dots: Move them over to the right to make room.
Black dot: Move the far-right strand left over the red and green strands, to the new fourth position.
After the moves:

3. Step four:
Pink dot: Move the second-to-the-left strand over to the far right position.
After the move:

4. Step five:
Yellow dot: Move the far-left strand (the same strand you moved in step 1) over two strands to the right to the new third position.
After the move:

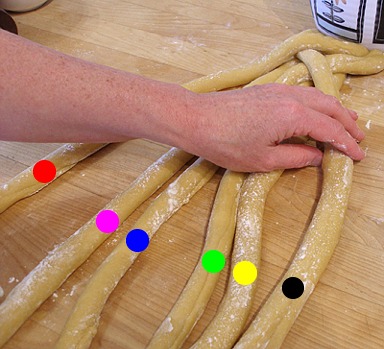
THIRD BRAID SEQUENCE:
Start dot colors lined up as: blue, black, yellow, red, green, pink
1. Step one:
Green dot: After the first braid sequence, whatever color ends up as the second-to-the-right strand, move it to the far-left position.
After the move:

2. Steps two and three:
Yellow and red dots: Move them over to the right to make room.
Pink dot: Move the far-right pink strand left over the yellow and red strands, to the new fourth position.
After the moves:

3. Step four:
Blue dot: Move the second-to-the-left strand over to the far right position.
After the move:

4. Step five:
Green dot: Move the far-left strand (the same strand you moved in step 1) over two strands to the right to the new third position.
After the move:

FOURTH BRAID SEQUENCE:
Start dot colors lined up as: black, pink, green, yellow, red, blue
Repeat First Braid Sequence.
FIFTH BRAID SEQUENCE:
Start dot colors lined up as: pink, blue, red, green, yellow, black
Repeat Second Braid Sequence
SIXTH BRAID SEQUENCE:
Start dot colors lined up as: blue, black, yellow, red, green, pink
Repeat Third Braid Sequence
SEVENTH BRAID SEQUENCE, EIGHTH BRAID SEQUENCE, ETC: Repeat First Braid Sequence, Repeat Second Braid Sequence, Repeat Third Braid Sequence , etc
At the end of braiding:
1. Braid the final ends, pinch ends to seal.
Moisten the pinched ends with a little bit of water and tuck them under the bread by lightly tapping each end of the loaf with your palms.
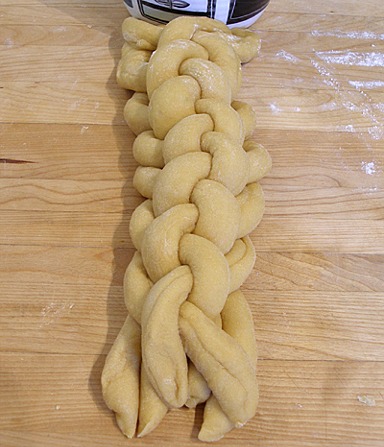
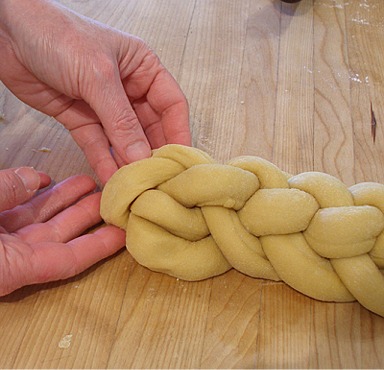
2. Repeat at the top of the braid, where it was originally weighed down.
STEP VI: LET THE SHAPED DOUGH RISE
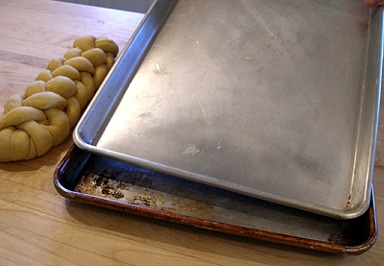
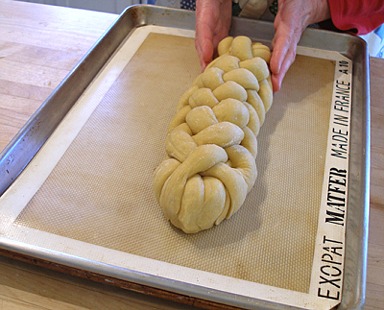
1. Line a baking sheet with parchment or a silpat, nonstick mat.
Stack two sheets together to keep the bottom of the bread from overbrowning during baking.
2. Grease the top of the loaf lightly with cooking spray or oil.
Cover with plastic wrap and place a smooth cotton kitchen towel over plastic wrap.
3. Let the loaf rise until doubled in bulk and the loaf remains indented when lightly pressed. This will take about 45 minutes to one hour, depending on room temperature.
If the room is cool, it may take up to two hours.
SARAH SAYS: If in doubt, let the dough proof more rather than less. Braided challah should be fully proofed so it does not rise much after going into the oven revealing a pale portion of the dough
that the glaze did not reach.
STEP VII: PREHEAT THE OVEN AND BAKE THE CHALLAH LOAF
1. 30 minutes before baking, position an oven rack in the lower third of the oven and preheat the oven to 325 degrees F.
2 Right before baking, brush the dough with the beaten egg, going well into the crevices of the braid.
SARAH SAYS: I like to glaze the loaf AFTER rising, preventing fewer pale unglazed parts showing.
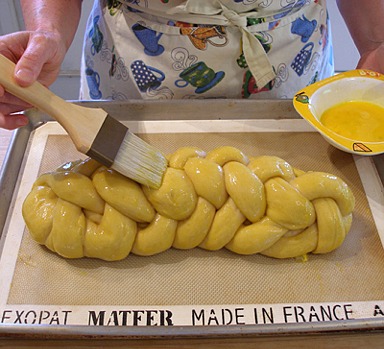
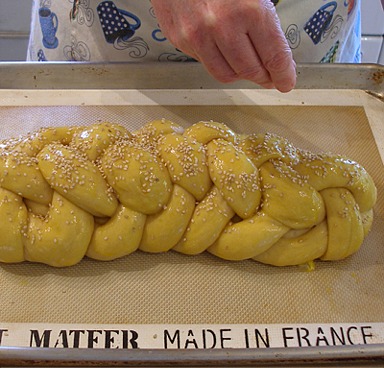
3. Sprinkle with sesame seeds or poppy seeds, if using.
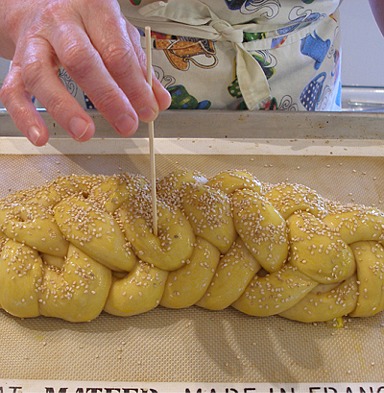
4. With a thin wooden skewer, poke the bread deeply all over (the holes will prevent air pockets and help the bread keep its shape during baking.
SARAH SAYS: This is a very important step!
5. Bake for a total of 35 minutes: Bake for 20 minutes. Rotate the challah half way through baking and bake until the bread is a dark, burnished brown, about another 15 minutes.
The loaf should sound hollow when lightly tapped.
An instant read thermometer inserted into the center, through the bottom of the bread, will read about 180 degrees F.
NOTE: If the challah is browning too rapidly cover it loosely with foil and let it finish baking. Don't remove the loaf too soon, as you'll risk underbaking.
6. Remove bread from baking sheet and cool completely on wire rack before slicing.
Take care because the bread is delicate.
STORAGE
Soft breads, such as Challah, are best stored, once cooled, in an airtight plastic bag.
Bread may be frozen for up to 3 months. Wrap in aluminum foil, then place bread in an airtight bag.
Thaw for 1 hour at room temperature before serving.