

Photo by sugarpie, Premium Member © Sarah Phillips
This cake is perfect for making Petits Fours with; it has a tight crumb and slices nicely, yet is moist and the almond paste gives it the perfect almond flavor. Petit Fours are small cakes, cut in squares or rectangles from a filled pound or sponge cake. They are covered first with a layer of marzipan and then dipped in poured fondant. Petits Fours are finished with a simple decoration. Use for Petits Fours ONLY — doesn't work well as a cake.
CAKE RECIPE HELP
SUGARPIE, Premium Member, Says: “Anyone who loves almond flavored anything will like this recipe. When mixing the batter you can actually smell the almonds. The final step and the most fun part was dressing them up. I used white chocolate and violet tinted marzipan to decorate.
I tested a final piece for taste. In spite of the sugary fondant on top, a few bites of the dessert did not feel excessively sugary at all. In fact the apricot glaze and strawberry jam taste tangy/tart when you bite into the cake, thus balancing out the sugary fondant and giving you a well rounded taste. The almond flavor is intense but not overpowering; the cake is light and very moist from the filling and the apricot glaze.”
INGREDIENTS
8 ounces almond paste, room temperature; homemade or store bought
3/4 cup sugar
1 1/2 sticks (12 tablespoons) unsalted butter; softened
4 large eggs
1/2 cup bleached cake flour; spoon into measuring cup and level to rim
1/2 cup bread flour; spoon into measuring cup and level to rim
—-or optionally, instead of 1 cup total combined cake and bread flour, use 3/4 cup all-purpose and 1/4 cup cake flour; spoon into measuring cup and level to rim
1/4 teaspoon salt
NOTE: Sugarpie used the combination of 1/2 cup cake flour and 1/2 cup bread flour
SARAH SAYS: Almond paste is basically a very dense and thick mass of ground almonds and sugar and has a very strong almond smell and flavor. It is denser than marzipan and slightly coarser in texture. It is easy to handle as far as getting it out of the can but it is a very sugary substance and so is quite sticky.
SUGARPIE SAYS: My local grocery store stocks almond paste in cans and in the form of logs wrapped in protective covering. I chose the can but I would not recommend it. The can I bought must have been sitting on the shelf for a while so there were two rust spots on the paste where it met the seam of the can. The logs are wrapped in non-reactive material so this should not be a problem. So I had to return the cans and get logs.
INGREDIENTS FOR ASSEMBLING AND DIPPING
Filling: 1/3 cup Raspberry Preserves or Jam Glaze, warmed, so it becomes easier to spread. Glucose syrup can be used, instead. Any other filling will do, but be sure to use a thin coating.
Covering: 1 pound marzipan, homemade or store boiught
Glaze: 1 to 3/4 cups apricot preserves or jam, warmed and strained
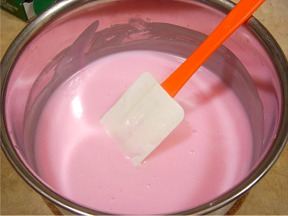
Dipping: 1 recipe Poured Fondant for Cakes and Cookies (flavored with 1/2 teaspoon almond extract), warmed. Instead, you can use poured fondant icing purchased in dried form from www.sugarcraft.com or make your own and color it with any color that you like. Pink, pale blue, white and yellow are most common. Alternately, you could also use tempered chocolate to dip your petit four in, but the classical version does use fondant.
Decorating: Royal icing, chocolate ganache, buttercream, and any other edible items can also be used to decorate the tops. Or, decorate with pistachio nuts, candied violets, or glacé cherries.
CAKE INSTRUCTIONS
1. Position an oven shelf in the middle of the oven and preheat the oven 325 degrees F. Prepare a 12- x 18-inch sheet pan by spraying with nonstick vegetable oil spray and lining the bottom with parchment paper and spray, again.
Combine the flours and salt in a small mixing bowl and set aside.
2. Soften the almond paste by beating it for several minutes with a stand mixer fitted with a paddle attachment.
SUGARPIE SAYS: The first step of the recipe says the almond paste needs to be softened for several minutes. So I ran my 250 watt KA, fitted with a paddle attachment, for 3 minutes on medium. Don’t expect the paste to soften up like creamed butter. Like the recipe says this process just breaks it up. There was no discernible difference in consistency though.
3. Lightly beat together the eggs in a medium size mixing bowl. Then add 2 tablespoons (approximately half) of eggs to the beaten almond paste and mix on medium; this will help moisten the paste. Add all of the sugar and mix on medium until until smooth.
4. With the mixer on medium, add the butter one tablespoon at a time and cream until very light, about 7 minutes.
Over the course of the next 5 minutes slowly add the remainder of the lightly beaten eggs, a little at a time and allow them to incorporate with the mixer on medium, before adding the next amount.
SUGARPIE SAYS: After I added a small amount of the lightly beaten eggs. I mixed it on medium for 1 minute creating a highly viscous mass. With the mixer on medium, I slowly added the sugar at the side of the bowl, and beat it for about 2 minutes. I added the butter, 1 tablespoon at a time, with the mixer on medium, and beat for 7 minutes. The batter turns a light ivory color. Be sure to scrap the bowl down every now and then. Next, with the mixer on low, I slowly added the rest of the eggs, drizzled at the side of the bowl, over a 5 minute time period. After the last addition of eggs, I mixed together the mixture for 30 seconds on medium.
5. Remove the mixing bowl from the mixer, and with a large rubber spatula, fold the flour mixture into the batter.
SUGARPIE SAYS: I initially wanted to stir in the flour by hand, but just used the lowest setting on my KA (mixer) for this. Then stopped the mixer and scrapped down the bowl. Finally, I let the mixer run on medium for a few seconds to incorporate any stray flour.
6. Spread the batter evenly in the prepared pan. Make sure the batter is smooth so it bakes evenly, taking care to distribute it into the corners of the pan.
7. Bake cake until it is firm, about 20 to 22 minutes. If you insert a toothpick in the cake and remove it, there should be a few moist crumbs attached, but not batter. The cake will not rise very much.
SUGARPIE SAYS: Once the batter is spread in the pan, it creates a thin layer. (When done) the cake was springy to the touch and the batter did not have a lot of height.
8. Let sheet pans sit on wire cake racks until cool enough to handle, then invert each pan and carefully peel off the parchment paper. Let cool.
SUGARPIE SAYS: I had to cool the pan on two cooling racks joined together. Make sure you grease/oil the racks or the crust of the cake will stick to it as it is very tender and moist. Do this with any surface you set the cake on.
ASSEMBLE PETITS FOURS
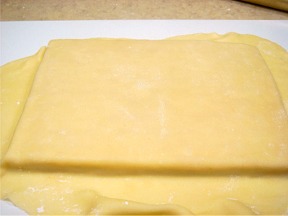
1. Cut the cooled sheet cake in half. On one half of the sheet cake, spread with a very thin layer of slightly warmed and strained apricot preserves or jam.
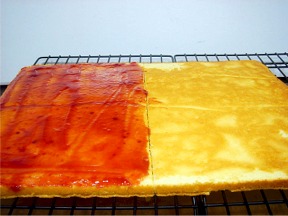
On the other half of the cake layer, do not spread with filling.
SUGARPIE SAYS: I used seedless strawberry jam. I proceeded to spread about 1/3 cup onto one half of the cake. I had to scrape some of it off as it seemed excessive, but it really depends on individual preferences. I didn’'t heat or strain the jam as it was easy to spread and seedless.
2. Top with the second half of the cake, making sure that the two layers are even.
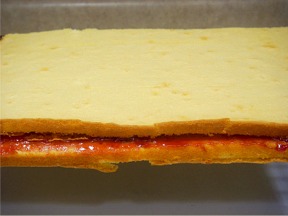
SUGARPIE SAYS: I carefully laid the other half onto the first one using the second cooling rack. Be careful during this step as the cake is not very thick and it is very tender; you could easily ruin it and end up with broken pieces.
3. Briefly heat the apricot preserves in a heavy-bottomed pan under medium heat or in a microwave on medium- high, until boiling. Then, rub mixture through a sieve to remove any lumps or seeds. Cover and set aside. You will need it warm for the recipe. If it gets too cold and solid, briefly reheat again.
4. Roll out marzipan to about 1/16-inch. Dust the countertop and the rolling pin frequently with sifted powdered sugar or cornstarch during rolling to prevent it from sticking onto the countertop. It's important to do this to avoid tearing the marzipan and ensure a clean finished surface.
SUGARPIE SAYS: Next I measured a pound of marzipan, kneaded it a bit and proceeded to roll it out. I used cornstarch liberally to roll it out to 1/16 of an inch. I used the back of the sheet pan to roll out the marzipan. I then used the pan to flip the marzipan onto the cake. My rolling pin rolls independent of the handles so it was tough getting the marzipan onto it.
5. With a pastry brush, apply WARM (not hot) apricot glaze onto the surface of the prepared cake to make sure that the marzipan will stick to its surface. Do not let it set.
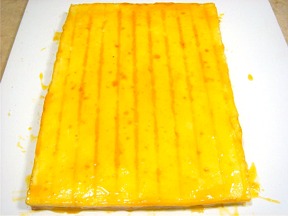
SUGARPIE SAYS: Once the cake is trimmed, I prepared the apricot glaze using apricot preserves. I heated 1 cup of preserves until boiling and strained it into a microwaveable bowl. The glaze went on the cake with a tiny rubber spatula. I don’t like brushes since they create striations in the glaze which can show through the marzipan.
6. Immediately, pick up the rolled marzipan by rolling it around rolling pin, well dusted with powdered sugar or cornstarch to prevent tearing. Roll the marzipan onto the prepared cake. Do not press it around the edges; it will be trimmed so it is even with the top edges. Pat the surface of the marzipan using the palm of your hands to eliminate air bubbles from being trapped in between the cake and the marzipan.
7. Trim off 1/4-inch off the bottom edges of the cake, with a sharp knife, so that it will have a nice and straight finish.
SUGARPIE SAYS: Once the marzipan was on the cake, I patted it down on the top and sides. I then trimmed the excess using a sharp knife. (You can also use a pizza cutter.)
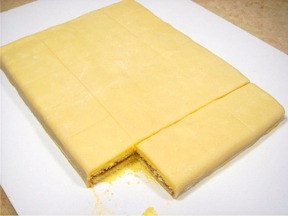
8. Cut into individual cake pieces: Divide the long side into six pieces and the shorter side into four pieces. Cut the cake with a knife using the marks as a guideline. For a nice and clean cut, dip the knife in hot water and dry before slicing.
SUGARPIE SAYS: Then came the cutting part; I boiled a tall glass of water and used it to warm the knife that I used. Cutting was a breeze with a warm knife. I set the pieces on a surface thoroughly dusted with cornstarch.
The resultant pieces are not very petite going by the instructions in the recipe. The recipe says short side should be cut into 4 rows while the long side should be cut into 6 rows. I ended up with not very petite looking petite fours – they are the size of modest brownies. So cut smaller if you prefer. You could even start off with three layers and create three layered, taller petits fours.
DIP INDIVIDUAL CAKE PIECES AND DECORATE:
Each square will be dipped individually with poured fondant. Decorations can be applied with parchment cones filled with melted white chocolate or royal icing. The cone is widely used in decorative work. It is inexpensive, easy to make, and it can simply be discarded after use. It is especially valuable if you are working with different colors; simply make a separate cone for each color icing.
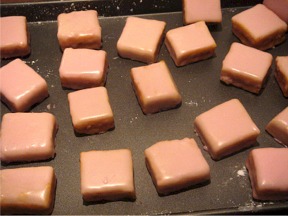
1. Using the fork, pick up one of the petits fours. Using a spoon, pour the warmed fondant glaze over it until fully covered.
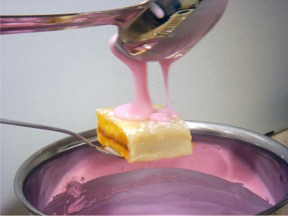
SUGARPIE SAYS: To glaze, I used a long fork on which I rested a petite four, marzipan side up. I didn’t want to pierce the cake with the fork as I didn’t want to damage the delicate structure. Make sure the petits four rests on a long fork or you will find that it wobbles while you glaze it. Once the fondant goes on, it covers the marzipan covered sides beautifully. The sides that are only covered in apricot glaze look a little bumpy and show through the translucent fondant. The only solution to this would be to individually wrap each cake square in marzipan like a wrapper. I would definitely do that the next time I make these. That would also give you a nice bottom finish.
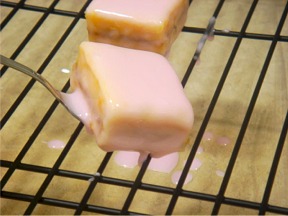
The petits fours have a bare base, except of course for the apricot glaze. It was difficult to pour fondant on the bottom and not have the petite four taking a dive into the bowl of fondant. Dipping the bottom in the fondant caused a few bits of crumb and apricot glaze to fall into the fondant. So, I mostly left the bottoms bare.
2. Now slide the bottom of the petits four over the side of the bowl to remove any excess fondant. Now slide the dipped petit four onto the wire rack.
3. Let the petits fours icing set and dry.
SUGARPIE SAYS: After the fondant, the petits fours dry pretty quickly.
4. Repeat Steps #1 and 2, for a double coating. Let dry on a wire cake rack.
SUGARPIE SAYS: I double coated a couple to see if it completely hides the marzipan-less sides, but it didn’t show much improvement.
5. The tops can only be decorated once the fondant glaze forms a crust and dries. This allows the decor to sit on top of the glaze, not sinking into it.
SUGARPIE SAYS: The final step and the most fun part was dressing them up. I used white chocolate and violet tinted marzipan to decorate.
STORAGE
Store in an airtight container, layered between strips of wax paper, for up to 3 weeks. The petits fours freeze well, preferably before slicing, layered between strips of wax paper, for a month or more. Thaw in its airtight container at room temperature. These improve with age.