

Photo and cookies by msbreez © Sarah Phillips
msbreez is so excited to be able to present this lesson for you, perfect for Valentine's Day! She emailed me her information and fabulous cookie photos with an attached note: “I have been having so much fun with my friend's camera. It's so great to work with the right equipment!” And, I whole-heartedly agree!
msbreez presents two types of stained glass heart sugar cookies, also referred to as Church Window or Cathedral Window Cookies, which she calls Heart Window Cookies and Conversation Hearts. Both cookies have open spaces, the Heart Window Cookie spaces are filled with crushed hard candy and the Coversation Heart spaces are filled in with melted gummi bears. When baked, both heart cookies give the appearance of “stained glass” and are quite colorful and beautiful, making a perfect and loving delicious gift to give to your sweetheart for Valentine's Day!
I truly think you will enjoy msbreez's heart-felt lesson!
COOKIE RECIPE HELP
EQUIPMENT NEEDED FOR BOTH PROJECTS
Heart Cookie Cutters 3-4 sizes
Mini alphabet cookie cutters
Parchment paper or silpat (silicone) mats
Sharp knife
Resealeble plastic sandwich bags
Toothpicks
HEART WINDOW COOKIES

Sugar cookie dough shapes are cut-out and then filled in with colorful crushed hard candy”. This is perfect for sugar cookies made with larger cut out spaces. The dough is then baked until the cookies are lightly browned and the candy is melted, so they look like stained glass windows when cooled.
INGREDIENTS
1 recipe Sarah's Creative Cut-out Sugar Cookie Dough, any flavor
MSBREEZ SAYS: For this lesson, I used vanilla cookie dough, the basic flavor
30-40 hard candies; Use to fill openings in the cookies.
MSBREEZ SAYS: For this lesson, I used Jolly Ranchers Brand, but you can use Lifesaver's Brand or clear colored lollipops
INSTRUCTIONS
1. Refrigerate sugar cookie dough according to Step #4 in the Sarah's Creative Cut-out Sugar Cookie Dough.
Meanwhile, separate hard candies by color and place them in individual plastic bags. Seal and place a bag on a wooden cutting board, and then crush candy with a wooden mallet or the side of a rolling pin.

3. Roll out one dough disk onto parchment paper, making sure the dough is about 1/4-inch thick.
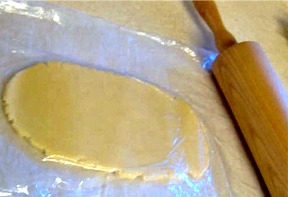
MSBREEZ SAYS: You can also roll the dough on a silicone mat!
If the dough is too cold and hard to be able to roll easily, let it sit for about 5 to 10 minutes at room temperature to warm. Try rolling it, again.
4. Cut large heart cookies, then remove excess dough around them.
MSBREEZ SAYS: Carefully move the large hearts on the parchment paper, so there is about 1-2-inches between them so they bake properly.
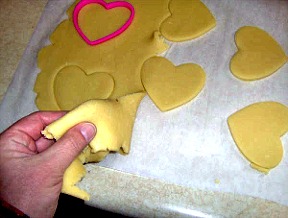
5. To create spaces within the cut-out cookie in order to fill with crushed candy, you have all kinds of design options. Here are photos of several that I have thought up! You can certainly be creative and think up your own unique designs!


Here are some examples:
A. Optionally cut a size smaller into the large heart, leaving a thin border but don’t remove the dough yet. Finally, cut a tiny heart into the second cut you made.
Now remove the middle size heart dough from the large and tiny heart.
MSBREEZ SAYS: Using a smaller cookie cutter or a knife, cut shapes into centers of cookies, reserving these center bits to add into extra dough.
Fill space with candies.

MSBREEZ SAYS: I find with the hard candy you should leave about 1/16-inch space between the candy and dough, so the candy doesn’t stain the dough and it looks better when it’s done baking.
8. Bake cookies according to recipe (350 degrees F), about 12 minutes. Candy will be bubbly and melted and cookies should be just beginning to color on edges.
9. Slide parchment paper from the pan to the wire cake rack and let cool for at least 10 minutes to allow candy to harden and remain stuck to cookie; otherwise, the candy centers may separate from the dough. Let cookies cool completely before removing from the parchment paper and rack.
STORAGE
When cookies are completely cooled, remove and store in an airtight container.
CONVERSATION HEART COOKIES by msbreez
Makes Makes about 2 – 3 dozen, 2-inch cookies

Gummi bear candy is melted and then poured into just baked sugar cookie cut out with smaller spaces, such as letters, and then cooled.
INGREDIENTS
1 recipe Sarah’s Creative Cut-Out Sugar Cookie Dough, any flavor – I used vanilla, the basic flavor
30 pieces gummy candy for smaller “glass” cookies with letters – I used Haribo Gummi Bears Brand
INSTRUCTIONS
1. Make 1 recipe sugar cookie dough.
Cooks' notes:
• Dough can be chilled up to 3 days.
• If dough becomes too soft to roll out, rewrap in plastic and chill until firm.
• Cookies keep, layered between sheets of wax paper or parchment paper, in an airtight container at room temperature 1 week.
Or, if using gummy candies place in plastic bags according to color for melting if making smaller “glass” pieces like letters.
1. Roll out dough on parchment paper about 1/4-inch thick. Cut large heart cookies. Bake according to recipe (350 degrees F), about 12 minutes.
2. Remove pan from oven and cut out words from hot cookies. Carefully remove pieces with the tip of a thin knife or toothpick. Leave cookies on the parchment and on the baking sheet still.
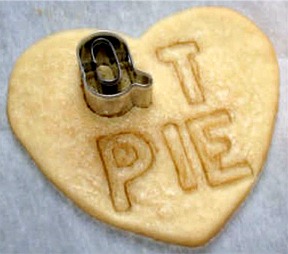
3. Melt gummy candy in heavy plastic zip bag. Heat for about 15 seconds at a time (for a lower wattage microwave). It could take 30-40 seconds for 20 small gummy candies. Take care not to burn them, it can happen quickly, trust me! The second they start bubbling up, turn off the microwave. I did melt a bag together because I wasn’t watching. WARNING: this is a very hot mixture. I use a pair of kitchen gloves to protect my hands from most of the heat while piping it out of the bag. Perhaps someone else can enlighten me of a better way!
4. Cut a tiny corner off bag of melted candy and carefully pour into letter holes in cookies. When they are all filled, remove parchment to a cooling rack for at least 10 minutes.

NOTE: If the cookies are sticky on the back from the candy, just lightly dust the back with powdered sugar and wipe off excess.


