
.jpg) Challah bread is typically braided. I use this baking technique is used when making my egg-rich and moist six strand Challah Bread from a Starter recipe. First follow my instructions for forming the dough snakes for braids for best results.
Challah bread is typically braided. I use this baking technique is used when making my egg-rich and moist six strand Challah Bread from a Starter recipe. First follow my instructions for forming the dough snakes for braids for best results.
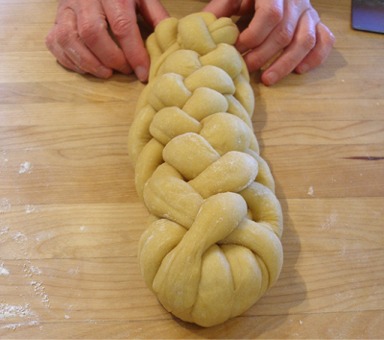
HOW TO TIPS:
Braid the six strands:
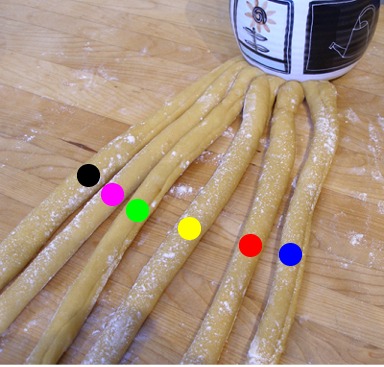
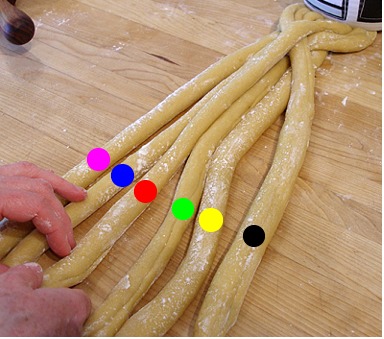
SARAH SAYS: I created a braid weaving coded color chart to help you with the task of braiding six strands, which can get really confusing.
I indicated colored dots on the strands in the photos so you can see them more readily.
On the actual dough, I mark each strand so it is easy to follow the colors on the chart in the tutorial.
Gently lay each strand on top of one another; do not squish or stretch a strand as you braid.
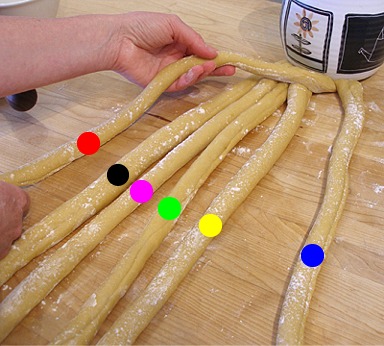
FIRST BRAID SEQUENCE:
Start dot colors lined up as: black, pink, green, yellow, red, blue
1. Step one:
Red dot: Move the second-to-the-right strand to the far-left position.
After the move:
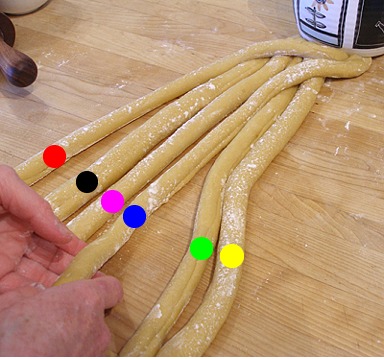
2. Steps two and three:
Green and yellow dots: Move them over to the right to make room.
Blue dot: Move the far-right blue strand left over the green and yellow strands, to the new fourth position.
After the moves:
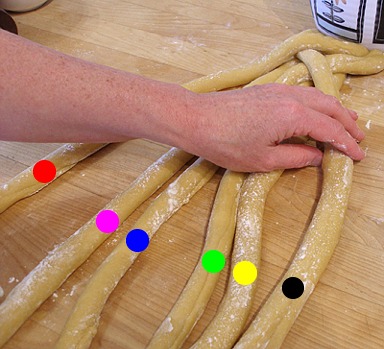
3. Step four:
Black dot: Move the new second-to-the-left strand over to the far right position.
After the move:
4. Step five:
Red dot: Move the far-left strand (the same strand you moved in step 1) over two strands to the right to the new third position.
After the move:
SECOND BRAID SEQUENCE:
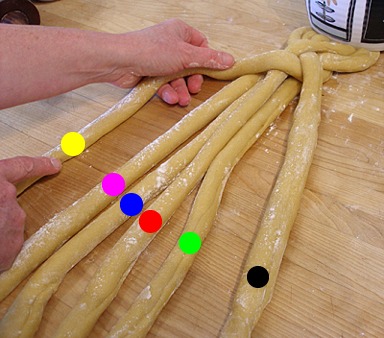
Start dot colors lined up as: pink, blue, red, green, yellow, black
1. Step one:
Yellow dot: After the first braid sequence, whatever color ends up as the second-to-the-right strand, move it to the far-left position.
After the move:
2. Steps two and three:
Red and green dots: Move them over to the right to make room.
Black dot: Move the far-right strand left over the red and green strands, to the new fourth position.
After the moves:

3. Step four:
Pink dot: Move the second-to-the-left strand over to the far right position.
After the move:

4. Step five:
Yellow dot: Move the far-left strand (the same strand you moved in step 1) over two strands to the right to the new third position.
After the move:

THIRD BRAID SEQUENCE:
Start dot colors lined up as: blue, black, yellow, red, green, pink
1. Step one:
Green dot: After the first braid sequence, whatever color ends up as the second-to-the-right strand, move it to the far-left position.
After the move:

2. Steps two and three:
Yellow and red dots: Move them over to the right to make room.
Pink dot: Move the far-right pink strand left over the yellow and red strands, to the new fourth position.
After the moves:

3. Step four:
Blue dot: Move the second-to-the-left strand over to the far right position.
After the move:

4. Step five:
Green dot: Move the far-left strand (the same strand you moved in step 1) over two strands to the right to the new third position.
After the move:

FOURTH BRAID SEQUENCE:
Start dot colors lined up as: black, pink, green, yellow, red, blue
Repeat First Braid Sequence.
FIFTH BRAID SEQUENCE:
Start dot colors lined up as: pink, blue, red, green, yellow, black
Repeat Second Braid Sequence
SIXTH BRAID SEQUENCE:
Start dot colors lined up as: blue, black, yellow, red, green, pink
Repeat Third Braid Sequence
SEVENTH BRAID SEQUENCE, EIGHTH BRAID SEQUENCE, ETC: Repeat First Braid Sequence, Repeat Second Braid Sequence, Repeat Third Braid Sequence , etc
At the end of braiding:
1. Braid the final ends, pinch ends to seal.
Moisten the pinched ends with a little bit of water and tuck them under the bread by lightly tapping each end of the loaf with your palms.
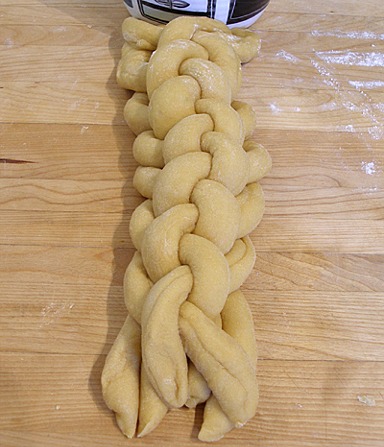
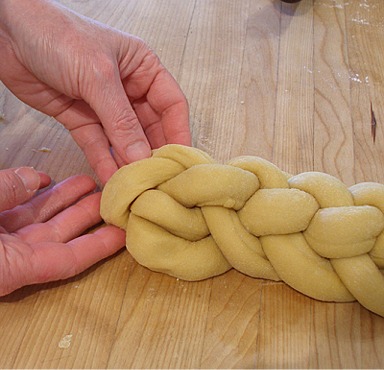
2. Repeat at the top of the braid, where it was originally weighed down.
3. Then let the shaped dough rise following the recipe's instructions.