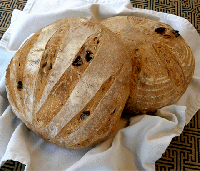
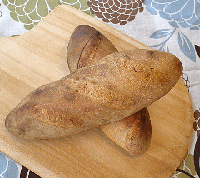
 Dough used to make Sourdough, Artisan or Hearth Bread recipes, such as French bread, sourdough or an Italian-style loaf, typically have crispy outside crusts. It is a wonderful contrast to the bread's insides, which are soft and porous with small holes throughout. But, how do you get a good flavorful, well-browned crispy and crackling crust?
There are several tips below, but the main ones are to use baking or pizza stone or tiles and to create stem in the oven during the first 5 – 10 minutes. Rustic breads that we buy in the store, are made with a commercial hearth oven, which creates the perfect environment during baking, critical to a crispy crust. Steam allows the yeast to work a little longer in the dough and this, combined with a hot baking surface, produces an extra push of volume. In addition, steam coagulating the starch on the surface of the dough gives the crust its characteristic brown color.
The properties of a good oven include thick baking stones heated with gas fire for more even heat distribution. The oven should have heating elements at the top. They also have steam tubes which deliver large amounts of steam, necessary for a rustic crust. It is difficult to fully replicate the effects of a commercial hearth oven at home, but we can come somewhat close.
 This how to baking technique is used with the Kalamata Olive and Rosemary Boule Recipe Tutorial and the Crusty Sourdough Loaves Recipe Tutorial.
BEFORE YOU START – BAKING EQUIPMENT TIPS
Make sure your oven is accurate
An oven thermometer, available from the supermarket, is the best tool to use. If the oven is not hot enough, the gases that cause fermentation, are allowed to expand without boundaries; the low heat does not adequately set the structure of the bread. The loaf will collapse and the crust will never brown properly. On the flip side, if the heat is too hot, the loaf sets before it fully expands and the crust burns.
Use a baking or pizza stone to disperse the heat evenly
Flat baking stones replicate the floor of a professional oven, where loaves are set directly to promote a crisp and brown crust. Place on the floor of the oven before preheating. Some recipes recommend sprinkling with cornmeal so the bread doesn't stick. It must get really hot, so I prefer to preheat my oven for an hour ! To check if ready, drop some water on top of the stone, and if it dances, it's ready — never touch the hot stone directly ! Then, place the bread dough on top of the stone to bake. Use a baking peel or long handled spatula. Make sure your wear long kitchen gloves to prevent burns.
DURING THE MAKING OF THE BREAD RECIPE
Use a high gluten flour, such as bread flour
Bread flour, because of its high protein content, results in a chewy bread without being solid or dense. It also results in a thin crispy crust. All-purpose flour gives you a thicker crust. The lower the protein content, such as all-purpose, the lower the moisture absorption rate of the flour and a thicker crust results. The stronger the flour, such as bread flour, the higher the absorption rate the thinner the crust.
Do not leave out the salt
Salt helps in crust formation because it retards yeast activity, leaving more sugar available to caramelize and form a nice, brown crust. However, don't put it in with the starter.
When kneading and shaping the dough, use as little extra flour as possible
A heavy coating of flour can interfere with crust formation.
BEFORE BAKING
After a lean dough almost rises, brush the bread with an egg wash or any other glaze for browning and to add a finished look.
Slash or score the top 3-4 times with lame, single-edged razor, or sharp knife, cutting about 1/4 inch deep. Spray the knife lightly with vegetable oil spray before slashing; it will prevent the knife from dragging on the dough's surface
Slashing makes a place for the bread to expand, instead of a blow-out happening. Also, bubbles may appear under a crust where there is no slashing. It is also done for aesthetics. Historically, French rural ovens were communal, in a sense: they were originally owned by the lord, and maintained by a fournier, or ovenmaster, who kept the oven hot but charged for its use. Since the bread of each household would be mixed with others in the oven, a distinctive slash was one way to tell the loaves apart.
Flour
Lightly sprinkle a little flour on top of the loaf before baking to give a rustic look. A lot of flour will result in a softer crust, though. Or, sprinkle with seeds.
DURING BAKING
Put the bread loaves into the oven right away.
Steam in the oven is crucial to making a crusty loaf of bread ONLY for the first 5 – 10 minutes, until the bread begins to brown
Applying steam to the dough during baking keeps the outer dough layer flexible and moist. This helps achieve the greatest amount of oven spring and loaf volume. Once the outside layer of the dough sets, gases in the loaf can no longer expand to increase the loaf size. Steaming the dough as it bakes also gelatinizes starch on the outside layer, producing a bread with a crisp crust and a brown crust color in varying degrees; too much steam results in an undesirable crust. Steam also helps to prevent wild breaks in the loaves because it delays the setting of the bread's crust, allowing it more time to bake and brown. However, in contrast, during the last stages of baking, a dry oven is required when the crust is browning; after the steam is removed, the gelatinized layer dries out forming a thick crunchy crust.
Commercial bakers inject steam into the oven with special equipment. But, at home, many of us do not have the luxury, so we have to create our own:
- To start, while the oven preheats, spray the bread all over with water.
- One way to create steam in a home oven, is to do so with a cast iron frying pan or jelly-roll pan filled with water. (Cast iron is more effective because it gets hotter). To do: before preheating, place a cast iron pan on the bottom of the oven. Preheat the oven and place the bread dough in the oven to bake. Standing as far as possible away from the oven, fill with 1/2-inch of hot water. This will cause an immediate burst of steam. Quickly close the oven door to trap the steam, and do not open for at least 10 minutes. Leave the pan in the oven and remove when the oven has cooled.
- I take aluminum muffin tins and poke tiny holes in the bottom of each well. I fill the tins with boiling water and place them on the bottom rung of the oven about a minute before putting the bread in to develop initial steam. The water will drip onto the bottom of the oven and create steam. After placing the bread inside, close the oven door to trap the steam. Remove the tins after the first 5-10 minutes.
- Another way to create steam is to use a spray water into the oven with a spray bottle filled with water but, I have found that it is not as effective as a pan of water, described above. To do: right after placing the bread in a well-preheated oven, spray water on the walls and floor of the oven, avoiding the bread and the oven's light. Do this until the loaves begin to color.
- Some bakers throw ice cubes on the bottom of the stove to create steam or place ice cubes on an old baking sheet and place it on the floor or bottom shelf of your oven. As the ice melts, it will form steam in the oven, which will give your loaves a nice crispy crust.
AFTER BAKING – STORAGE
The proper storage is critical to keeping your loaf's crust crispy
As soon as the bread begins to cool on the cooling rack, the bread starts to go stale. The interior of the loaf dries out and the crust starts to absorb moisture, making it soft. If you love crusty bread, store it in a brown paper bag or let it just sit on the counter. Don't use plastic wrap or a bag because it will soften the crust and preserve the moist interior.


