
Basic pie crusts are usually made from just four ingredients – flour, solid fat, water and salt – but may include sugar, eggs, leavening or even vinegar. The fat is “cut into” the flour and dry ingredients and the dough is rolled with a rolling pin and fitted into a pie pan. It can be prebaked, partially baked and then filled, or baked with the filling. There are different ways to mix the basic flaky pie crust dough, either by hand or with a mixer or by food processor.
The object of mixing pie dough is to surround small bits of fat with flour without allowing the fat to warm and soften. This is done by keeping the ingredients cold, handling the dough as little as possible and to working quickly and to bake the crust in a very hot oven. When the pie crust is placed in a hot oven, the fat is an excellent heat conductor and heats very quickly, turning any moisture in the dough to steam. This super-heated steam (also coming from the butter) helps dry the pastry and quickly set the flour starches that immediate surround these particles. The pastry surrounding the fat, sets in a shape around it, and then as the fat melts and is absorbed into the pastry, a space is left where the fat once was. These resulting air space gives the flaky texture when we bite into the crust. You want chilled fat because you want the fat to melt slowly so the pastry has a chance to set around it; warm fat melts faster!
PASTRY RECIPE HELP
MODULE I: MAKING A FLAKY OR Pâte Brisée PIE CRUST WITH RECIPE, STEP-BY-STEP
MIXING BY HAND
BASIC RECIPES
INGREDIENTS – ONE CRUST PIE
1 1/2 cups unbleached all-purpose flour, plus extra needed for rolling pie crust (spoon into dry measuring cup and level to top)
1 tablespoon sugar
1/2 teaspoon salt
1/4 cup (1/2 stick or 4 tablespoons) COLD unsalted butter, cut into evenly-sized 1/4-inch cubes. Return the fat to the freezer to chill again while preparing the other ingredients; can use salted butter. If you do, reduce the salt by 1/4 tsp.
1/4 cup COLD vegetable shortening (or 1/2 stick or 4 tablespoons unsalted butter); cut or shape shortening into evenly-sized 1/4-inch cubes or pieces. Return the fat to the refrigerator to chill again while preparing the other ingredients.
1/4 cup COLD water; to prepare, make ice water. Let it sit until very cold and then measure.
OPTIONAL: 1/8 teaspoon baking soda (blend in with the flour)
INGREDIENTS – DOUBLE CRUST PIE
3 cups unbleached all-purpose flour, plus extra needed for rolling pie crust (spoon into dry measuring cup and level to top)
2 tablespoons sugar
1/2 teaspoon salt
1/2 cup (1 stick) COLD unsalted butter, cut into evenly-sized 1/4-inch cubes. Return the fat to the freezer to chill again while preparing the other ingredients; can use salted butter. If you do, reduce the salt by 1/4 tsp.
1/2 cup COLD vegetable shortening (or butter); cut or shape shortening into evenly-sized 1/4-inch cubes or pieces. Return the fat to the refrigerator to chill again while preparing the other ingredients.
1/2 cup COLD water; to prepare, make ice water. Let it sit until very cold and then measure.
OPTIONAL: 1/4 teaspoon baking soda (blend in with the flour)
NOTES: Lard and shortening produce a more tender crust than butter or margarine because it contains 100% fat.
However, a butter crust tastes better. For the best of both worlds, use half lard or shortening and half butter. But, in this recipe, you can use 1 cup or 2 sticks butter instead of 1/2 cup butter and 1/2 cup shortening.
You can flavor pastry dough by adding a 1 teaspoon of ground cinnamon and/or a sprinkling of allspice, nutmeg or ginger. For savory pies, eliminate the sugar and add 1/2 teaspoon chili or curry powder, or 1 teaspoon or more of crushed dried basil or tarragon leaves. Mix flavorings into the flour before cutting in the fat.
INSTRUCTIONS
MIX BY HAND
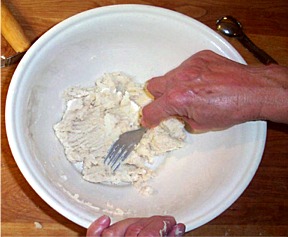
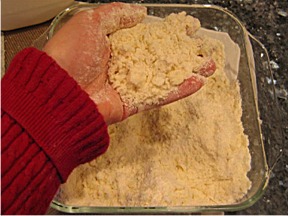
1.Combine the flour, sugar and salt in a large mixing bowl. Add the prepared butter and shortening to the flour mixture by sprinkling the pieces evenly around the bowl. Toss to mix.
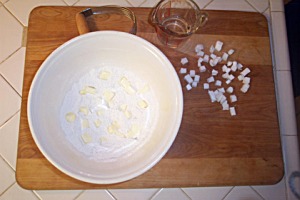
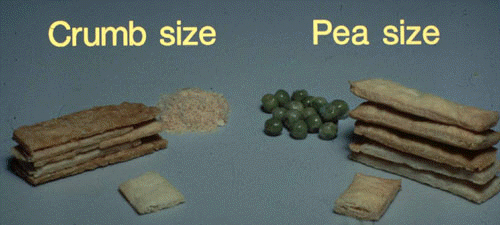
Using a pastry blender, 2 knives, or your fingertips, cut or rub the butter and shortening into the flour. Occasionally, make sure you reach down into the bottom of the bowl and toss the ingredients to make sure all of the fat is combined with the flour mixture. Continue until the fat is broken into pieces the size of small peas among smaller particles.
SARAH SAYS: When mixing by hand, make sure you use your FINGERTIPS, not your hands, to cut the fat into the flour mixture. Your fingertips are the coldest part of your hands. Rub the very quickly between your fingers. Pick it up, rub it, and drop it until it’s mixed. If the fat in the pastry dough gets too warm and soft, cover entire mixture with plastic wrap and place in freezer for a few minutes until chilled.
2. Sprinkle half of the water over the mixture.
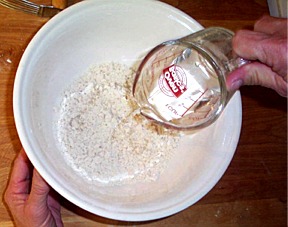
3. Toss well with a fork to dampen the mixture. Add the remaining water, 1 to 2 tablespoons at a time.
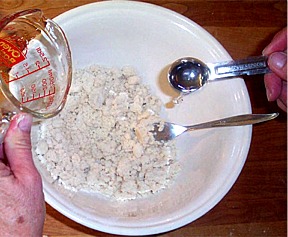
SARAH SAYS: The amount of water necessary to bring a dough together can vary up to 50 percent depending upon how dry the flour is. If more water is needed, sprinkle one teaspoon at a time for a one-crust dough and one tablespoon at a time for a two-crust dough, gently tossing the ingredients together after each addition. If more flour is needed, do the same. DO NOT OVERMIX.
4. Continue to toss and mix, pulling the mixture up from the bottom of the bowl on the upstroke and gently pressing down on the downstroke. If necessary, add water 1 or 2 teaspoons at a time until the pastry can be packed. Continue pulling the mixture up from the bottom of the bowl on the upstroke and gently pressing down on the downstroke. The pastry should start packing together.
When it does, gather it in your hands.
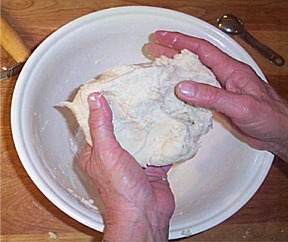
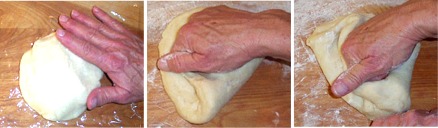
OPTIONAL: For extra flakiness, give the dough what are called two folds and a turn. This gives it extra flakiness. Quickly flatten the dough; Fold it in half over onto itself, and turn it a quarter turn and fold the other edge onto itself. Proceed to the next step.
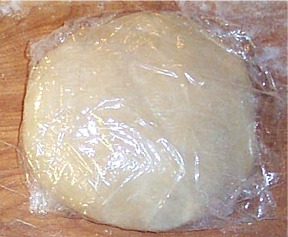
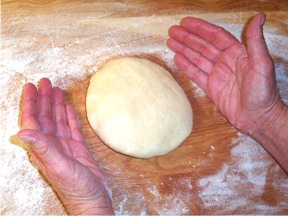
5. Form the pastry dough into a disk shape. If you are making a double crust, separate the dough into two balls and make one slightly larger than the other; the larger one will be the bottom crust and smaller one the top. Wrap (each disk) with plastic wrap and refrigerate for 1 to 4 hours before rolling. This step is not optional.
SARAH SAYS: Chilling allows the fat to reharden so that the dough is firm when rolled and helps to evenly distribute the moisture in it. It also allows the gluten strands developed during mixing to relax (some always develops, no matter how careful you are), lessening pie crust shrinkage during baking. For most dough, a minimum of an hour or two in the refrigerator will suffice. When I make dough in large quantities, I prefer to let them chill and rest overnight.
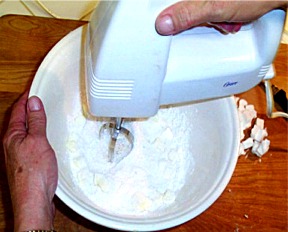
MIX WITH A MIXER
Rather than mix a pie crust dough by hand, you can use a stand or hand-held mixer, instead. (Fit the hand-held mixer with beater attachments or a stand mixer with a paddle one.) For a one-crust pie recipe, a hand-held mixer is preferred.
1.Combine the flour, sugar and salt in a large mixing bowl. Add the prepared butter and shortening to the flour mixture by sprinkling the pieces evenly around the bowl. Toss to mix.
With the hand held mixer on low speed, blend the butter and shortening into the flour until it is broken into pieces the size of large clumps. Occasionally, stop the mixer, and with a fork, make sure you reach down into the bottom of the bowl and toss the ingredients to make sure all of the fat is combined with the flour mixture. Continue mixing on low speed until the fat is broken into pieces the size of small peas among smaller particles.
SARAH SAYS: If the fat in the pastry dough gets too warm and soft, cover entire mixture with plastic wrap and place in freezer for a few minutes until chilled.
2. Sprinkle half of the water over the mixture. Mix briefly on low speed.
3. Continue adding the water while mixing on low until the moistened ingredients just start to stick together. When they do, stop adding water. Stop periodically to stir the mixture up from the bottom of the bowl with a fork.
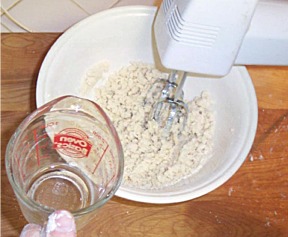
SARAH SAYS: The amount of water necessary to bring a dough together can vary up to 50 percent depending upon how dry the flour is. If more water is needed, sprinkle one teaspoon at a time for a one-crust dough and one tablespoon at a time for a two-crust dough, gently tossing the ingredients together with a fork after each addition. If more flour is needed, do the same. DO NOT OVERMIX.
4. Continue to mix the dough on low. It will form large clumps.
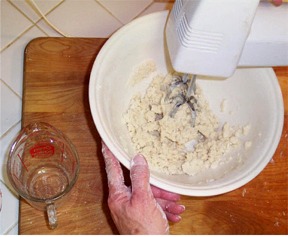
5. As you mix, the dough will come together. Stop the mixer. Do NOT overmix.
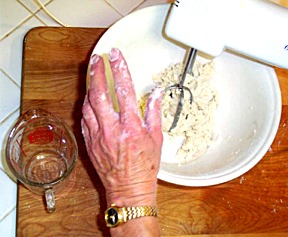
When it does, gather it in your hands.
OPTIONAL: For extra flakiness, give the dough what are called two folds and a turn. This gives it extra flakiness. Quickly flatten the dough; Fold it in half over onto itself, and turn it a quarter turn and fold the other edge onto itself. Proceed to the next step.
6. Form the pastry dough into a disk shape. If you are making a double crust, separate the dough into two balls and make one slightly larger than the other; the larger one will be the bottom crust and smaller one the top. Wrap (each disk) with plastic wrap and refrigerate for 1 to 4 hours before rolling. This step is not optional.
STORAGE
Pie dough can be made ahead, wrapped and refrigerated for up to 4 days. It can also be frozen for longer storage up to 3 months. If frozen and not yet rolled, thaw it in the refrigerator for at least 3 hours or overnight before using. (You can also roll it out first, shape it into a pan and then freeze it. You need not thaw before using.)
PROBLEMS WITH SOLUTIONS
Question: Flour & butter mixture becomes pasty and sticky
Sarah Says: The butter is melting. If the ingredients are now yet mixed, force the dough to accept at least 3/4 of the liquid called for. Stir it in a fork. The dough will be very soft; leave as is.
Question: Large lumps in the dough
Sarah Says: Press the dough into a rectangle about 3/8 inch thick. Fold it in half onto itself a couple of times, and press down, to work in the fat particles; do not knead. If the lumps are really large, break the dough into chunks, and try to work in the large pieces of fat ONLY, in each chunk with fingertips. Then, form into a disc.
Question: Ingredients are still dry
Sarah Says: If your dough is too dry and the pieces will not stick together, sprinkle drops of cold ice water on the crust ingredients. Mix them together quickly with a fork and press the dough together motion.
Qustion: Dough is very dry
Sarah Says: Tear dough into particles. Scatter drops of water on it. Toss them in with a fork until the dough holds together. A dough made without enough water will be difficult to form into a disk, and will tear and crumble when rolled out.
Question: Dough is very wet
Sarah Says: Sprinkle 1 teaspoon of flour (1 tablespoon if a double crust pie) at a time on the ingredients and fold the dough onto itself three or four times. It should absorb the flour.
EXTRA MIXING NOTES by Sarah Phillips
I have always wondered why bakers use a deep, round mixing bowl when mixing a pie crust. It doesn't make sense to me. I like use a square 2-inch deep baking pan as my mixing bowl. I’ll tell you why!
Making a typical American flaky pie crust involves using very few ingredients: wheat flour, usually all-purpose, cold fat, usually butter, shortening and making a comeback again, lard, a liquid, usually cold water, and some salt to enhance the flavor present in the recipe.
The flour is placed in a mixing bowl. The chilled fat is cut into cubes and rubbed in or cut into the flour and salt, previously mixed together. Then a minimum of ice water is sprinkled over the flour, while tossed with a fork, until the dough barely comes together.
Good flaky pastry is judged by the amount/some relative evenness of the flakes and their distribution.
This is how ~ “Think cold! When making pie crusts, be quick and keep the ingredients well-chilled. Handle it as little as possible. Try to use your fingertips instead of your hands which are too warm for the dough.”
How flaky pie pastry works:
The fat that is cut into the flour, works as a spacer in between the dough layers; when fully baked, the flour's starches have set around the once existing fat. When initially placed in the oven, the fat begins to melt and is absorbed by the dough around it, leaving an empty space where it once was. What remains is an air pocket that is inflated by the steam created when the liquid from the pie crust evaporates. As the crust bakes, the flour starches gelatinize and set, leaving an inflated air pocket intact where the fat once was. When we bite into the baked crust, we describe it as flaky because we are really crunching into lots and lots of air pockets baked into the dough.
Chilling the fat makes it longer to melt; allows more time for the flour's starches to set, leaving a more defined space where the butter once was — hence, more flakiness. But, if the fat piece as too small, the crust will be less flaky because the air spaces are smaller. If you use shortening, with a higher melting point than butter, it holds the space longer so the crust has more time to set around the fat particles, resulting in a flakier dough. If the fat is too warm before it goes into the oven, it melts too quickly before the crust has a chance to set and the air pockets collapse or are too small.
The amount of water used is essential to the recipe; and there is so little of it to begin with. The amount of water added is variable – when the “mixture starts to look shredded and clumps together, while still on the dry side, stop adding water”. (From Baking 9-1-1) If too much water is added to the dough, it can create too much steam and glue the air pockets together, and you’ll get a cardboard like crust. If too little is added, the crust will be too flaky, will be hard to roll and will crumble and fall apart. If you overmix the wheat flour and water together too much, an abundance of gluten is formed, and the crust will be tough.
How you add the water and how much you mix the recipe is essential. For example, “½ cup water to 1 ½ cups flour, and evenly sprinkle it over the flour one tablespoon at a time, gently tossing with a fork after each addition”, and “you have to reach down into the bowl with a fork to work in the liquid, before adding more water”. (From Baking 9-1-1) Just when I think I have mixed the dough perfectly, I always find dry clumps of flour hiding at the bottom, requiring my adding more water and then more mixing. Sometimes large clumps of butter are hiding deep down, requiring my reaching down and using my fingertips to break them up (many of us use our hands, the warmest part!). The result is I either warm the fat or overwork it as a result.
When using a mixing bowl, it's hard for me to tell if I have cut in all the pieces of fat and if they are the “right size” or sprinkle water effectively over the surface of the dry ingredients. That’s why I like to use my square (or rectangular) 2-inch deep baking pan as my mixing bowl, instead. This way I can sprinkle the water more effectively over a greater surface area of flour at a time, because more is exposed. (I can actually toss the flour with a fork while sprinkling the water evenly over its surface. I can even use a spray bottle filled with water to evenly moisten the flour!) It’s also easier for me to cut the fat into the flour for the same reason. (I can use a bench scraper with its straight edges to cut my fat into the flour, instead of an icky pastry blender, which never seems to work very well for me.)
I can actually see the size of all of the fat particles, instead of guessing what is in the bottom of the bowl. A greater surface area being exposed means that I do not have to fiddle with the ingredients as much to correct any dryness or too much water being added and/or risk melting the fat from overhandling. No more wondering what is in the bottom of the bowl!
So, next time, think square when mixing your next pie dough crust! It seems to make more sense! ~ (How about square mixing bowls? hmmmm….)
MODULE II: ROLLING THE DOUGH AND FITTING IT INTO THE PAN
After mixing the pie dough, this step involves rolling the dough and then, fitting it into a pie pan. Afterwards, chill the dough, for 1 to 2 hours, preferably overnight before using to bake a pie with or pre-baking, also know as blind-baking.
There are several surfaces to roll dough on. Use a floured pastry cloth and a rolling pin sleeve, or two sheets of lightly floured plastic wrap on top of a counter, marble block or other smooth surface, such as a wooden board.
INSTRUCTIONS
1. Unwrap the pie crust and lightly flour the work surface:
Make sure the dough has chilled in the refrigerator in a disk shape for at least an hour (more is preferable) or if frozen, it has thawed in the refrigerator before rolling. (If frozen, it is best to allow it to defrost in the refrigerator for at least 3 hours, or overnight).
Remove the single dough disk or the larger one for a 2-crust pie, from the refrigerator. Allow the dough to sit for about 5 to 10 minutes or until it softens enough to be malleable. Unwrap.
Place dough the center of a lightly floured pastry board. Start by lightly flouring a work surface with pinches of flour, rather than handfuls. The tendency is to throw lots of flour on the work surface to keep dough from sticking, but the result will be a flavorless and tough crust when baked.
You can also roll the dough on a silpat mat. There's no need to flour its surface. If the dough is sticky, it will stick to the silpat mat, unless you flour its surface first.
SARAH SAYS: The pie crust must remain chilled. If at any time it becomes too warm and soft, cover with plastic wrap, as is, and place in the refrigerator for 1/2 hour until well chilled.
2. Flatten the chilled disk before rolling:
My method of starting my dough rollig is simple: flatten the well-chilled disk by smacking it with the long part of the rolling pin. If you are rolling a naturally soft dough or one with a lot of sugar, lightly smack it in between two pieces of plastic wrap.
After each “hit”, make sure you don't do the next one on the same spot and rotate the dough. After four smacks, turn it over, and do so in the opposite direction. The goal it to soften the dough while keeping it's round shape before rolling. Do not fret if you get a crack; it's because the dough is too cold. Let it sit, covered for a few minutes at room temperature to soften.
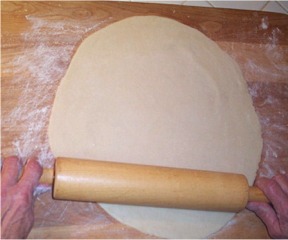
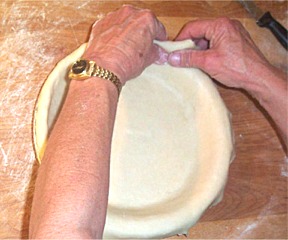
3. Roll the pastry dough into a circle about 1/8 inch thick and approximately 3 to 4-inches larger in diameter than your pie pan:
To start, begin in the center of the dough and roll outward. Stop the rolling pin as it nears 1/4 inch from the edge of the dough; don't roll over the edges as they crack or become too thin. Do not roll backwards; simply lift the rolling pin. Lift and rotate the dough by a quarter before resuming again, tossing a light dusting of flour beneath, only if necessary.
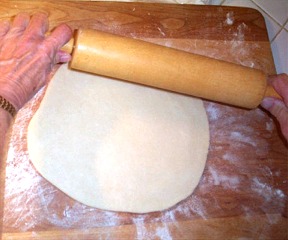
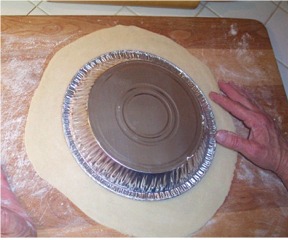
Repeat the rolling, starting in the center of the dough and rolling outward until the dough is at least 12 inches in diameter for a 9-inch pie pan andabout 1/8 inch thick. Double check if its the right size by periodically placing you pie pan up-side-down over your pie crust.
If the dough is too cold, it will crack and break up during rolling, so let it sit a few minutes at room temperature to warm. If, at any time, the dough becomes too soft, refrigerate it until firm. However, don't bunch it up to do so; simply place the dough as is on a cookie sheet with the help of a large spatula, if necessary.
If rolling between two pieces of plastic wrap, no need to flour in between the sheets. Instead, simply turn the dough with the sheets attached. Then, resume rolling from the center out.
SARAH SAYS: Make sure the rolled dough dough so it is shaped into a circle. Do this by lightly and quickly shaping it with your right and left cupped hands. Place each on the opposite edge of the dough, with the bottom edge of each palm resting on the work surface. To shape, use both hands at the same time and keeping the edge of your palm on the work surface at all times, gently tap and cup the edge of the dough, rounding it,. Move both hands to another position, and repeat, going all the way around the dough, if necessary. This will give it a more rounded shape.
3. Carefully fit the pastry dough into the baking pan:
The goal is to first get it from the countertop to the pie pan, without tearing, and then, to EASE IT into place; do not force it otherwise it will shrink during baking. Correctly fitted dough stays put and has less of a chance of shrinking during baking. Dough can also be fitted into a heart or any-other-shaped pie pan. You do not have to prepare the pans in advance; because there is so much shortening in a piecrust, pans usually need not be greased or floured.
To roll the dough onto the rolling pin, first place a floured rolling pin, centered on the edge away you. Roll towards you…
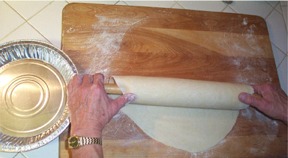
…And at the same time pick up the edge (use a bench scraper or spatula if dough sticks to the countertop) and support the dough as you wrap it around the pin. Be careful not to press it. Keep rolling until all of the dough is rolled onto the pin.

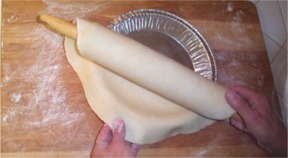
Then, drape the loose end over one edge of the pan and gently unroll, lowering it into the pan.
After getting the dough in the pan, lift up the edges of the dough and carefully ease it down into the corners of the pan. It is important to handle the dough lightly, as it will later shrink during baking if you do it too hard or stretch it.
Gently press the dough around the side of the pie pan with your fingertips so the dough adheres to the corner of the pan; do not press too hard. It is important to press lightly, as the dough will later shrink during baking if you do it too hard or stretch it.

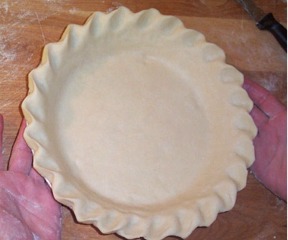
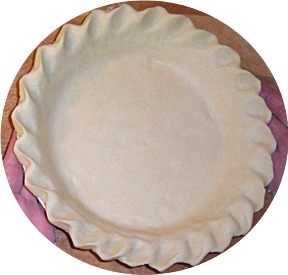
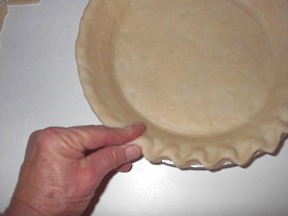
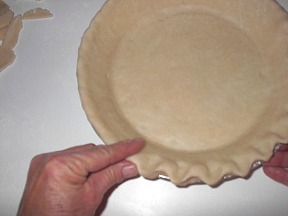
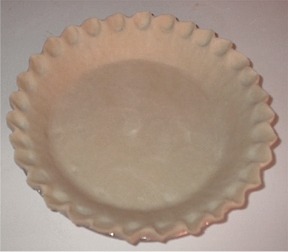
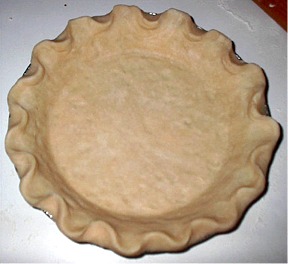
4. Trim pie crust and flute:
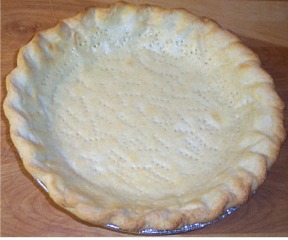
Fluting provides several purposes — as decoration and to provide a double layer of dough at the rim to help prevent burning or filling overflow.
Trim the excess dough around the edge of the pie with a sharp knife or with kitchen shears, which I find the easiest to use. Leave about an inch overhang for both a one-crust and a two-crust pie.
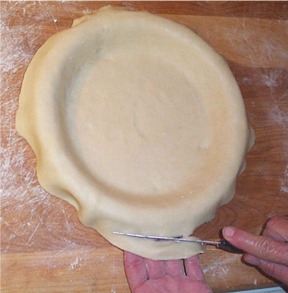
One-Crust Pie: Fold the excess dough underneath itself at the pie pan rim and even with the lip making a double layered edge. NEXT STEP: Flute pie crust.
For a Two-Crust Pie or Lattice Top: Chill the bottom pie crust for 1 to 2 hours, preferably 24, before filling.
SARAH SAYS: ALWAYS THINK COLD! Chill the dough, if a single crust pie, after forming it in the pie or tart pan, and after fluting, for 1 to 2 hours, preferably overnight before using to bake a pie with or pre-baking, also know as blind-baking.
HOW TO FLUTE (CRIMP) THE PIE DOUGH EDGE – A MINI SKILLS LESSON
After fitting the pie crust dough into the pie pan, the pie dough is trimmed and folded under to provide a double rim. Then, the crust is fluted, also known as crimping. Fluting provides several purposes — as decoration and to provide a double layer of dough at the rim to help prevent burning or filling overflow.
DESIGN #1 – SCALLOPED EDGE
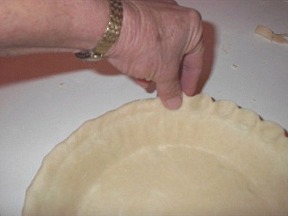
A. Make sure you fold the rim of the pie crust under itself. Place your index finger across the edge of the pie crust at an angle.
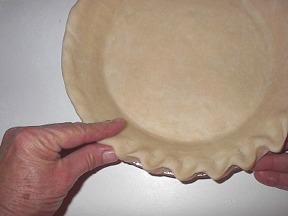
B. Place the pad of your thumb flat against the outside edge of the dough and push forward on the dough. At the same time pull backward on the dough with your index finger . This motion will form a sideways “S” in the top edge of the pie dough.
C. Proceed to the next step by placing your thumb against the previous impression made by the index finger and place your index finger across the edge as before. Simultaneously push forward with your thumb and pull back with your finger.
D. Repeat all the way around to make a scalloped edge. Don't press too hard; you only want to shape the dough, not stretch it.
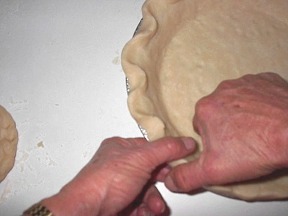
DESIGN #2 – PINCHED EDGE
A. Make sure you fold the rim of the pie crust under itself. Gently lift up the edge of the pie dough slightly that you are going to work on. Place your index and middle finger under that edge of the pie dough, taking care not to stretch it…
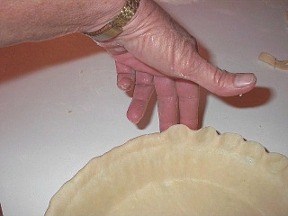
B. …Place your thumb directly in front of your two fingers with the pie dough in between …
C. …Gently squeeze your fingers together, and press the dough. Don't press too hard; you only want to shape the dough, not stretch it. Repeat the design all the way around the rim of the pie crust.
DESIGN #3 – CRISS-CROSS EDGE
A. Make sure you fold the rim of the pie crust under itself. Place your thumbs on opposite sides of the pie dough with the first joint of the thumb even with the edge of the pie pan. Gently pull each thumb in the opposite direction while at the same time straightening the thumbs so that they are even with the top of the pie pan. This motion will pull the pie dough in opposite directions creating the design.
B. Complete the design all the way around the pie crust.
MODULE III: PREBAKING (BLIND BAKING) A SINGLE PIE CRUST
Pre-baking a pie crust, also known as “blind baking”, refers to baking an unfilled pie or tart shell to produce a partially or fully baked crust. It is done when making cream pies or tarts if a fillings is particularly moist or where precooked fillings are part of the recipe.
How to Make a:
Partially Baked Pie Shell: The time and temperature called for here result in what is technically a “blind-baked shell,” cooked just enough to hold a filling without turning soggy and to allow further baking without darkening the rim.
Bake the pie shell for 18 to 20 minutes. The dough should look fairly dry but not at all browned. Remove from the oven.
Fully Prebaked Pie Shell: Allow the pie crust to brown.
INGREDIENTS
One, unbaked and well-chilled pie crust (single recipe)
1 large egg white
INSTRUCTIONS
1. Place an oven shelf both in the lowest rung of the oven and in the middle. (You will need both shelves). Preheat the oven to 425 degrees F, a good 20 minutes before baking the pie crust.
2. Bake weighed-down pie shell for 15 – 20 minutes at 425 degrees F. Empty pie shells need to be weighed down during baking. Without the weight of a filling, a pastry shell set into a hot oven can shrink dramatically, fill with air pockets and puff up resulting in a shrunken uneven shell that looks unfinished.
A. Take the pie crust from the refrigerator and fit foil into it. Some bakers use parchment paper or waxed paper, but I like foil because you can press it right against the sides of the crust. In addition, foil promotes better heat conduction or a more even browning of the pastry, which parchment or waxed paper do not.
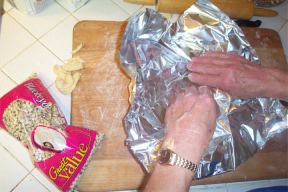
B. Fill the foil lined pie crust with pastry weights. Fold the foil over on its edges so the beans won't fall out. Do NOT fold the foil over the pie crust edges (see next photo #2C).
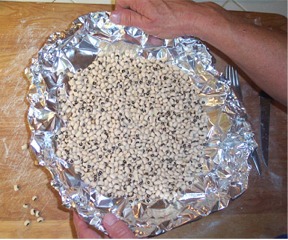
Fill ALMOST TO THE TOP with pie weights, pennies, rice or dried beans. (See photo #2C, below for how full). Metal pie weights or pennies outperform rice and beans because they are heavier, and thereby better able to keep the shell from puffing. Also, being made of metal, they are better conductors of heat helping the crust to brown better.
C. Place pie crust in the preheated oven on the shelf that is already positioned on the lowest rung in the oven. Bake weighed-down pie shell for 15 – 20 minutes.

3. Reduce the oven heat to 350 degrees F, remove pie crust weights, prick the crust all over and bake for another 5 – 10 minutes.
A. Remove crust from the oven and then remove the foil and pie crust weights: carefully grab b