One year, when my kids were little, I decorated my entire tree with edible cookies. My kids helped me bake and decorate them. We also hung the cookie cutters as ornaments. It was such a beautiful tree and we had so much fun creating everything together.
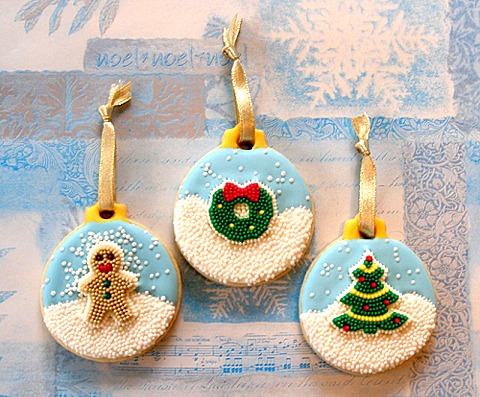
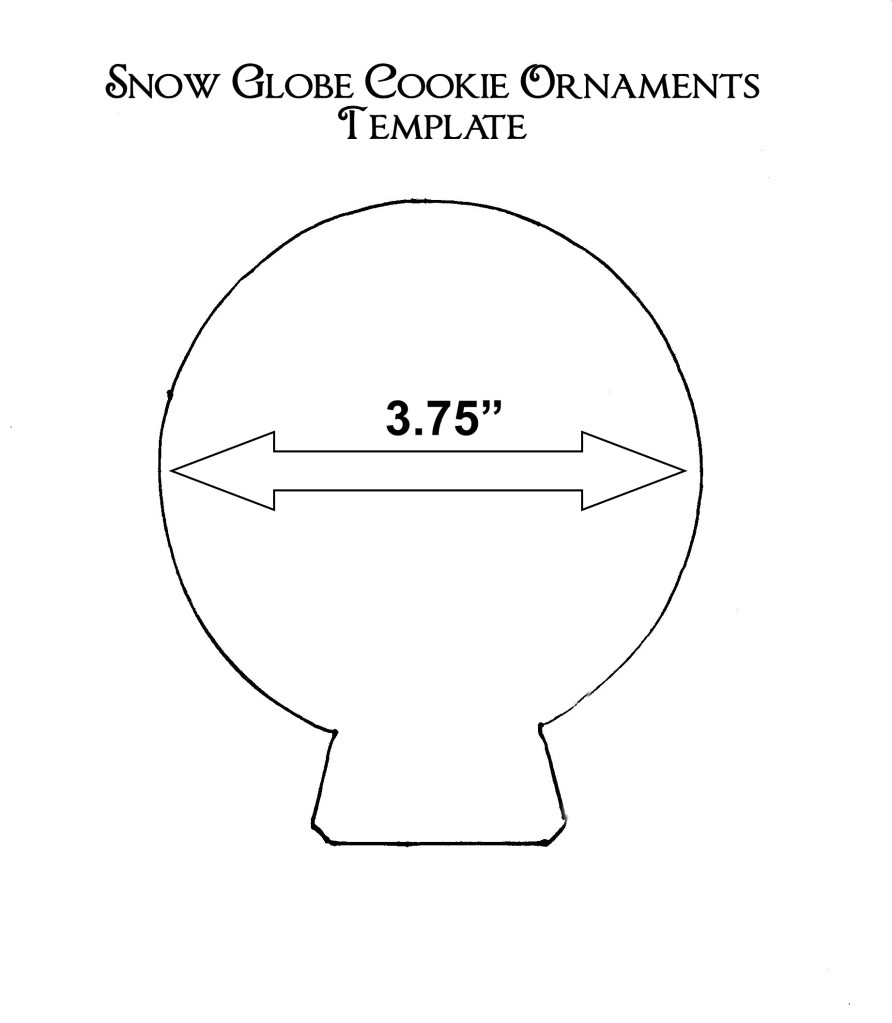
Kelly and I discussed making edible tree ornaments, again, and these are a more grown-up version, that both adults and kids in your life will love and cherish. We have included a template
COOKIE RECIPE HELP
niky, Premium Member, Says: “Kelly you are a star! My goodness your work is so clean and perfect! I love it so muchhhhhhhhhhh.”
CYNDI65, Premium Member, Says: “Those snow globe ornaments are ADORABLE!!! Kelly, You are amazing with the stuff you come up with!”
RECIPES USED:
One Recipe Sarah's Creative Cut-out Sugar Cookie Dough Kelly Says: “I ADORE Sarah's Creative Cut Out Cookie recipe!”
One Master Recipe – Royal Icing
SUPPLIES
Miniature Holiday Themed Cookie Cutters
4 Tablespoons Sanding Sugar
Black Edible Food Marker-for small details
STEP I: MAKE THE CREATIVE CUT-OUT SUGAR COOKIE DOUGH AND PREPARE THE TEMPLATE
Prepare the cookie sheets:
1. Line two non-insulated cookie sheets with parchment or silpat, nonstick baking mats. Do NOT grease the cookie sheets.
Make the cookie dough and cookie template:
1. Make 1 recipe Sarah's Creative Cut-out Sugar Cookie Dough. Divide dough in half and wrap each section and chill it for at least 2 hours.
2. While the cookie dough chills, copy the SNOW GLOBE COOKIE ORNAMENT TEMPLATE and print it out or trace it on heavy cardstock or heavy paper, then cut it out.
STEP II: MAKE THE COOKIES, BAKE & COOL
To start, roll out HALF of the cookie dough and cut-out with a template and cookie cutters:
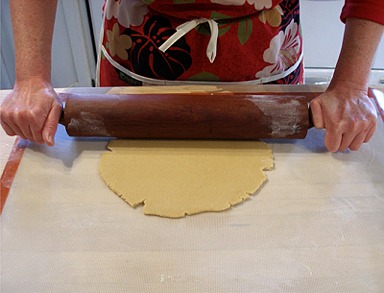
1. When chilled, remove one dough piece from refrigerator and roll it out on a lightly floured surface to a thickness of about 3/16th of an inch.
KELLY SAYS: I like to roll the dough on a nonstick silpat mat; that way I do not have to use excess amounts of flour, which toughen the dough.
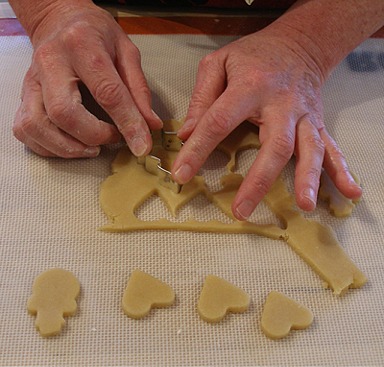
2. Place cookie template on rolled-out dough and, using the tip of a sharp paring knife, cut all the way around the template.
Cut cookies so they are close together, minimizing the scraps, as much as possible.
3. Choose the mini cutters, that will be featured inside the snow globes and cut the cookies out.
It is a good idea to cut the mini cookies using the small scraps that are left-over after cutting the snow globe shapes.
Gently gather scraps, press together, reroll and cut more cookies.
4. Place cut snow globe cookies on parchment or silpat lined baking sheet, leaving at least one inch between cookies, to allow for spreading.
5. Using a plastic drinking straw, cut hanging holes in the top of each cookie. Just press the straw straight down and then pull it up, the excess dough will stay in the straw, leaving a clean hole.
6. Place mini cookies on another silpat lined baking sheet.
You do not want to put them on the same sheet as the snow globes, because they will bake faster.
7. Cover and chill the dough on cookie sheets for 15 minutes
Bake cookies and cool completely:
1. While the cookie dough chills, position two oven racks – one of them 1/3 of the way from the bottom and the top rack 1/3 of the way from the top of the oven.
2. Preheat the oven to 350 degrees F.
3. Bake the snow globes for 10-12 minutes, or until the edges of the cookies begin to turn a light golden brown.
Bake the mini cookies for 8-10 minutes, or until the edges of the cookies begin to turn a light golden brown.
4. Allow to cool on cookie sheet 1-2 minutes and remove to a wire cake rack to cool.
If baked on parchment paper, cookies can be cooled right on its surface; simply slide the paper with the cookies on top to a wire cake rack to cool. Remove cookies when cooled.
5. Cool completely.
STEP III: MAKE THE SECOND HALF OF THE COOKIE DOUGH
1. Repeat Step #II, above with the second half of the sugar cookie dough.
Use two cold cookie sheets for the next batch.
STORAGE
At this point, already baked cookies can be stored at room temperature or frozen. Crisp cookies should be stored in an airtight container. They will keep for about 4 days. Wrap cookies well for the freezer where they will keep for about a month.
STEP IV: MAKE THE ROYAL ICING RECIPE, SEPARATE INTO PORTIONS AND TINT
While cookies cool, make, thin and tint your royal icing:
1. Make the royal icing recipe and divide into portions:
You will need:
1. Blue for the sky
2. White, uncolored, for the snow and details
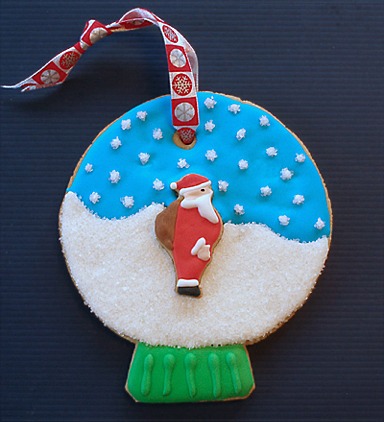
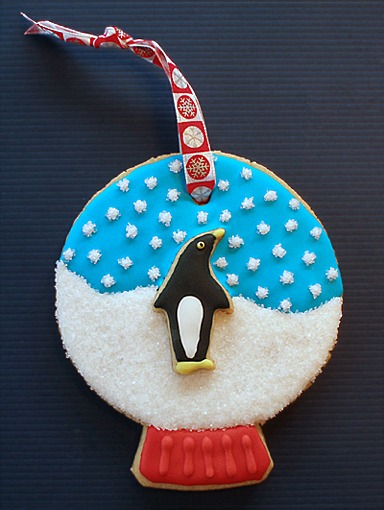
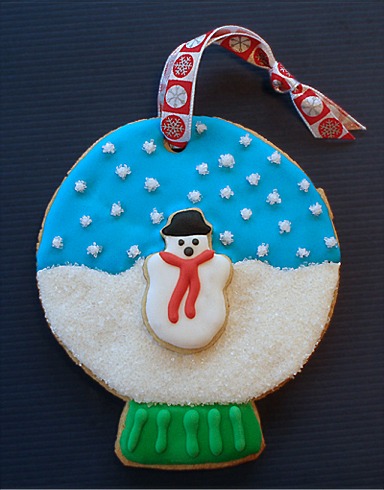
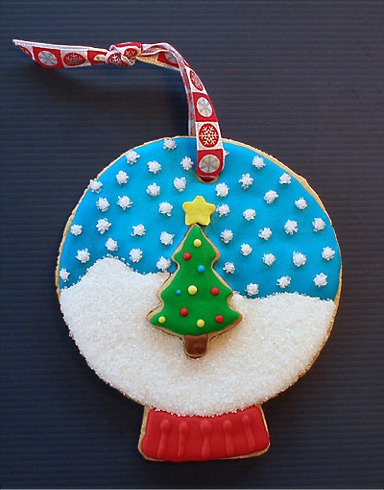
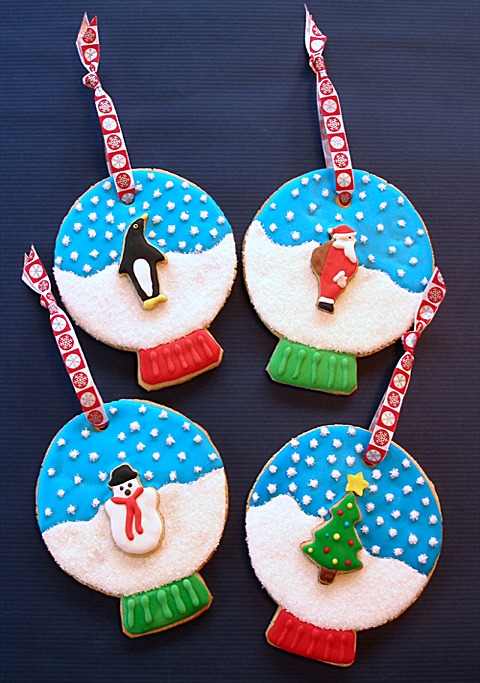
KELLY SAYS: I chose to feature a Santa, penguin, Christmas tree, and snowman in my snow globes, so I also made small amounts of the following colors:
3. Red-Santa's suit, Christmas tree decorations, snowman's scarf, base of snow globes
4. Black-Santa's boots, penguin, snowman's hat and face
5. Dark Green-Christmas tree, base of snow globes
6. Yellow-Penguin's beak and feet, Christmas tree decorations
7. Brown-Christmas tree trunk, Santa's sack
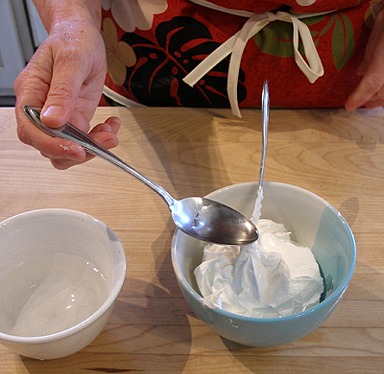
2. Royal icing is very thick and fluffy when you make it, in order to pipe it, it needs to be thinned, with water, to honey consistency.
KELLY SAYS: It is difficult to say how much water to add because it all depends on how much icing you are trying to thin.
I usually just scoop out a quantity, put it in a small bowl, add the water and then tint. I do the same thing to make all the colors I need. For a small bowl of icing, it may be a couple of teaspoons. I never measure it because I add a few drops at a time.
I never thin the whole bowl of icing. I thin it and tint it as I need it.
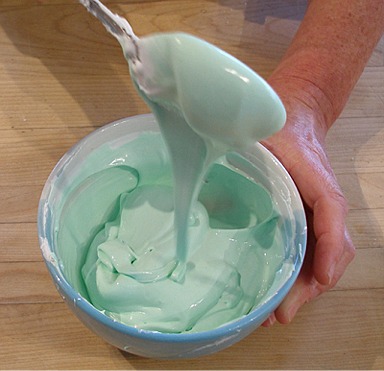
If you look at the photo of the thinning/tinting process below, you can see how the thinned icing flows into the bowl. This is thin enough to flow on the cookie. If you make the icing too thin, it can be really hard to control, and run right off the side of your cookie. You want it to have some body to it.
I know that some people like to make two thicknesses…one to outline and color, and one to fill in. That's a real pain, because then you have to have twice as many piping bags and tips.
I just outline and fill with the same icing. I move the fill icing around a little, with a toothpick, to get it in all the nooks and crannies. When I am done, I tap it on the counter, gently, to level the icing.
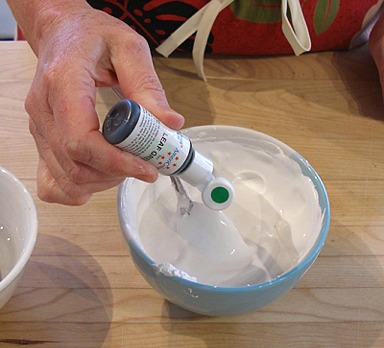
A. Add very little water, less than a teaspoon at a time, stir, and then add more till it is the correct consistency.
Keep the main bowl of untinted royal icing covered with plastic wrap, while you thin and tint, so it does not dry out.
For example, for the sky's blue color, I slowly add water and stir it in, till the desired consistency is reached. It should be as thick as honey.
It pipes better if it is not so thick.

B. Add desired color and stir till uniform.
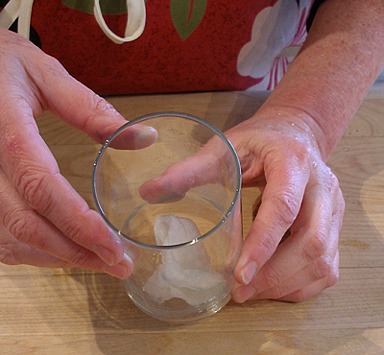
3. Place a damp piece of paper towel into the bottom of a drinking glass for each piping bag used.
This will help keep the icing from drying in the tip of each piping bag and help prevent eventual clogging.
4. Fit a disposable piping bag with a small #2 tip and place one bag each into a prepared glass.
Fill piping bag with royal icing.
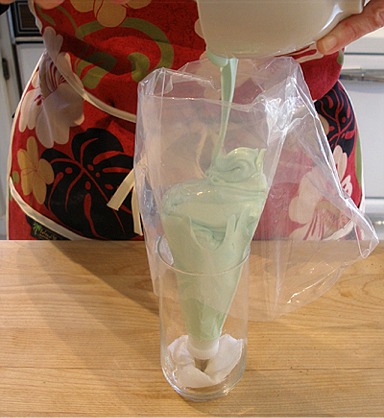
5. Place other piping bags into the prepared glasses and fill with thinned and tinted royal icing.
Fold tops of bags down, and prepare to pipe.
STEP V: ASSEMBLE AND DECORATE COOKIES
Decorate the mini-cookies:
1. First ice and decorate your mini cookies and set them aside to dry for about 20 minutes.
You can use a black edible marker, to make very small details, like Santa's eye.
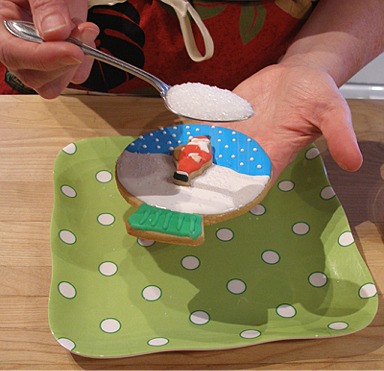
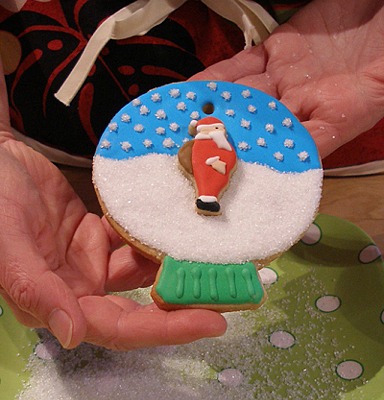
NOTE: Do not hold the cookie like this unless the previously piped colors are completely dry!

2. Place a couple of dots of royal icing on the back of a mini cookie and center it on the snow globes, gently pressing it down, to adhere.
Decorate the larger, snow globe cookies:
Pipe with royal icing:
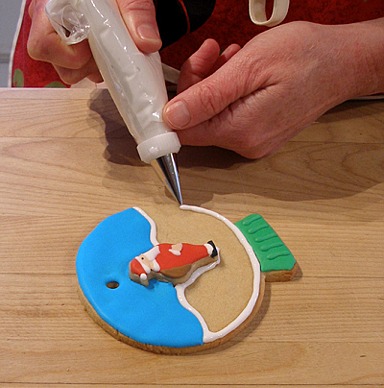
1. Take the blue icing and create a horizon line across the center of the cookie. This will be the “sky”.
Do not make the horizon line straight across, gently curve it, up and down, so it appears that your mini figure is standing in the snow.
2. Pipe the base of your snow globe, using red or green icing.
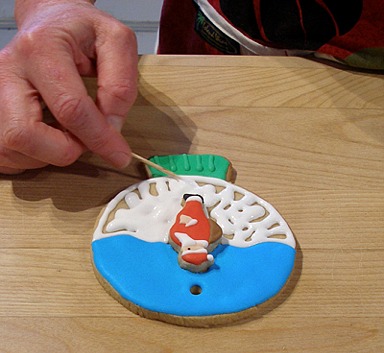
3. Set the cookie aside for about ten minutes, till the icing crusts, then pipe the line details on the base of the snow globe.
4. Repeat this procedure with all of the cookies.
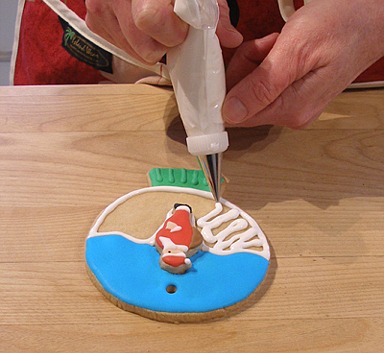
5. When you are done, start piping the white, or “snow”, starting with the first cookie you iced, since the icing on this cookie will be the driest.
Using the white icing pipe a line right up against the horizon line you made earlier, then go around the perimeter of the bottom of the cookie.
6. Loosely fill in the outline and then use a toothpick to fill in the icing to the edge. Gently tap the cookie on your work surface, to level the wet icing.
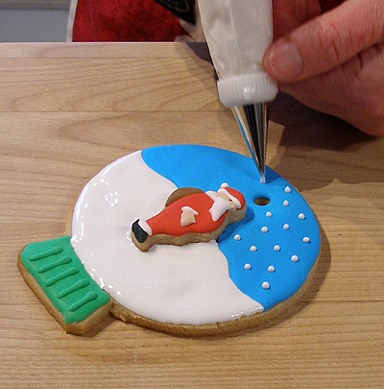
7. Pipe “snowflakes” in the sky, in a random pattern.
Apply sanding sugar:
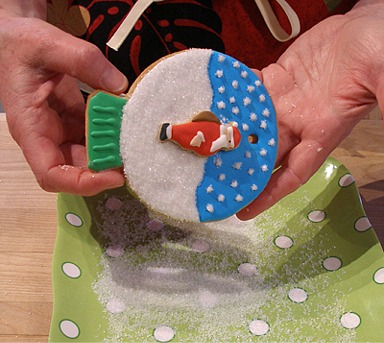
1. Put the sanding sugar into a small bowl.
Place a plate on the counter and hold a cookie above it. Using a teaspoon, sprinkle sanding sugar over the wet white icing, till it is completely covered.
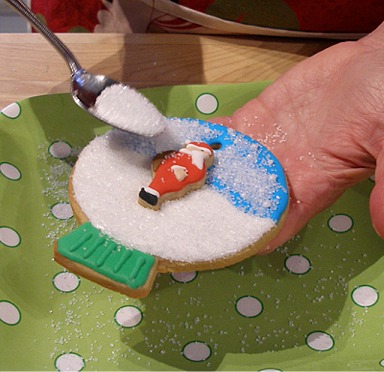
2. Carefully tip cookie, letting the excess sanding sugar fall onto the plate.
After coating a few cookies in sugar, pour the excess sugar, that has fallen onto the plate, back into the bowl of sugar, and reuse.
3. Set cookie aside to dry, and then repeat these steps with the rest of your cookies.
4. When cookies are COMPLETELY dry, tap cookie gently on its edge, to remove and of the loose sugar that remains.
5. Loop a hanging ribbon through the hole, and knot it at the top.
STORAGE
Cover and store at room temperature, where the cookies will keep for about 5 days. If you are using as a decoration, they will last for a few weeks, but will not be edible.
You can wrap and freeze for a month or more. Thaw them in their wrappers at room temperature.
The dye will not run.