
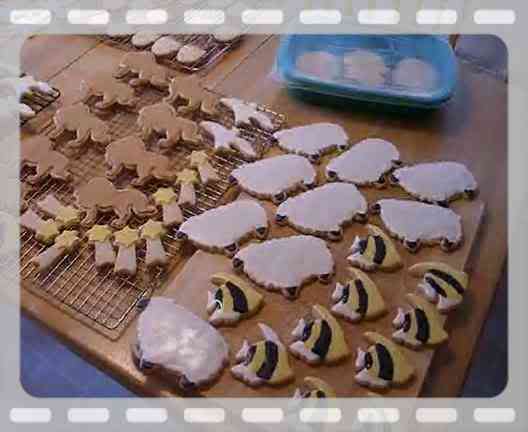
Tired of the same old boring Cadbury Eggs and hollow chocolate bunnies? Jazz up your child's Easter basket with some iced sugar cookies instead! I decided to make Easter Bunnies, the quintessential symbol for rebirth, the Butterfly, and, the ever-popular Easter Egg with sugar decorations and with feathering designs!
When Sarah asked me if I would do a cookie tutorial I was thrilled. You see, I am ALL about the cookies. I would MUCH rather make and decorate cookies than cake, any day of the week.
KELLY SAYS: I know that some of you are very experienced bakers but I have included little tips that I have learned in my pursuit of ultimate cookie perfection.
COOKIE RECIPE HELP
PART 1 – GATHER EQUIPMENT, PREPARE THE COOKIE RECIPE, BAKE COOKIES AND LET COOL
INGREDIENTS AND EQUIPMENT
The perfect canvas for tasty Easter cookies is the wonderful Sarah's Creative Cut-out Sugar Cookie Dough. Make 1 batch per cookie design!
1 recipe Royal Icing
Easter Themed Cookie Cutters
Silpat mats
Several baking sheets
Piping bags and tips
You will need several small and very small tips to do detail work. You will need one for each color you plan on using, so you don't have to deal with switching them out, mid-cookie. That's no fun at all.
I generally use sizes 2 and 3 for flooding icing and size 1 for details.
INSTRUCTIONS
1. Roll out the chilled cookie dough from Sarah's Creative Cut-Out Sugar Cookie Recipe.
I roll my dough out on a silicone mat. The mat allows you to roll out your dough with very little added flour. Adding too much flour, when rolling, can also toughen your finished product. Also, make sure your dough is nice and cold, for easy release from the cutters. Cold dough also ensures that the cookies will retain their shape when baked.
KELLY SAYS: I have found, when baking cookies, that it is best to try to cut your cookies out, leaving as little scrap as possible. Re-rolling dough tends to make it tougher, so cut those cookies close!
2. Carefully lift the cut out cookie dough on a silicone mat lined cookie sheet. Leave plenty of room between cookies, on the baking sheet, to allow for spreading.
KELLY SAYS: I ALWAYS bake my cookies on silicone mats. In my opinion, these are a baker's best friend! If your dough is too warm, just pop the whole sheet of cookies into the freezer for a quick chill before baking.
3. Bake cookies until the edges are golden brown. If you like your cookies on the crispier side, you can bake them a little longer.
KELLY SAYS: After your cookies are baked and cooled, you are ready to take on the fun part!
PART II – COOKIE DECORATING TUTORIAL
I use royal icing for decorating my cookies with. While the cookies cool, I make a batch of Royal Icing. I then tint the icing in multiple colors with gel food coloring. For this tutorial, I used Wilton colors.
INGREDIENTS
1 recipe Royal Icing – enough for 1 batch of Sarah's Creative Cut-Out Sugar Cookies
Multiple gel colors
TINTING ROYAL ICING
1. Separate Royal Icing into small bowls for tinting.
KELLY SAYS: I always keep my royal icing covered with plastic wrap so it will not dry out on top.
2. Color each batch of Royal Icing. When coloring your icing, add colors with a clean toothpick and then mix icing with spoon. If you want more a more concentrated color, add more color until you are satisfied with the results. Stir thoroughly.
You may thin the icing with water, a little bit at a time, to get it to the proper consistency. I like to use icing that easily flows off the end of the spoon, when you lift it up. It is similar to the consistency of Elmer's glue. Icing that is either too thin or too thick will give you a big headache.
FILLING A PIPING BAG
KELLY SAYS: When I was first learning how to decorate cookies, I would often find myself venturing to “salty language territory” when dealing with pastry bags and fingers coated with sticky royal icing. Oh, how I HATE to be sticky! I know that this may be old hat to more experienced bakers, but, here's how to save yourself from becoming a sticky mess when preparing your pastry bag…
Watch my video clip!
Please note green-tipped index finger. Be prepared to have colorful fingers when you are done mixing your icing colors. It is all part of the fun. It comes off….eventually!
THE SEQUENCE OF EVENTS ON MY VIDEO CLIP:
1. Cut the tip of the pastry bag and fit the coupler in the bag and screw on the coupler ring.
SARAH SAYS: The end of your bag needs to be measured and cut to fit the coupler. It will hold the decorating tip. The coupler comes in two parts: the base and the screw ring. Here's how to fill it: A. Separate the coupler (ring and base) and drop the cone shaped base, narrow end down, into the pastry bag, forcing it as far as it will go; B. Use a pencil to mark a line on the outside of the bag half way between the narrow end coupler and the first thread of the coupler. Remove the coupler from the bag and then make your cut at the mark.; C. After you cut the tip of the pastry bag, push the cone-shaped base of the coupler, narrow end first, back into the open end of the bag and down toward the pointed end as far as it will go (be gentle if using paper). Push it until its tip and one or two threads are showing through the cut hole. You will see the rest of the threads through the pastry bag, and; D. Screw on the coupler ring so the tip is straight and secure and the bag is airtight at the end.
2. You MUST fold the top of your bag down, creating a collar, before you fill it. This way, there is no icing in the way when you go to fold your bag down.
SARAH SAYS: Fold down the top of the bag about 2 to 3 inches to make a generous cuff. Place your hand beneath the cuff to hold the bag. It may be easier for you if you stand an empty pastry bag, tip side down in a glass, about 3 inches shorter than it; fold the top of the bag down over the edge of the glass to form a cuff.
3. Fill the pastry bag.
SARAH SAYS: With your free hand, using a long spatula (an offset or rubber spatula works well), fill the bag with frosting or filling a third full when piping small designs. Don't overfill the bag because during piping, the bag will become unyielding. Also, filling it too much risks melting and softening the icing inside from the heat of your hand while piping. To remove the icing from the spatula, hold the bag on the outside between your thumb and fingers and wipe or pinch the spatula and the icing will fall into the bag. When filled sufficiently, unfold the cuff and and with the side of your hand, force the contents to the end of the bag.
4. Fold the cuff to enclose the royal icing inside.
SARAH SAYS: Squeeze a small amount of icing into the icing bowl to make sure there's no air in the bag. An air encountered during piping will result in a little explosion of filling, disrupting your design. More about: How to hold the pastry bag. It is good to do this step every time you fill the bag and when you have problems piping.
5 Afterwards, place it in a tall drinking glass with a damp piece of paper towel in the bottom. The damp paper towel keeps the tip clean and does not allow a dry plug to form on the end of the tip. Dry plug = Sad decorator.
Here are my glasses, waiting for the filled pastry bags. Seriously, you will LOVE this tip! The glasses hold your bags when not in use and the damp paper towel keeps the tips clear and ready to go.
EASTER BUNNIES – OUTLINE AND FILL WITH FLOODING TECHNIQUE
For Easter cookies, I decided to make Easter Bunnies. What can I say? Bunnies are cute. I am especially partial to brown and white bunnies, so, that's what I decided to do. I went for a sweet and simple design on this one.
For this cookie, I isolated the colors by outlining and filling, and then letting them dry. Doing this makes them stand up a little, from the surface of the cookie, adding a little dimension. The eye and nose were added afterwards.
If your icing is the correct consistency, it will level out before it dries, leaving a nice smooth surface. If your icing is too thin, it may bound over the outline, and down the side of the cookie, making a sticky mess. This is what makes novice cookie decorators give up on the whole idea. PERSEVERE, it just takes practice to get it right!
INSTRUCTIONS
1.A. Start with one cookie. Outline one of the areas you want to fill in. In this case, I outlined an area with brown royal icing. When finished with the color, make sure you place the piping bag tip side down in the bottom of a glass lined with a wet paper towel.
If you want to isolate a small area within the larger area, such as a pink color, first apply the base area color in a small strip with a piping bag.
Then, nudge the icing in place with a toothpick. If you do this, just make sure to use a clean toothpick so your colors don't get muddied.
Lastly, I outline the small pink area with the base color, brown!
1.B. Fill in the larger area by piping it zigzags of brown royal icing before the brown outline of the same color royal icing before the border has had a chance to dry. Using a clean toothpick, spread the icing to fill in the area.
KELLY SAYS: I do not wait for the outline to dry before I fill it in. If you do this, you tend to be able to see the outline when the cookie is dry. I basically outline and then fill in right away, that way the outline just blends in with the rest of the icing and it looks better. If the icing is the correct consistency, it won't flow over the edge of the cookie, even though it is not dry.
2.A. Outline the next large color area you wish to fill in. Place the outline of the second color right up against the outline of the first color. Here, I am using white royal icing.
2.B. Fill in the larger area by piping it zigzags of white royal icing before the white outline of the same color royal icing has had a chance to dry. Using a clean toothpick, spread the icing to fill in the area.
FINISHED COOKIE
The nose and eye were added AFTER the base colors had dried. I added a tiny spot of white in the eye, to give it a little life and sparkle. Also notice the cute little cottontail! (I outlined the area for the cottontail with white royal icing and filled it in!) :
STORAGE
After the icing is totally dry, you can store them in an airtight container. I usually use metal tins to store them in. You can stack them.
The icing dries pretty hard so you don't have to worry about wrecking them, unless the icing is still wet. It can fool you. It may look dry on the outside and still be a bit damp on the inside.
If I ice early in the morning, I can safely stack them at night. If I ice in the afternoon, I let them sit overnight on the counter to dry.
Cookies can be individually wrapped in small cellophane bags, tied with pretty ribbons. Tuck the wrapped cookies in your child's Easter basket along with the usual fare, or bring them to an Easter party and sit back and accept the compliments.
QUESTION: Hi, I have made cut out cookies and am using the flooding method to decorate, using white as the background color, then adding red stripes over the white (while still wet) for a smooth flat surface. I have also outlined the cookie in black, also while the white is still wet. My problem is that the red bled into the white, while the black did not. What do I do to remedy the problem?
SARAH SAYS: If you are having bleeding issues, I think the best way to combat this problem is to not put the red OVER the white, instead, put the white in the areas you want white and, then apply the red next to it.
You can see what I mean by watching this little video clip I made. My hubby is narrating. He doesn't normally talk like this. He is imitating one of the chefs on the cartoon “Pucca”.
Click on the image below to see the video:
BUTTERFLIES – WET ON WET, OUTLINE AND FLOOD TECHNIQUE
For Easter cookies, I decided to make the quintessential symbol for rebirth, the Butterfly. Besides, I just got this lovely enormous copper Swallowtail cookie cutter for Christmas, and I needed an excuse to use it for the very first time. Come on, isn't it lovely?
Cookie and photo by Kelly CA © Sarah PhillipsCraftyBaking.com
Here's where I can pipe multiple colors of icing right next to one another without letting each space dry in advance. The colors will not run into one another.
INSTRUCTIONS
1. Remember to bake and let your cookies cool.
2. A. I started out with yellow icing, outlining on half of the perimeter of the cookie. I filled in the space with yellow frosting. I left a bare area around the perimeter of the wing, where I would later pipe on the black icing.
KELLY SAYS: Notice the little gob of black icing that is escaping between the bag tip and the coupler. I had to stop and tighten the coupler up a little, mid-cookie. If the blob had dripped onto the cookie, it would have been ruined. Make sure your coupler is screwed on nice and tight!
Always remember to place the filled pastry you are not currently using, tip side down in the glass with the wet paper towel in the bottom. This is so the frosting ion the pastry bag's tip will not dry out and clog it.
2.B. After the black perimeter and the yellow was filled in and still not dry, I began adding the wing veining with the black frosting, on top of the yellow field:

2.C. I continued veining with the black frosting:
2.D. I finished veining the first half of the butterfly with black frosting.
3. I did the same thing on the other side of the wing as in Steps 2, above.
KELLY SAYS: Notice that the errant blob of icing on the tip has been dispatched.
4. After the veining was all done, I went back in to add the orange dots on the wings and the blue details:
5.A. Then I piped on the body of the butterfly, in between the wings, being careful to not let the body and wings flow into each other.
KELLY SAYS: You can also wait until the wings are completely dry to pipe on the body. That way, you don't have to be as careful.
5.B. After you have piped on the veins, you can use a toothpick to gently tweak the lines, if necessary.
On the butterfly's thorax, I placed a dot of yellow over the still-wet black and then pulled the yellow dot down, with a toothpick to make a triangular shape.
I also added three triangular shaped vertical stripes on each wing and pulled them down with the toothpick, to elongate them.
Really, the toothpick is a fabulous tool, when icing cookies with royal icing.
FINISHED COOKIE
STORAGE
After the icing is totally dry, you can store them in an airtight container. I usually use metal tins to store them in. You can stack them.
The icing dries pretty hard so you don't have to worry about wrecking them, unless the icing is still wet. It can fool you. It may look dry on the outside and still be a bit damp on the inside.
If I ice early in the morning, I can safely stack them at night. If I ice in the afternoon, I let them sit overnight on the counter to dry.
Cookies can be individually wrapped in small cellophane bags, tied with pretty ribbons. Tuck the wrapped cookies in your child's Easter basket along with the usual fare, or bring them to an Easter party and sit back and accept the compliments.
EASTER EGG COOKIES – WET ON DRY AND SUGARING
Easter egg cookies can be made sparkly and attractive with superfine or sanding sugar!
A fun cookie decorating technique is piping wet royal icing on top of a dry royal icing base coat. Doing this allows you to create a little dimension in your cookies, as the icing you add onto the dry icing will stand up from the dry base coat. I often do this, when I want to add details to finished cookies that need a little “oomph”. Adding sparkling sugar to some areas before the royal icing has dried, adds additional interest and fun!
INGREDIENTS
Superfine sugar or sanding sugar for more sparkle
INSTRUCTIONS
1.A. Start with one cookie. On this, I piped a green base royal icing coat and let it dry. I then piped white royal icing polka dots in an overall pattern.
I then spooned super-fine sugar onto the cookie, while the white dots were still wet. The sugar adds a nice sparkle to the raised dots. You can also use sanding sugar to do this, for even more sparkle:
1.B. You then tip the cookie over, letting the excess sugar fall onto a plate. (You can use the excess sugar over again!) Gently tap the back of the cookie with the spoon, to shake off even more excess sugar:

1.C. After the sugared dots are dry, you go in with a SOFT clean paintbrush and brush away any excess sugar. You MUST wait till the sugared areas are completely dry to brush the sugar away, or you will have a mess on your hands. It is difficult to see the effect in pictures, but, the sugared areas have a delightful frosted appearance.
FINISHED COOKIE
STORAGE
After the icing is totally dry, you can store them in an airtight container. I usually use metal tins to store them in. You can stack them.
The icing dries pretty hard so you don't have to worry about wrecking them, unless the icing is still wet. It can fool you. It may look dry on the outside and still be a bit damp on the inside.
If I ice early in the morning, I can safely stack them at night. If I ice in the afternoon, I let them sit overnight on the counter to dry.
Cookies can be individually wrapped in small cellophane bags, tied with pretty ribbons. Tuck the wrapped cookies in your child's Easter basket along with the usual fare, or bring them to an Easter party and sit back and accept the compliments.
EASTER EGG COOKIES – FEATHERING
What is Easter without Easter Eggs? Well, you simply MUST have them!
The fun thing about decorating Easter egg cookies is that the simple oval shape is a great blank canvas for all kinds of cookie fun! Here, I show you how to use the technique of feathering to jazz up your cookie icing repertoire.
INSTRUCTIONS
1.A. Outline the cookie in the base color:

1.B. Loosely fill in the outline with the base color.
1.C. Spread icing within outline with toothpick or small offset spatula. The icing here is a little thick, but, it still leveled out:
1.D. Pipe colors of your choice over the base color:
2.A. Using a toothpick, pull a line through the wet base coat and the piped lines, reversing direction each time, to create a feather pattern:
FINISHED COOKIE
If necessary, you may go back on and use a clean toothpick to nudge the base color if the lines don't fill in completely.
STORAGE
After the icing is totally dry, you can store them in an airtight container. I usually use metal tins to store them in. You can stack them.
The icing dries pretty hard so you don't have to worry about wrecking them, unless the icing is still wet. It can fool you. It may look dry on the outside and still be a bit damp on the inside.
If I ice early in the morning, I can safely stack them at night. If I ice in the afternoon, I let them sit overnight on the counter to dry.
Cookies can be individually wrapped in small cellophane bags, tied with pretty ribbons. Tuck the wrapped cookies in your child's Easter basket along with the usual fare, or bring them to an Easter party and sit back and accept the compliments.