
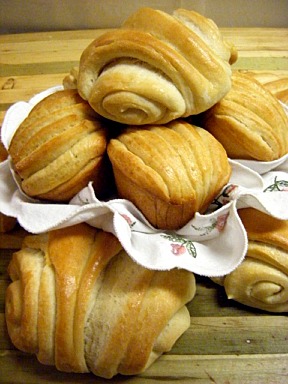
Rolls and photo by msbreez, Premium Member © Sarah Phillips
These are my favorite rolls. Not only are they delicious, but I can make the dough ahead and bake before serving. I have family members who ask that I make this recipe every Thanksgiving, which I have done for many years. I make a double batch so we have enough to make sandwiches from left-over turkey meat.
BREAD RECIPE HELP
merllgirl, Premium Member: Sarah….I am using your Make Ahead recipe. I found this to be the tastiest of all! Thank you.
INGREDIENTS
1 1/4 cups warm water (110 to 115 degrees F)
Two 1/4-ounce packages (about 4 1/2 teaspoons) Active Dry Yeast
1/2 cup warm milk (110 to 115 degrees F); can substitute with 2% or whole milk, soy milk or Lactaid
1/3 cup butter, softened; can substitute with Earth Balance soy buttery sticks
1/4 cup honey or 1/2 cup sugar; I prefer honey
1 1/2 teaspoons salt; do not reduce the amount
5 1/2 to 6 cups all-purpose or white whole wheat flour (or 1/2 all-purpose flour and 1/2 whole wheat flour)
2 large eggs, lightly beaten
INSTRUCTIONS
STEP I: MIX THE DOUGH
1. Rinse the bowl of a stand mixer with very warm water to warm it. Attach it to the mixer and fit it with the paddle attachment. Place 1/2 cup 110 to 115 degrees F water in the mixing bowl. Sprinkle in yeast and stir until dissolved.
2. In the same mixing bowl, add the remaining 110 to 115 degrees F (3/4 cup) water, 110 to 115 degrees F milk, butter, honey, salt and 2 cups flour. Beat 2 minutes at medium speed with electric mixer.
3. With the mixer on low, add the eggs and 1/2 cup flour. Beat at high speed for 2 minutes. With the mixer on low, add in enough remaining flour, 1/2 cup at a time, to make soft dough.
4. Stop the mixer, remove the paddle attachment and replace it with the dough hook. Turn the mixer on low and continue adding flour, 1/2 to 1/4 cup at a time, and mixing after each addition, until the mixture forms a stiff, but slightly tacky dough. Contiue adding in flour a few tablespoons at a time, and mixing after each addition, until the dough stops sticking to the sides of the bowl.
The small amounts of dough stuck to the bowl sides and bottom, should eventually become incorporated into the large dough mass – it will take awhile. Keep adding in tablespoons of flour with the mixer on low, and mixing well after each addition, until the sides of the bowl are nearly clean of sticky dough pieces. The dough should hold together a one cohesive unit when enough flour has been added, but should still remain slightly tacky and not dry.
STEP II: KNEAD THE DOUGH
You can knead the dough with the mixer for about 4 minutes until smooth and elastic. I like to finish the dough with some hand kneading, too. Turn onto an unfloured work surface – you do not need any more flour if the dough is mixed correctly. Knead for about 2 to 3 minutes.
OR, knead the dough by hand entirely for 8 to 10 minutes on a very lightly floured work surface. Avoid using a lot of flour on the work surface; you should barely need any if the dough has been mixed properly. The dough should remain slightly tacky.
STEP III: LET THE DOUGH RISE, PUNCH DOWN AND SHAPE
1. Form the dough into a ball and place in a greased bowl. Turn the dough ball in the bowl so it is greased all over. Cover the bowl tightly with plastic wrap and let rise until doubled.
2. Punch the dough down. Shape into desired shapes for dinner rolls.
SARAH SAYS: I weigh each piece of dough for evenly sized rolls. I weigh 2-ounces of dough for each roll and get about 30 rolls from each batch. I cut each portion with a bench knife cutting straight down – never saw at the dough with a knife to break off pieces or tear at the dough.
TWO OPTIONS AFTER SHAPING THE DOUGH:
NOTE: You have two options after shaping the bread dough!
OPTION 1: RIGHT AFTER SHAPING, LET THE ROLLS RISE AND BAKE:
You can bake the rolls right after shaping them in Step #7, above:
Place shaped rolls on a greased cookie sheet, two-inches apart and let rise in warm, draft-free place, until doubled in size, about 45 minutes to an 1 hour.
Thirty minutes before the rolls are done rising, position the oven shelf to the middle of the oven and preheat it to 350 degrees F.
After the rolls have done rising, brush them lightly with one egg or egg white beaten with a little water for a super shiny crust.
If you forget to do it before baking, you can do it five minutes before the rolls are ready to come out of the oven.
Bake the rolls for about 20 to 30 minutes or until done. Cool rolls on a wire cake rack. Can serve warm!
SARAH SAYS: My favorite and most accurate way to do test whether bread is done is to place an Instant Read Thermometer dead center in the bottom of it. If it reads between 190 – 210 degrees F, the bread is done.
Rolls and photo by Sarah Phillips © Sarah Phillips
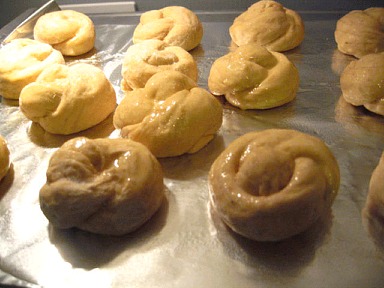
OPTION 2: FREEZE THE SHAPED DOUGH, THAW AND LET RISE AND BAKE
You can freeze the unbaked rolls right after shaping them in Step #7, above:
Place shaped rolls on a parchment or waxed paper lined baking sheet and place uncovered in freezer until frozen — about 1/2 hour. This is so they won't stick together when placed in a plastic freezer bags for permanent storage. They will keep for about a month or more, frozen.
To bake after freezing:
1. Remove from freezer; place frozen rolls on greased or parchment paper lined baking sheets, about two-inches apart.
2. Loosely cover with plastic wrap or a kitchen towel and let rise in warm, draft-free place until they have risen about 1/3 in size taking about an hour.
Position the oven shelf in the middle of the oven and preheat to 350 degrees F. I have found that if the thawing place is around 75 – 80 degrees F, next to a stove or in the sunlight, that it takes only 20 minutes or so).
3. Brush rolls with one egg or egg white beaten with a little water for a super shiny crust.
Ready to go in the oven for baking:
Rolls and photo by Sarah Phillips © Sarah Phillips
If you forget to do it before baking, you can do it five minutes before they are ready to come out of the oven.
4. Bake the rolls for about 20 to 30 minutes or until done. Cool rolls on a wire cake rack. Can serve warm!
SARAH SAYS: My favorite and most accurate way to do test whether bread is done is to place an Instant Read Thermometer dead center in the bottom of it. If it reads between 190 – 210 degrees F, the bread is done.
STORAGE
Shaped frozen dough: Will keep for a month or more.
Baked rolls: will keep frozen for a month or more.
ROLL SHAPES
Crescents: Roll each half to 14-inch circle. Cut each into 12 pie-shaped wedges. Roll up tightly from wide end. Curve ends slightly to form crescents.
Knots: Divide each half into 12 equal pieces; roll each to 9-inch rope. Tie once loosely.
Coils: Divide each half into 12 equal pieces; roll each to 9-inch rope. Coil each rope and tuck end under the coil.
Twists: Divide each half into 12 equal pieces; roll each into 12-inch rope. Hold each end and then twist in opposing directions couple of turns. Don't wind too tightly.
BROWN AND SERVE ROLLS
Bake rolls as usual, but do not let them brown; they will be slightly tacky on top. Take out of pan let cool completely on a rack. Wrap in foil or plastic wrap and then place in an airtight bag. They will keep up to 7 days in the fridge and 3 months in the freezer. They can be baked right from the fridge, until golden brown. If frozen, let thaw covered at room temperature and then bake.
Nutrition Information Nutrition Information Per Serving (1 roll): calories 100; total fat 6 g; saturated fat 3.5 g; cholesterol 50 mg; sodium 360 mg; total carbohydrate 9g; dietary fiber 0g; protein 2 g