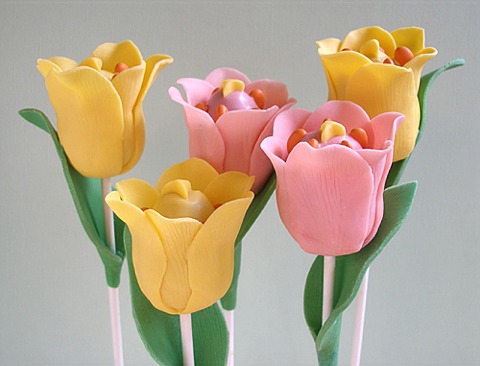
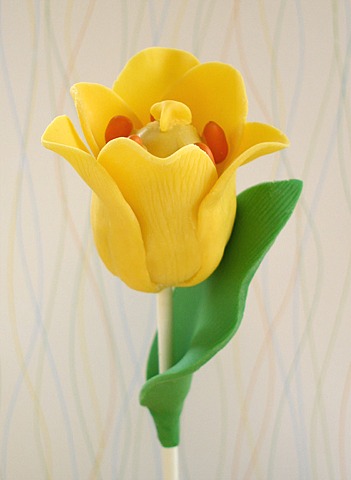
These stunning and realistic Spring Tulip Cake Pops are made from cake balls made from homemade cake and buttercream frosting, that does not need refrigeration, dipped in candy melts with adorable candy clay accents. You can use a cake mix and frosting from the grocery store if you are pressed for time, and our other elements to the recipe are simple and easy to make. Our extensive recipe-tutorial shows you how to make successful cake balls, how to secure them to a lollipop stick and how to decorate them to your liking! Of course, you can omit the candy clay leaves if you wish, but they really add to the realism of the tulips. They also make a perfect and delicious bouquet to give for Mother's Day!
CAKE RECIPE HELP
See also:
 Cake Pops 101
 Easter Bunny Cake Pops
YOU WILL NEED:
Make the night before or a couple of hours before:
Step I:
1 recipe each Easy Candy Clay or Chocolate Plastic from Candy Melts; one recipe pink; one yellow; one recipe leaf green.
NOTE: We selected pink and yellow for the tulips, but of course, you may also choose any color you wish for the tulips.
ONE 9-inch layer Red Velvet Layer Cake with Traditional Cream Cheese Frosting or the Gluten-Free Everyday Chocolate Cake or Cupcakes. You may use other butter cake recipes, or even a cake mix, but you may have to use more cake and/or frosting to get the yield and consistency indicated in the tutorial.
IMPORTANT NOTE: The cake used should not be overly moist or wet because it causes the coating on the cake balls to crack when it hardens. The cake also gets misshapen easily and will not hold its shape and fall from its stick. If the cake layer is overly moist, leave it out overnight, unwrapper at room temperature to dry slightly.
3/4 to 1 cup Tami’s or Perfect Buttercream or store-bought tub frosting
NOTE: We selected this buttercream because it does not need refrigeration.
Special Ingredients and Equipment:
3 rimmed baking sheets
parchment or waxed paper cut to size
Step I:
One 2 TEASPOON Cookie Scoop (small size) for equal portioning. (You may be able to find it less expensive, but remember the cheaper it is it may hurt your hand.)
Step II:
Silpat Nonstick Mat lightly dusted with cornstarch
One Small plastic fondant rolling pin
“Tulip Petal” Cutter and “Stick Two” from the Wilton Gum Paste Flowers Kit
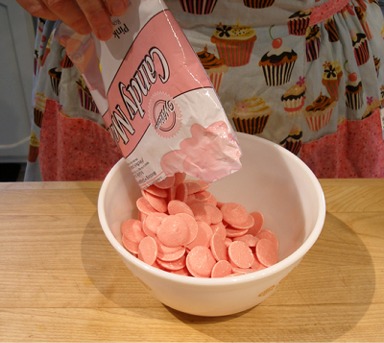
1 -2 14-ounce packages Pink Wilton Candy Melts or Merckens Brand for coating
1 -2 14-ounce packages Yellow Wilton Candy Melts or Merckens Brand for coating
Small amounts Paramount Crystals or shortening(about 1 teaspoon per pound of candy melts) to thin the Candy Melts, if needed; Paramount Crystals work better
Several clean Styrofoam egg cartons to shape flower petals(wash cartons in warm soapy water and rinse, to remove possible salmonella threat)
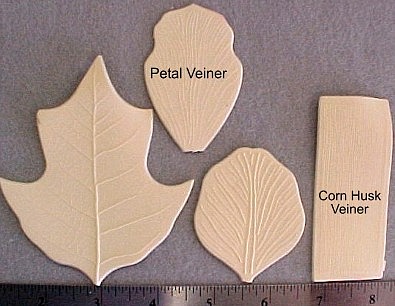
One FMM Veining Mats Set 5-8. Use the “Petal Veiner”; optional, but it makes the flowers look more realistic.
(Corn Husk Veiner” used in Step IV)
40-50 8-inch Paper Lollipop Sticks
cotton balls or tissues, such as Kleenex Brand
Step III:
Candy Melts: Pink and Yellow from Step II
Paramount Crystals or shortening from Step II
8-inch Paper Lollipop Sticks from Step II
Two large Blocks of Sheet Styrofoam or wood, with lollipop stick sized holes drilled into it, to hold your cake pops while the candy coating hardens.
Tulip Stamens: One package Candy Coated Sunflower Seeds – assorted colors; I just picked the orange ones out of the mix to use for this project.
Step IV:
Candy Melts: Pink and Yellow from Step III
Paramount Crystals or shortening from Step III
Silpat Nonstick Mat lightly dusted with cornstarch, from Step II
One Small plastic fondant rolling pin from Step II
“Tulip Leaf” Cutter from the Wilton Gum Paste Flowers Kit
One FMM Veining Mats Set 5-8, from Step I. Use the “Corn Husk” Veining Mat, optional; it makes the leaves look more realistic
SPECIAL TIP: HOW TO MELT/REHEAT CANDY MELTS
1. Place one 14-ounce package Pink Wilton Candy Melts in a microwave proof bowl.
2. Microwave at 40% power or defrost setting for 1 minute. Stir thoroughly. Continue to microwave and stir at 30-second intervals until smooth and completely melted.
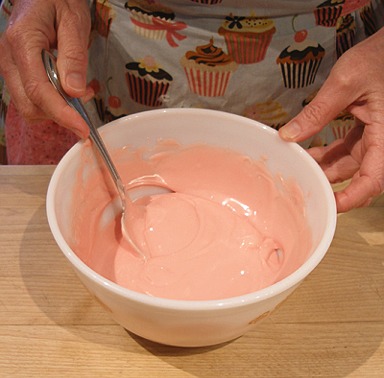
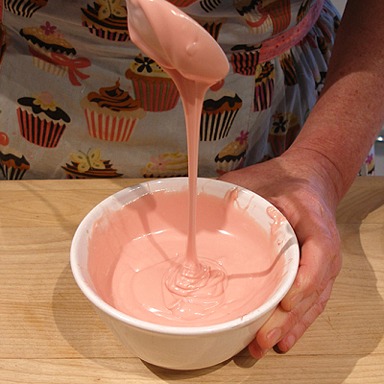
3. Make sure the melted Candy Melts flows easily like honey from a spoon when dipped in it and lifted out.
If the candy coating is too thick, you will have a difficult time dipping the cake pops. If it is too thin, you may see deeply colored cake ball dough through the coating.
NOTE: Or, you can melt Candy Melts in a double boiler: Fill lower pan with water to below level of top pan. Heat water to a simmer, then remove from heat. Put Candy Melts in top pan and set in position on lower pan. Stir constantly, without beating, until smooth and completely melted.
3. If at any time the Candy Melts need reheating, microwave and stir at 40% power for 10 seconds intervals or less.
SPRING TULIP CAKE POPS TUTORIAL
STEP I: MAKE THE CAKE BALL DOUGH. FORM THE 40-50 TULIP CENTERS.


Cake pops are made from cake balls. The trick to making cake balls is to start with cake that is not overly damp and gooey and to not mash the frosting.
After forming the cake balls and placing them on sticks, you can freeze them for later use.
INSTRUCTIONS
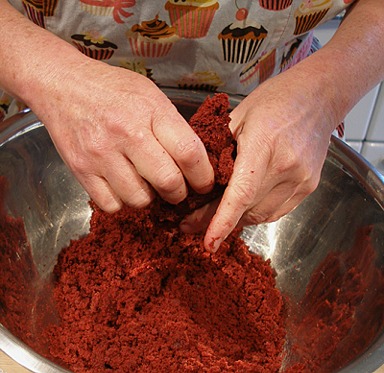
1. With your fingertips, crumble the Red Velvet Layer Cake layer into small cake pieces in a large bowl. There should be NO large pieces visible.
Make sure you do not squish the cake pieces together; the cake should not be overly moist or wet. If they are, spread them onto cookie sheet and let them sit at room temperature for about an hour.
You do not want to use DRY cake, but you do not want it to be overly damp, either.
2. Starting with 3/4 cup Tami's or Perfect Buttercream, add it 1/4 cup at a time to the crumbled cake pieces.
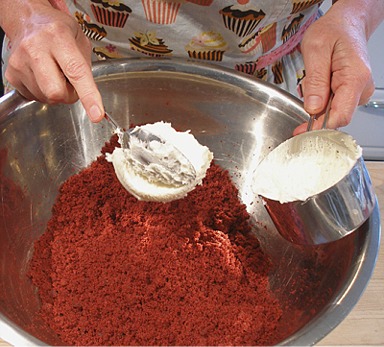
After each 1/4 cup addition, lightly mix the buttercream and cake pieces together with your fingertips.
NOTE: Do not to mash and squish the cake pieces together with the frosting, otherwise the cake balls will get overly damp, slimy and dense.
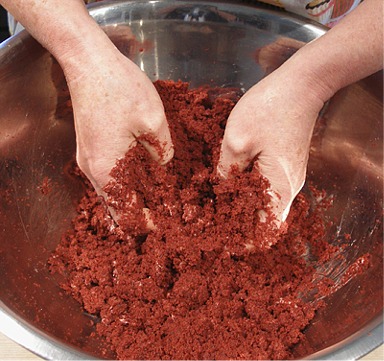
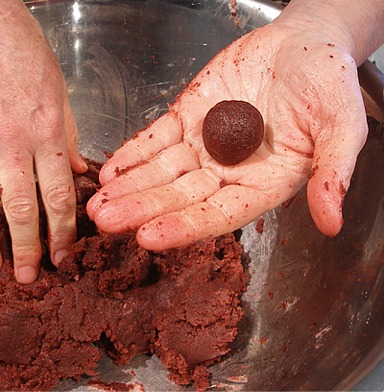
3. Continue mixing the cake crumbs with your hands until it starts to form a cohesive mass. To test, roll a ball of the cake/frosting mixture until it holds together.
If it does, stop mixing.
NOTE: If necessary, add A LITTLE more frosting, a tablespoon at a time, up to 1/4 more, and mix after each addition, until you can roll a cohesive ball of the cake/frosting mixture.
Do not add too much frosting because if your cake/frosting mix is too wet, it may cause the coating to crack when it hardens.
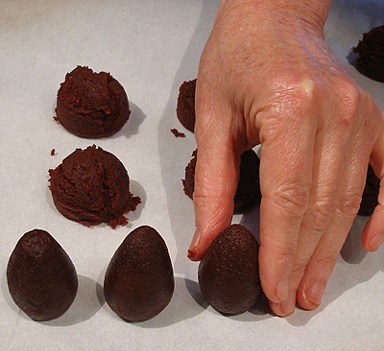
Form 40-50 Egg-Shaped Cake Balls to use as the TULIP CENTERS
1. Line two rimmed baking sheets with parchment or waxed paper.
2. Portion 40-50 cake pieces from the CAKE BALL DOUGH using the Two Teaspoon Cookie Scoop. Place each one on the prepared baking sheet.
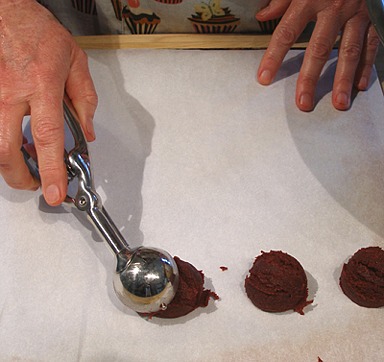
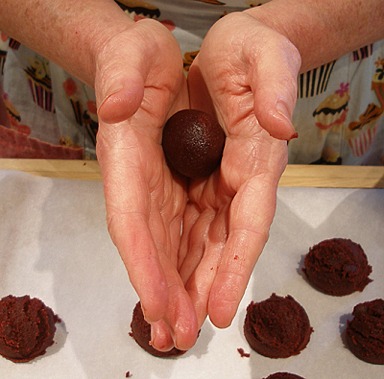
3. Roll each cake portion in your hands to form a neat CAKE BALL.
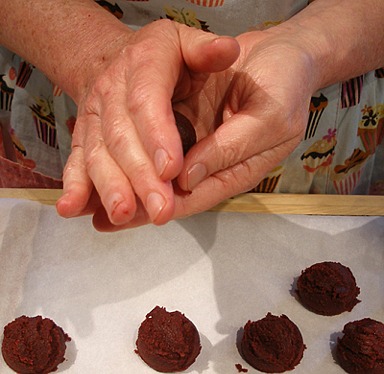
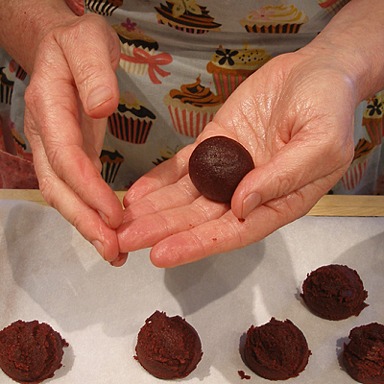
4. To form the TULIP CENTER, roll each CAKE BALL into an egg-shaped cake ball.
Do that by rolling one end of the CAKE BALL to elongate its shape.
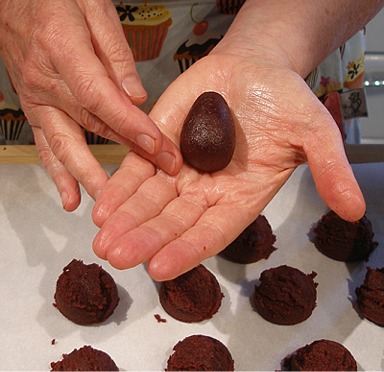
5. After making, place each TULIP CENTER WIDE END DOWN on the prepared baking sheet. Cover loosely with a large sheet of plastic wrap.
STORAGE
When completed with 40-50 TULIP CENTERS, cover and place them in the refrigerator chill for AT LEAST an hour, or up to 4 hours before attempting to dip them in the PINK AND YELLOW WILTON CANDY MELTS, Step III. They need to firm up before dipping otherwise the coating will crack.
STEP II: MAKE THE TULIP PETAL SETS AND PISTILS FROM THE PINK AND YELLOW EASY CANDY CLAY


You will need: 40 – 50 Tulip Petal Sets; 20 – 25 sets in pink and 20 – 25 sets in yellow or in any colors you desire!
INSTRUCTIONS
Make the Tulip Petals Sets
While the TULIP CENTERS chill, use the PINK AND YELLOW EASY CANDY CLAY to form the TULIP PETAL SETS AND PISTILS.
INGREDIENTS
one recipe PINK EASY CANDY CLAY and one YELLOW EASY CANDY CLAY
One Silpat Nonstick Mat lightly dusted with cornstarch
One Small plastic fondant rolling pin
“Tulip Petal” Cutter and “Stick Two” from the Wilton Gum Paste Flowers Kit
One FMM Veining Mats Set 5-8. Use the “Petal Veiner”; optional, but it makes the flowers look more realistic.
(Corn Husk Veiner” used in Step IV)
1 -2 14-ounce packages Pink Wilton Candy Melts or Merckens Brand for coating
1 -2 14-ounce packages Yellow Wilton Candy Melts or Merckens Brand for coating
Small amounts Paramount Crystals or shortening(about 1 teaspoon per pound of candy melts) to thin the Candy Melts, if needed; Paramount Crystals work better
40-50 8-inch Paper Lollipop Sticks
Several clean Styrofoam egg cartons to shape flower petals(wash cartons in warm soapy water and rinse, to remove possible salmonella threat)
cotton balls or tissues, such as Kleenex Brand
INSTRUCTIONS
Soften the Easy Candy Clay:
NOTE: It will be VERY hard after sitting in storage, but will soon soften up, due to the warmth of your hands, as you knead it.
It is easier to warm and roll out small portions of candy clay at a time.
1. Unwrap the PINK EASY CANDY CLAY and cut off small portions of it at a time with a paring knife.
2. Work it between your fingers until it becomes soft and pliable.
3. Keep any unused candy clay covered and set aside.
NOTE: Soften the YELLOW EASY CANDY CLAY using the above steps when needed.
Make the Tulip Petal Sets:
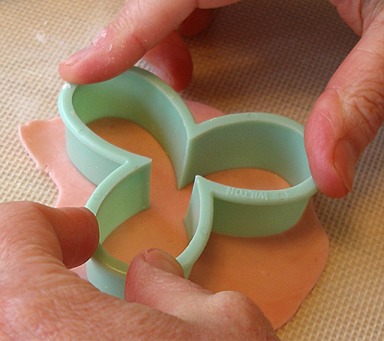
1. When a small amount of the PINK EASY CANDY CLAY is sufficiently kneaded and pliable, roll it out on a Silpat Nonstick Mat lightly dusted with cornstarch until it is very thin, about 1/16-inch thick.
NOTE: It is easier to roll out small portions of Candy Clay at a time. I like to use a small plastic fondant rolling pin.
2. Using the “Tulip Petal” Cutter from the Wilton Gum Paste Flowers Kit, cut out TWO PETAL SETS.
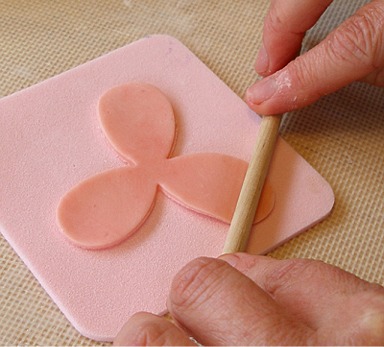
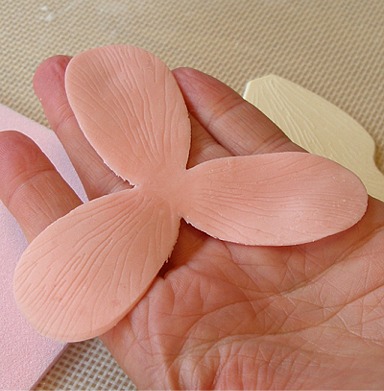
3. Using “Stick Two” from the Wilton Gum Paste Flowers Kit, roll out the edges of each petal of the FIRST PETAL SET to thin them.
Leave the center of the petals thicker, for more support. Repeat with the SECOND PETAL SET.
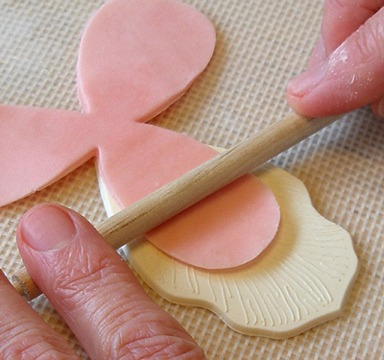
4. Set the Petal Veining Mat from the FMM Veining Mats Set 5-8, under one petal at a time from the FIRST PETAL SET.
Roll over it with b]”Stick Two”[/b] to emboss the surface.
Repeat with each petal from the SECOND PETAL SET.
5. Place the FIRST PETAL SET, embossed(design) side DOWN, on a Silpat Nonstick Mat lightly dusted with cornstarch.
6. Prepare the “Tulip Petal Set Glue”:
Place 1/2 cup PINK WILTON CANDY MELTS in a microwave-proof bowl. Microwave at 40% power or defrost setting for 30 seconds. Stir thoroughly.
Continue to microwave and stir at 30-second intervals until smooth and completely melted. (See also SPECIAL TIP: HOW TO MELT/REHEAT CANDY MELTS at the beginning of this tutorial.)
7. Using a toothpick, place dots of the matching MELTED CANDY MELTS color on the PETAL SET, as shown in the photo below.
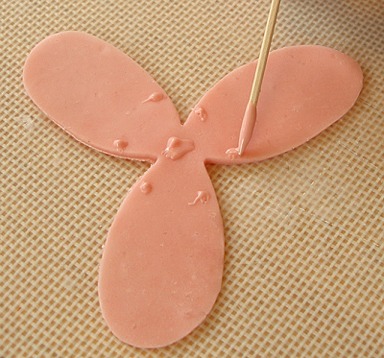
8. Flip the SECOND PETAL SET embossed(design) side DOWN, and then center it over the FIRST PETAL SET. Make sure all six petals will be showing.
Gently press the middle of the SECOND PETAL SET so it will adhere to the “Tulip Petal Set Glue” on the FIRST PETAL SET.
NOTE: Please excuse the blurry picture.
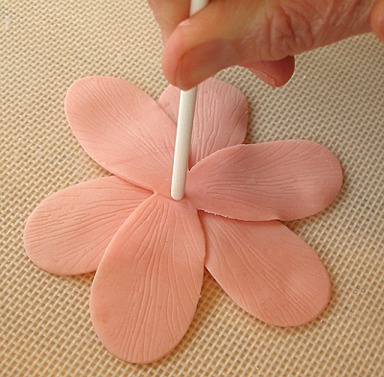
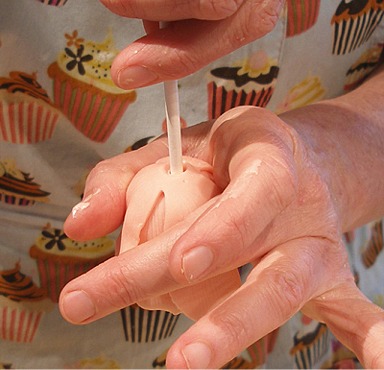
9. Flip the TULIP PETAL SET set over, so the embossed sides are UP.
Push an 8-inch Paper Lollipop Stick through the center of the petal set to make a hole and then, remove.
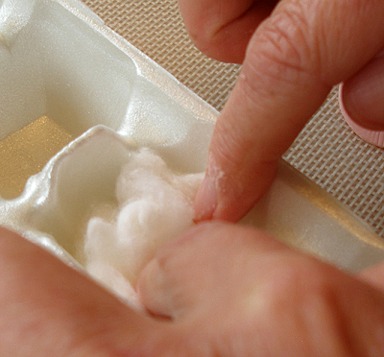
10. Put a little cotton balls or tissues, such as Kleenex Brand in each hollow in the Styrofoam egg cartons, pressing it down to make an impression in the center.
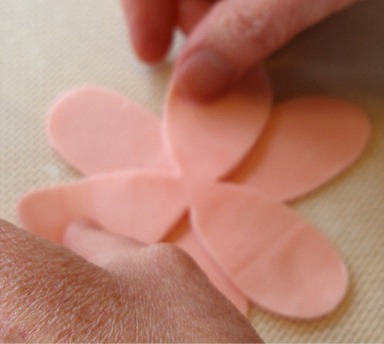
11. Then, gently place the completed TULIP PETAL SET in the depression, molding it into a tulip shape.
You can make it more realistic looking by frilling the end of the petals with your finger tips.
12. Repeat the process until you have 40 – 50 TULIP PETAL SETS: 20 – 25 sets in pink and 20 – 25 sets in yellow or in any colors you desire!
Make the Tulip Pistils:
1. Line a rimmed baking sheet with parchment or waxed paper.
2. Pinch a small amount of softened YELLOW EASY CANDY CLAY into a three-lobed TULIP PISTIL shape.
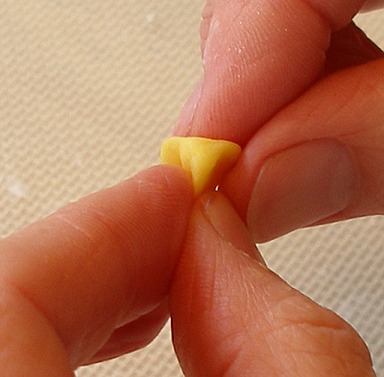
3. Cut off any excess off the bottom with a sharp paring knife, so it lies flat. Set it aside, on the prepared baking sheet, to set.
4. Make 40 – 50, plus some extras in case of breakage.
STEP III: INSERT THE LOLLIPOP STICKS INTO THE TULIP CENTERS. COAT THEM WITH CANDY MELTS. ATTACH THE PISTILS AND STAMENS (SUNFLOWER SEEDS)


INGREDIENTS
40 – 50 Chilled TULIP CENTERS, from Step I; Keep in refrigerator until needed in the recipe
Candy Melts: Pink and Yellow from Step II
Paramount Crystals or shortening from Step II
8-inch Paper Lollipop Sticks from Step II
Two large Blocks of Sheet Styrofoam or wood, with lollipop stick sized holes drilled into it, to hold your cake pops while the candy coating hardens.
STAMENS: One package Candy Coated Sunflower Seeds – assorted colors; I just picked the orange ones out of the mix to use for this project.
PISTILS: 40 – 50, from Step II
INSTRUCTIONS
Insert the Lollipop Sticks:
1. Place 3/4 cup PINK WILTON CANDY MELTS in a microwave-proof bowl. Microwave at 40% power or defrost setting for 30 seconds. Stir thoroughly.
Continue to microwave and stir at 30-second intervals until smooth and completely melted. (See also SPECIAL TIP: HOW TO MELT/REHEAT CANDY MELTS at the beginning of this tutorial.)
2. Remove a few TULIP CENTERS from the refrigerator at a time, to insert the sticks.
Stick the end of the 8-inch Paper Lollipop Stick 1/2-inch into the MELTED CANDY MELTS.
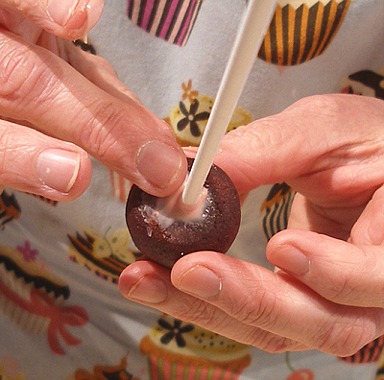
3. Push the coated end of the 8-inch Paper Lollipop Stick into the center of the WIDE END(the side that was resting on the baking sheet) of the TULIP CENTERS. Make sure to only push the stick half-way into the cake ball.

If there is excess candy melt coating where the stick was inserted, wipe it away with your fingertip.
4. Place the other end of the stick into the Block of Sheet Styrofoam.
5. Repeat Step#s 1 – 4, above, to complete 20 – 25 TULIP CENTERS, using PINK CANDY MELTS.
Repeat Step#s 1- 4, above, using YELLOW CANDY MELTS, to complete 20 – 25 TULIP CENTERS.
6. Place the cake pops, with sticks inserted in the refrigerator while you prepare the candy coating for dipping.
STORAGE
Place the TULIP CENTERS ON STICKS in the refrigerator for 30 minutes to an hour prior to coating them.
Coat them with Candy Melts. Immediately Attach the Pistils and Stamens (Sunflower Seeds):
1. Place one 14-ounce package of the PINK WILTON CANDY MELTS AT A TIME, in a small deep bowl. Melt according to the SPECIAL TIP: HOW TO MELT/REHEAT CANDY MELTS at the beginning of this tutorial.)
Let it cool slightly so it still flows easily like honey from a spoon when dipped in the candy melts and is lifted from it.
Melt more PINK WILTON CANDY MELTS as needed.
2. Have the TULIP STAMENS and PISTILS (orange candy coated sunflower seeds) ready at your dipping station.
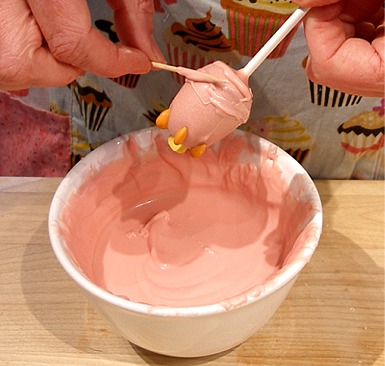
3. Dip one chilled TULIP CENTER at a time into the melted PINK WILTON CANDY MELTS until it is completely submerged up to where the Lollipop Stick is inserted. Make sure you cover all of the cake.
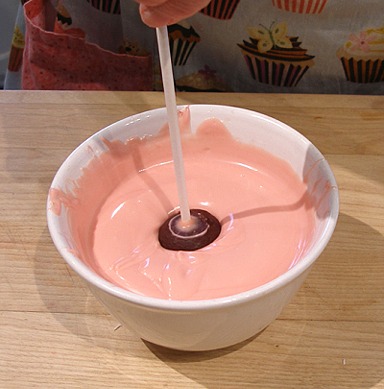
4. Then, lift the PINK COATED TULIP CENTER straight out and let the excess candy melts drip off and back into the bowl.
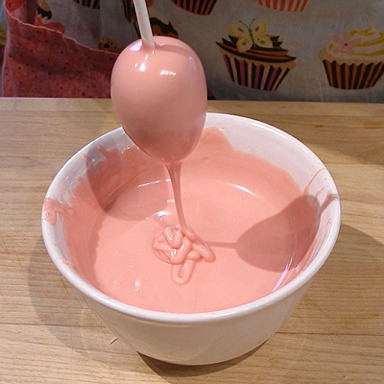
NOTE: It is helpful to pat the wrist of your hand to help the excess coating drip off. BE CAREFUL, if you tap too hard, you can dislodge the cake pop and it will fall right off the stick.
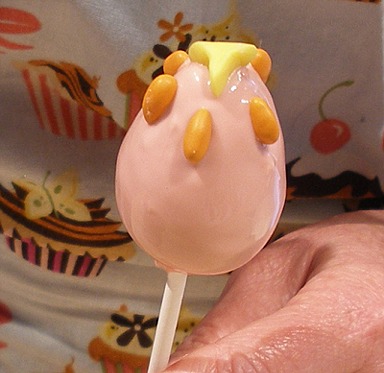
5. Turn the PINK COATED TULIP CENTER upright.
Immediately place one of the TULIP STAMENS in the center.
Then, place 6 PISTILS (orange candy coated sunflower seeds), equally spaced, as shown in the photos below.
6. Place the COMPLETED PINK COATED TULIP CENTER back into the Block of Sheet Styrofoam.
7. Repeat Steps# 1 – 7 until 20 – 25 TULIP CENTERS become COMPLETED PINK COATED TULIP CENTERS
Repeat Steps# 1 – 7 until 20 – 25 TULIP CENTERS become COMPLETED YELLOW COATED TULIP CENTERS using YELLOW CANDY MELTS,
STORAGE
Let the COMPLETED COATED TULIP CENTERS set at room temperature for about an hour before proceeding to STEP IV. Optionally place them in the refrigerator for about 15 to 30 minutes to help firm up the coating faster. Do NOT cover them.
Do NOT store them in the refrigerator.
STEP IV: COMPLETE THE PROJECT – ASSEMBLE THE TULIP CAKE POPS. MAKE THE LEAF GREEN TULIP LEAVES AND ATTACH TO THE TULIP CAKE POPS.


When the coating on the COMPLETED PINK AND YELLOW COATED TULIP CENTERS has hardened, use the candy melts that remain. We will use this to “glue” in the project.
INGREDIENTS
20 – 25 COMPLETED PINK COATED TULIP CENTERS, from Step III
20 – 25 COMPLETED YELLOW COATED TULIP CENTERS, from Step III
20 – 25 PINK TULIP PETALS SETS, from Step II
20 – 25 YELLOW TULIP PETALS SETS, from Step II
Remainder of:
Candy Melts: Pink and Yellow from Step III
Paramount Crystals or shortening from Step III
One recipe LEAF GREEN EASY CANDY CLAY
One Silpat Nonstick Mat lightly dusted with cornstarch, from Step II
One Small plastic fondant rolling pin from Step II
“Tulip Leaf” Cutter from the Wilton Gum Paste Flowers Kit
One FMM Veining Mats Set 5-8, from Step I. The “Corn Husk” veining mat, optional; it makes the flowers look more realistic
INSTRUCTIONS
Assemble the Tulip Cake Pops:
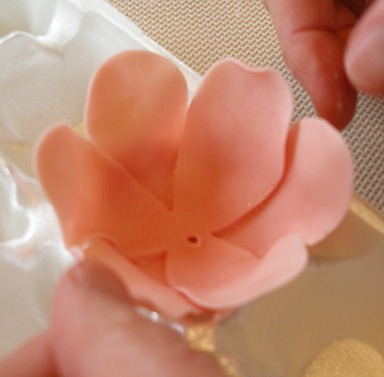
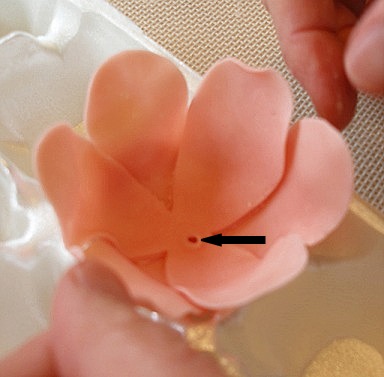
1. Have ready, one PINK TULIP PETALS SET. Make sure the petals face upwards. Locate the hole you made in the middle, Step II. (See arrow). Set aside.
2. Place 3/4 cup PINK WILTON CANDY MELTS in a microwave-proof bowl. Microwave at 40% power or defrost setting for 30 seconds. Stir thoroughly.
Continue to microwave and stir at 30-second intervals until smooth and completely melted. (See also SPECIAL TIP: HOW TO MELT/REHEAT CANDY MELTS at the beginning of this tutorial.)
3. Starting with one COMPLETED PINK COATED TULIP CENTER at a time, using a toothpick, spread the “glue” (melted pink Candy Melts) on the bottom of the cake part and 1/3 of the way up the sides of it.
4. Working quickly, place the bottom of the stick from the COMPLETED PINK COATED TULIP CENTER through the hole in the middle of the PINK TULIP PETALS SET. Thread the
PINK TULIP PETALS SET onto the stick to the top, and press it against the COMPLETED PINK COATED TULIP CENTER to adhere to the “glue”.
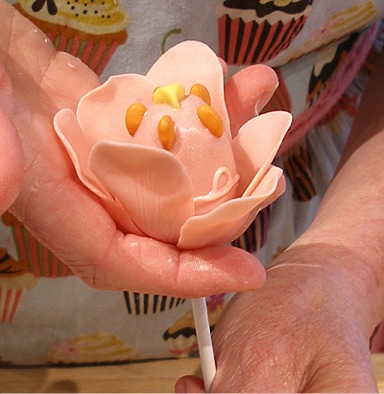
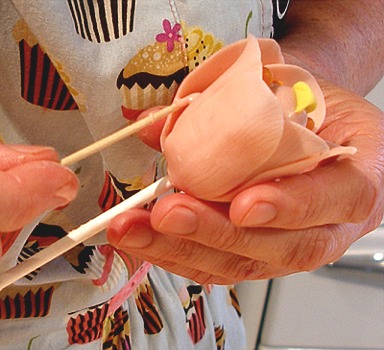
5. Turn the PINK SPRING TULIP CAKE POP upside down and continue to gently press it into place.
Then, flip it back over and press the petals into shape and hold them in place for about 30 seconds to give the “glue” a change to set up.
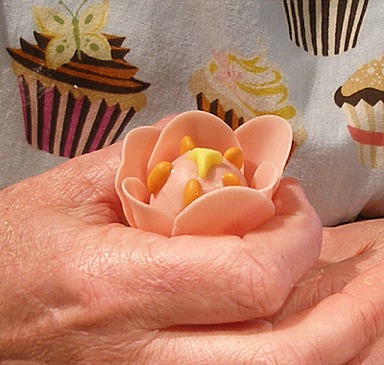
6. Using a toothpick, dab a small amount of “glue” between the outside petals, about 1/2 way up, to glue them in place.
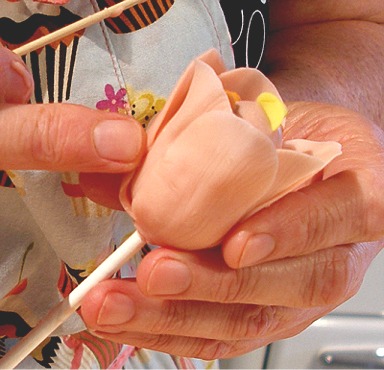
7. Place the PINK SPRING TULIP CAKE POP in the Block of Sheet Styrofoam.
8. Repeat Step#s 1 – 6, above until you have completed 20 – 25 PINK SPRING TULIP CAKE POPS and 20 – 25 YELLOW SPRING TULIP CAKE POPS.
Make the Leaf Green Tulip Leaves and Attach to the Tulip Cake Pops:
Soften the Easy Candy Clay:
NOTE: It will be VERY hard after sitting in storage, but will soon soften up, due to the warmth of your hands, as you knead it.
It is easier to warm and roll out small portions of candy clay at a time.
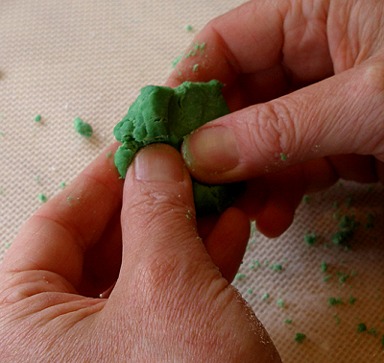
1. Unwrap the LEAF GREEN EASY CANDY CLAY and cut off small portions of it at a time with a paring knife.
2. Work it between your fingers until it becomes soft and pliable.
3. Keep any unused candy clay covered and set aside.
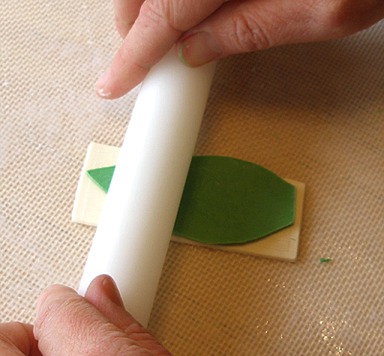
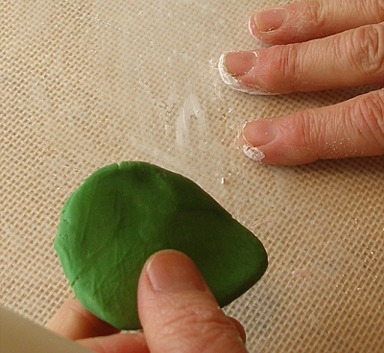
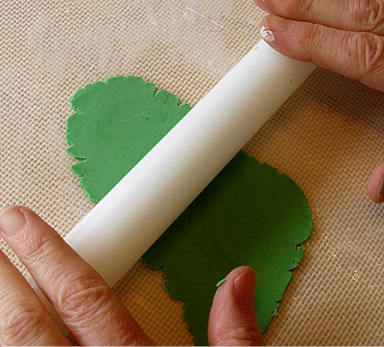
1. When the LEAF GREEN EASY CANDY CLAY is sufficiently kneaded and pliable, roll it out on a Silpat Nonstick Mat lightly dusted with cornstarch until it is very thin, about 1/16-inch thick.
NOTE: It is easier to roll out small portions of Candy Clay at a time. I like to use a small plastic fondant rolling pin.
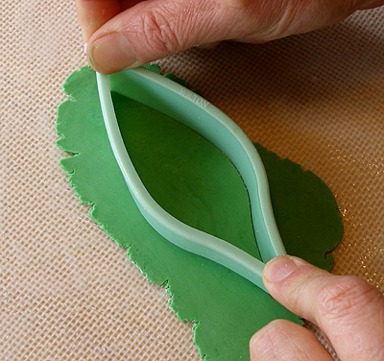
2. Use the “Tulip Leaf” Cutter and cut out a LEAF GREEN TULIP LEAF.
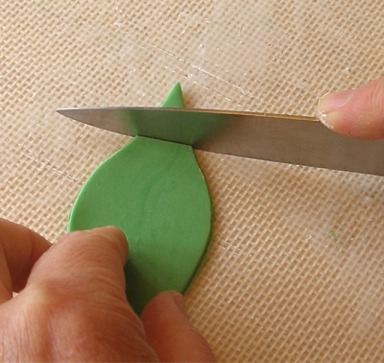
3. Using a paring knife, cut off about 3/4-inch off the pointy tapered end of the LEAF GREEN TULIP LEAF.
 .
.
4. Place the LEAF GREEN TULIP LEAF on the “corn husk” veining mat, that has veins that run vertically up the length of the mat.
Roll it with the small plastic fondant rolling pin to emboss the leaf.