
Cakes and photo by chocolatedrummer, Premium Member © Sarah Phillips
Cakes and photo by chocolatedrummer, Premium Member © Sarah Phillips
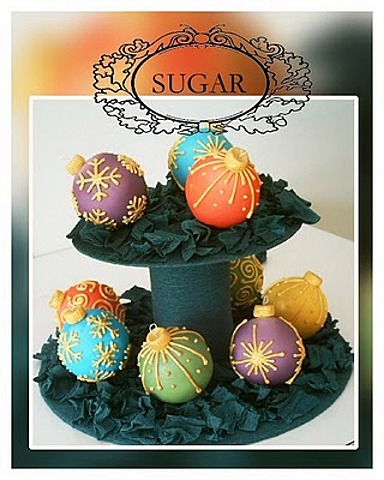
These are great fun to make and look stunning packaged in a box with tissue paper or on a cake stand.
CAKE RECIPE HELP
EQUIPMENT
Food color pastes
Alcohol
Piping bag & round piping nozzle (I used Wilton 3 but for finer lines use 2)
Airbrush (optional)
Wooden skewer sticks
Gold luster dust
Thin paintbrush
Thick paintbrush
Sharp knife
Rolling pin
INGREDIENTS
1 recipe Ultimate Yellow Butter Cake or UBC*
1 recipe Tami's or Perfect Buttercream, for 3 cups
1 recipe Rolled Fondant
1 recipe Royal Icing Master Recipe
*Optional: You can also use stryofoam balls instead of baking cakes! That's what I used for mine!
MAKE THE CHRISTMAS CAKE ORNAMENTS
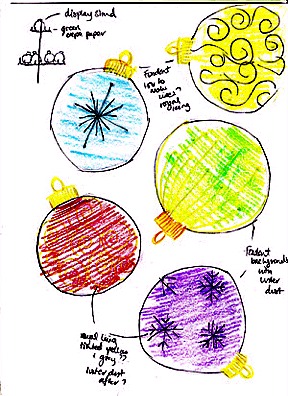
Step 1: SKETCH
I always do a sketch first before starting a cake, this helps me to see what designs and colors will work together. It doesn't need to be a work of art but just something to give you a plan to work from.
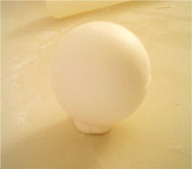
Step 2: MAKE CAKE BALLS
Ingredients
1 recipe Ultimate Butter Cake or UBC which is a sturdy cake recipe as they will be handled quite a bit.
Instructions
Bake 10 cake balls using Wilton's mini ball pan.
Step #3: COVER CAKE BALLS
Ingredients
1 recipe Tami's or Perfect Buttercream. Do not use a crusting or meringue buttercream.
Instructions
Cover balls with a thin coat of Tami's or Perfect Buttercream.
NOTE: I have actually put the fondant straight onto the Ultimate Butter Cake or UBC without buttercream so it's not essential (although you will need to sandwich the balls together with buttercream). If you do want to use buttercream apply a very thin layer (a couple of millimeter's), wear gloves and roll the balls in your hands to cover evenly.
Step #4: COVER THE CAKE BALLS WITH FONDANT
Ingredients
1 recipe Rolled Fondant
NOTE: If you are airbrushing leave the fondant white, if not, tint the fondant with your chosen color with paste colors.
Instructions
1. To cover the balls take a small piece of fondant and stick the ball to your work surface, this will stop the ball from moving when you lay the fondant on.
2. Roll out a small piece of fondant, enough to generously cover the ball.
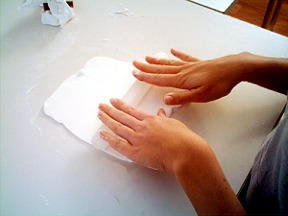
3. Place the fondant over the ball and carefully smooth down the top sticking the fondant to the buttercream.

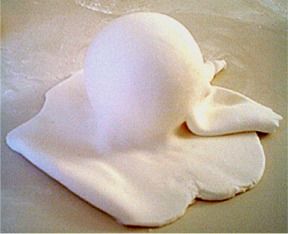
4.Then gently lift the ball from its fondant base and remove any of the base left on the ball. Gently close by pinching the fondant and remove any excess. At this point your ball will look quite bumpy, to smooth gently roll the ball between the palms of your hands until you have a smooth surface. You can remove any air bubbles with a pin and then just smooth out the hole.
5. Repeat with the remaining cake balls. Set each cake balls back on the each fondant base in a cool dark place.
Step #5: AIRBRUSH OR PAINT EACH CAKE BALL
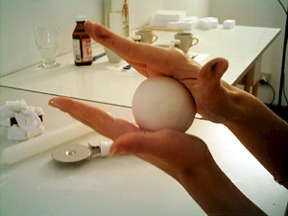
If you are airbrushing insert a skewer gently into the ball and place on a Styrofoam base. Using diluted food color mixed with alcohol, build up coats of color on the balls until you achieve the desired color. Remember the color deepens on drying. Leave the color to dry for an hour.

If not airbrushing, you can paint each fondant covered cake ball, but it's easy to get streaks; that's why I suggest pre-coloring the fondant if you are not going to use an airbrush.
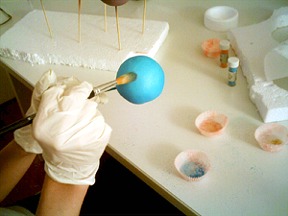
Step #6: APPLY LUSTER DUST
Luster duster can also be brushed on dry a little at a time if you want a gentle shimmer on the entire cake ball rather than a flat color. It comes in lots of colors but you can brush the gold onto the colored balls to add a different color dimension without changing the base color.
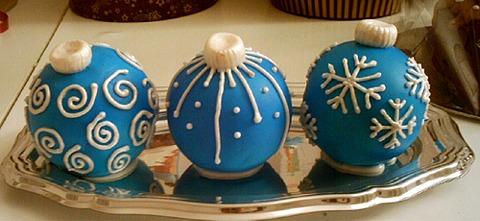
Step #7: DECORATE WITH ROYAL ICING
Ingredients
1 recipe Royal Icing
Instructions
1. Fill your piping bag half full with royal icing. I used Wilton round tip #3 but if you are good at piping you can use a smaller tip.
I tinted the icing yellow as I wanted gold highlights. If you use a base colored royal icing, you won't have to worry about missing patches with your luster dust.
Practice a little by piping your design onto parchment paper and then pipe onto your ball. If you make a mistake you can gently remove the icing with a cotton bud and then pipe over the area again.
2. Place the cake ball on the top of a drinking glass so it won't roll around and pipe royal icing on the ball.
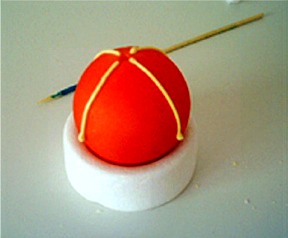
“I used a Styrofoam collar to hold my cake ball.”
When piping lines touch the tip onto the surface and then pull backwards and up in a straight line away from the surface touching the tip back down at the end of the line. For swirls do the same action but pull up and round.
Leave each side of the ball to dry for at two hours and then you can turn the ball and continue piping your design on the other side.
Step #8: MAKE ORNAMENT TOPS
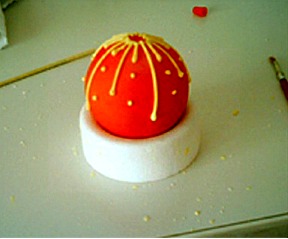
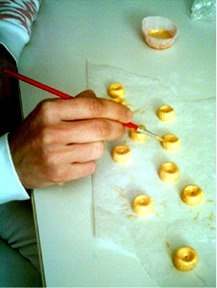
1. Make the tops for your balls using yellow tinted fondant, roll small even sized balls and press between your fingers to get a concave shape. You can add the lines with the tip of a skewer. Paint with a paste made from a little luster dust mixed with alcohol.
2. When your piping is dry attach the tops with a little royal icing. If piping a design across the top of your ball, attach the top immediately after piping so the top is fixed into the design. If you airbrushed your balls place the top over the hole made by the skewer. I also made little wire hooks for mine, it’s not necessary but makes them more realistic. If you want to do it remember to make a little hole in the top of your ‘top’ with a skewer to insert the wire.
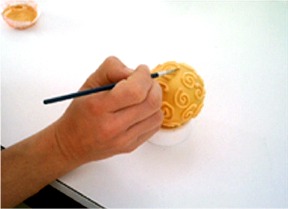
3. Finally mix a little gold luster dust with alcohol to get a thick paste. Paint this onto your piped design with a fine brush; you may need two or three coats.
After the final coat of luster dust you only need an hour or so for the luster dust to dry completely.
DISPLAY YOUR WORK!
Now you can display your cakes either on a board covered in paper like mine or perhaps in a box with tissue paper. The cakes do not need refrigeration and can be displayed for 3 to 5 days at the cool side of room temperature.
Cakes and photo by chocolatedrummer, Premium Member © Sarah Phillips