
Variation: Basic Genoise Cake Tutorial; Orange Cloud Mini-Layer Cake

Cake and photo by odetteganda, Premium Member © Sarah Phillips
My Raspberry Cloud Cake is perfect for any holiday; it can be served after a casual or formal meal. The delicate raspberry flavor of the cake, filled with raspberry preserves and frosted with hot pink colored buttercream, topped with gum paste flowers or fresh raspberries, is hard to beat. This recipe can be made with other flavor combinations.
CAKE RECIPE HELP
odetteganda, Premium Member, Says: “I made Sarah's Raspberry Cloud Cake yesterday…. We had it for dessert today and it was so heavenly! Sarah thanks for the wonderful recipe, it was another hit.”
INSTRUCTIONS
STEP I: MAKE BASIC GENOISE MINI-CAKES
BASIC GENOISE MINI-CAKE / Recipe alone
Makes two 6 x 2-inch and two 4 x 2-inch cakes
Genoise Cake can be made in advance.
INGREDIENTS
unbleached or bleached all-purpose flour: 1 cup (spoon flour into measuring cup and level to rim) – I used unbleached ap flour / 4.41 ounces / 125.02 grams
salt: 1/2 teaspoon / 3 grams
eggs: 6 large / 10.5 ounces / 300 grams
regular or superfine table sugar: 3/4 cup – I used regular table sugar / 5.25 ounces / 150 grams
vanilla extract: 1 teaspoon / 4 grams
INSTRUCTIONS
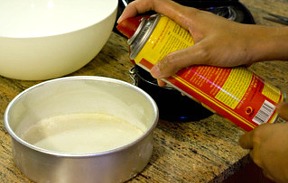
1. Position a rack in the lower third of the oven and heat the oven to 350 degrees F. (Do NOT reduce the oven heat by 25 degrees F if using a dark, nonstick pan.) Generously grease two 6 x 2-inch pans and two 4 x 2-inch pans, line with parchment paper, and grease its surface. Dust the interior with flour, and tap out the excess. Set aside.
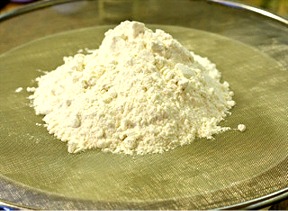
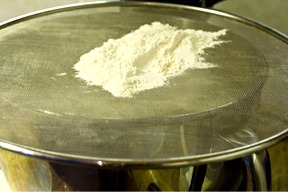
2. Combine the flour and salt, and then, sift into a medium-size mixing bowl.
ODETTE SAYS: After measuring, I double sifted the flour and salt.
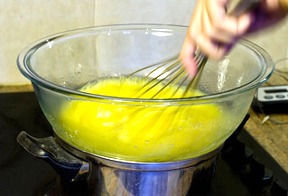
3. Combine eggs and sugar in a medium bowl.

Hand-whisk the eggs and sugar together in the bowl, with a large balloon whisk. Place the bowl over a pan of simmering water, taking care not to touch the water, and, whisking steadily.
4. Heat the mixture about 2 to 4 minutes, until it is foamy, slightly pale, and reads 110 to 120 degrees F on an instant-read thermometer. Remove the bowl from the water immediately, and dry the bottom.
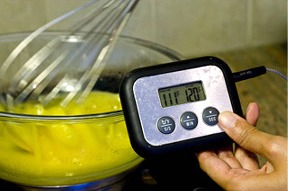
Hot Tip: From time to time, during cooking, measure the temperature of the eggs and sugar with an instant read thermometer. To measure, remove the bowl from the stove or the simmering water, stir the mixture and, place the end of the thermometer half way in, making sure you don't touch the bottom of the bowl.
SARAH SAYS:
Warming the ingredients simply helps dissolve the sugar better and improves the emulsifying properties of the eggs. As a result, it helps them reach maximum volume when beaten. Make sure the sugar is dissolved by rubbing a small amount of mixture in between your fingers. It should not be sandy. If it is, stir rapidly until the sugar is thoroughly dissolved. I like to use superfine sugar because it dissolves faster than regular table sugar. It's very important because if the sugar is NOT dissolved all the way, the egg structure won't be done correctly.
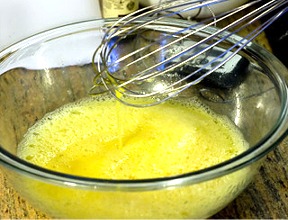
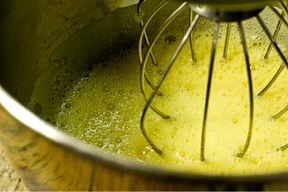
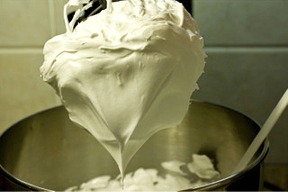
5. Beat the warmed egg and sugar mixture for a total of 8 to 10 minute or until it becomes thickened. The egg foam passes through various stages – it first becomes foamy, then light and aerated and finally it thickens.
First, fit the electric mixer with a whisk attachment, and beat the mixture on medium-high speed (speed #8 on a KitchenAid 325-watt mixer), until it cools to room temperature and increases in volume and is pale yellow, about 4 to 5 minutes.
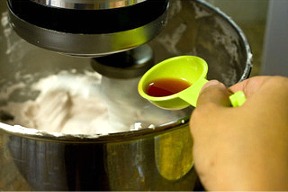
6. Then, add in the vanilla extract. Beat 4 to 5 minutes longer, with the mixer speed on medium to medium-high or until the egg and sugar mixture becomes denser and more compact.
7. Stop beating when the beaten mixture holds together like a sheet of batter and then, falls very slowly into a thick ribbon back into the mixing bowl, when the rubber spatula is dipped into the mixture and pulled out. The ribbon will not disappear into the mixture, but will sit on top and then, spread slightly and then, slowly flatten. The ribbon will still have some definition to it in the bowl. It will be hot to the touch, tripled in volume, light in color and the sugar will have completely dissolved.

SARAH SAYS: This is a very important step. Take the time to do this carefully. During the last four to five minutes of beating, stop the mixer from time to time and test the egg yolk/sugar mixture for ribbon thickness. If the mixture is under whipped, the genoise will be dense. Be careful not to overbeat, either.
8. Sift 1/3 of the flour evenly over the batter. With a large rubber spatula, gently fold it into the beaten egg mixture so most of it is no longer visible – it's OK to have some wisps of flour showing. Repeat two more times. With the last addition of flour, make sure there is no flour or flour streaks visible in the batter. Take care to handle the batter gently in order to maintain its bubble structure. Be patient; it takes awhile to fully fold in the flour.
SARAH SAYS: Use a large rubber spatula, about 2 3/4-inch wide, and fold the flour and beaten egg mixture with large strokes. This helps the flour to incorporate more easily, otherwise the cake will be grayish, not rise as high and have flour lumps. During folding, the batter will lose some volume, which shouldn't jeopardize the finished cake, unless you deflate it too much from over handling. Make sure you get all of the flour folded in and scrape the bottom of the bowl as you do. I found clumps of flour hiding at the bottom of my mixing bowl, and I really made sure I got it all.

9. With a large rubber spatula, immediately push the batter into the prepared pans. (To push, hold the mixing bowl and tilt it until its top rim matches up to the rim of the baking pan. Then, push the batter with a large rubber spatula into the pan.)
ODETTE SAYS: Be careful in pushing batter into the pans because the 6-inch and 4-inch pans are quite small and batter can overflow when pushed.
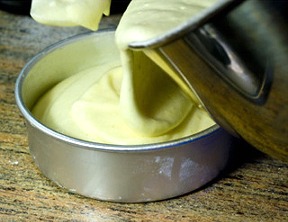
The batter will fill the pan 3/4 full or almost to its rim. Place the baking pan on a foil-lined baking sheet, in case there are any spill-overs. Run a table knife through the batter in an “s” shape before baking the cake to get rid of large air bubbles. Gently smooth the batter so it is even.
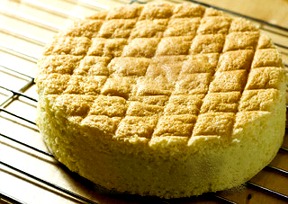
10. Immediately place the filled pan in a well-preheated oven and bake for 20 to 25 minutes, or until the top is golden brown, the sides are pale golden in color, and the cake is springy to the touch. It should shrink slightly from the sides of the pan. Do NOT open the oven to check on the cake until 5 minutes before the minimum baking time, or risk a fallen cake.
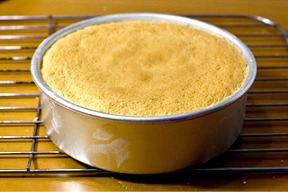
11. Transfer the cake to a cooling rack; unmold after 5 to 7 minutes – do not let it sit any longer in its pan.
With a small metal spatula or table knife, loosen the sides of the cake and unmold at once. Carefully remove the parchment paper. Turn the cake right-side-up to cool to room temperature on the rack.
SARAH SAYS: Do not wait to unmold the cake longer THAN 7 minutes or it may sink in the middle.
STORAGE
Without the syrup: When cool, place the cake in airtight plastic bags to keep it from drying. Store 2 days at room temperature, 5 days refrigerated or frozen for a month or two. When a genoise is stored in the refrigerator, its skin becomes soft. Remove before using.
After adding the syrup: Let cake sit for a day to absorb. Then, cake can be stored for up to 5 days in the refrigerator or frozen, for 1 to 2 months.
ODETTE SAYS: After cooling, I put my cakes in food grade plastic wrap.
STEP II: MAKE RASPBERRY SYRUP
INGREDIENTS
1/2 cup water
1/3 cup sugar
1/4 cup raspberry liqueur, such as Chambord, or 1 1/2 tablespoons clear framboise, raspberry eau-de-vie
INSTRUCTIONS
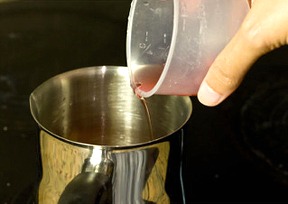
1. Combine the water and sugar in a small saucepan and bring to a boil under low heat.
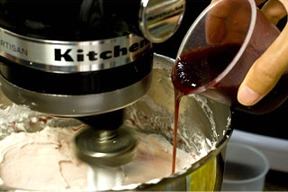
2. Set aside to cool. Stir in the raspberry liqueur.
STORAGE
SARAH SAYS: The syrup can be made in advance and poured into a bowl or airtight container and refrigerated for up to a week.
STEP III: MAKE RASPBERRY ITALIAN MERINGUE OR MOUSSELINE BUTTERCREAM OR IMBC
INGREDIENTS
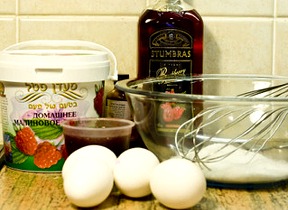
One 10-ounce package frozen raspberries in syrup, thawed; or 1/2 cup thick raspberry puree
4 large egg whites
1 cup sugar
1/2 teaspoon salt
3 sticks (12 ounces / 350 grams) unsalted butter, 65 degrees F – slightly softened and cool – not runny, greasy or soupy
2 tablespoons raspberry liqueur, such as Chambord, or 1 tablespoon clear framboise, raspberry eau-de-vie
Optional: In place of raspberry liqueur,
Coffee: 3 tablespoons instant espresso powder or coffee dissolved in 2 tablespoons water, cold coffee or rum
Lemon: 3 tablespoons lemon juice plus 2 tablespoons lemon peel
Orange: 3 tablespoons Grand Marnier plus 2 tablespoons orange peel
Vanilla: 3 tablespoons pure vanilla extract
INSTRUCTIONS
1. Make the raspberry puree: Mash the thawed raspberries. (See tips) and place in a saucepan. Cook over medium heat until it boils, stirring often. Reduce the heat to low and let the berries simmer until they are reduced in liquid and measure about 1/2 cup. Set aside to let cool.
SARAH SAYS: You can make the puree, several days in advance, and kept covered in the refrigerator.
ODETTE SAYS: I can't find fresh Raspberries right now in Israel so I used Raspberry Preserves.
2. Combine the egg whites, sugar and salt in a medium-sized heatproof bowl.
SARAH SAYS: Before you begin this recipe, clean all utensils and equipment thoroughly with a paper towel moistened with lemon juice. This eliminates any grease or oil that may prevent the meringue from whipping to its proper volume and consistency.
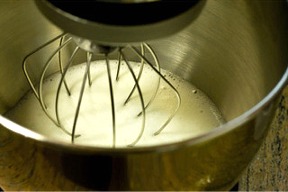
3. Place a bowl over a pan of simmering water and with a large balloon whisk, whisk gently until the egg whites are hot (about 140 degrees F measured with an Instant Read Thermometer) and sugar is dissolved, about 3 to 4 minutes.

SARAH SAYS: Plain whole eggs without added ingredients are pasteurized but not cooked by bringing them to 140 degrees F and maintaining that temperature for 3 and 1/2 minutes. You can use a stand mixer bowl as the bowl to place the egg whites in.
4. The mixture should look thick and syrupy.
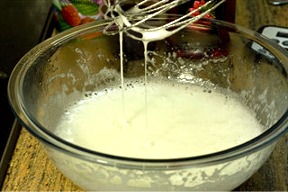
5. Remove from heat and transfer to a stand mixer bowl. With a whisk attachment, whip on high until thick and cooled, about 5 minutes.
SARAH SAYS: If you used a stand mixer bowl to heat the egg whites in, you need only clamp it onto the mixer.
This is how the egg white mixture will look like after 5 minutes.
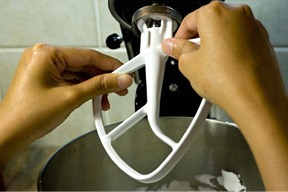
6. On the stand mixer, replace the whisk attachment with paddle attachment.
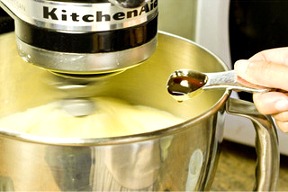
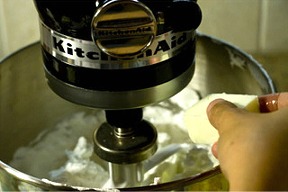
7. With the mixer on low, slowly beat in the butter in large pieces.
ODETTE SAYS: At one point after adding all the butter and flavoring with the mixer on medium, the mixture will look curdled, as shown below. Don't worry; continue beating and the buttercream will smoothen into a silky mass.
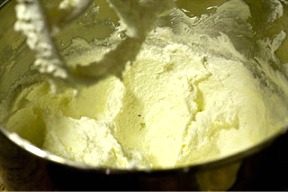
8. Beat for 5 minutes on medium to medium-high until buttercream is smooth and spreadable. Beat in the raspberry puree.
Then lastly, add the raspberry liqueur.
SARAH SAYS: Use buttercream immediately or refrigerate, covered, for up to 5 days. Before using, bring buttercream to room temperature and beat smooth by with a stand mixer fitted with a whisk attachment, on high.
STORAGE
Will keep 10 days refrigerated, 8 months frozen. Allow to come to room temperature completely before rebeating to restore texture or it will break down irretrievably.
STEP IV: MAKE THE TIERED CAKE AND DECORATE
ODETTE SAYS: The 4-inch cake will be the top tier above the 6-inch cake. Each layer will consist of two cakes. I used the Upside-Down Smooth Icing Technique to frost my cakes. Some of the photos are from that step-by-step lesson to help you understand what I did.
FILLING INGREDIENTS
1/4 cup seedless raspberry preserves
1 cup fresh raspberries, optional
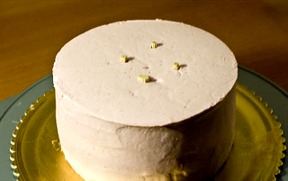
Frost the bottom 6-inch cake layer:
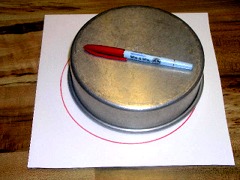
1. Trace the outline of the 6-inch pan [top side down] onto a sturdy surface, such as a cardboard cake round.
2. Cover the outline with a piece of parchment paper about 1 to 2 inches larger than the pan's outline and tape securely so that there are no wrinkles. Some people have had success using acetate instead of parchment.
3. Using the Raspberry Italian Meringue Buttercream, “ice” the area of the circle, extending the icing about 1/4-inch past the outline; any extra icing will be removed later. Apply the icing about 1/4″ thick.
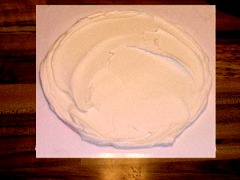
Place the “iced” board in the refrigerator and allow to chill until firm, about 10 to 15 minutes.
4. Once chilled, remove the iced board from the refrigerator and place one 6 x 2-inch cake layer upside-down on a cardboard cake round, centered on the icing circle.
5. With a clean pastry brush, dab the top of the layer with about 1/3 of the Raspberry Syrup.
Top with layer with half (1/8 cup) of the raspberry preserves.
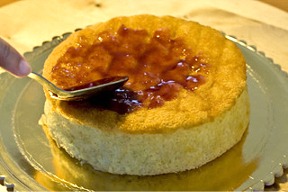
Spread 1/4 of the buttercream over the preserves.
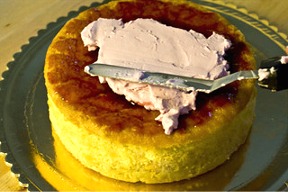
6. Place the second layer on top with the layer, upside down. Remove the parchment paper from the bottom of the cake that is now on top of the cake.

7. Crumb coat the sides of the cake with the buttercream and let it chill in the refrigerator for 20 to 30 minutes.
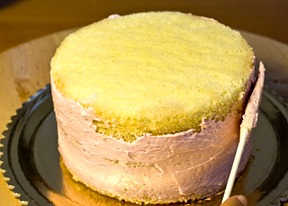
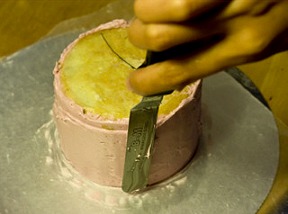
8. Once chilled, apply final coat on the sides. Smooth any icing build up over onto the “bottom” of the cake with a small angled spatula. When the side are smooth to your satisfaction, carefully cut the parchment paper loose from the board ALL THE WAY AROUND THE CAKE using an Exacto Knife. Return the cake to the fridge for about 10 to 15 minutes to firm the icing.
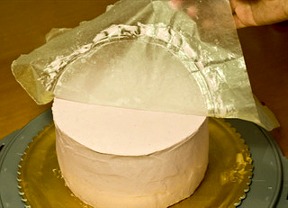
9. Prepare the final cake board by smearing a few strokes of icing on it. Remove the cake from the fridge, center the board and quickly “FLIP” the cake over. REMOVE the top cardboard, but leave the parchment in place and return the cake to the fridge for about 10 minutes.
Then carefully remove the parchment paper. Return the iced layer, uncovered in the refrigerator.
10. Repeat the same techniques with the 4-inch layer, and place the iced layer, uncovered in the refrigerator when done.
Stack the 4-inch layer on top of the frosted 6-inch layer:
1. Remove the 6-inch cake from the refrigerator. Mark the center of the 6-inch cake, which is 3-inches from the edges.
2. Measure a distance of less than 2-inches from the marked center and place a dowel. Repeat three times so the dowels are evenly spaced around the center.
ODETTE SAYS: The dowels will be eventually under the 4-inch mini tier placed above to support it.
3. Remove the frosted 4-inch tier from the refrigerator. Carefully place the layer, on its cardboard cake round onto the on top of the 6-inch cake, taking care that the centers of both tiers are aligned. Make sure the 4-inch layers are also placed on all four dowels, earlier placed in the 6-inch layer, so they do not show.
Then using a IMBC filled pastry bag, fitted with decorating tip #17, pipe mini shells at the line where both tiers meet.
To pipe mini shells, hold piping bag 45 degrees from the cake and move hand in a motion that seem to write small letter “u”. Repeat until all sides are covered.
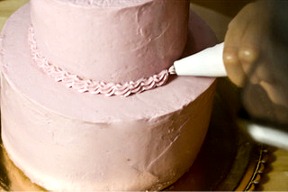
4. Pipe mini shells on the bottom edge of the cake.

5. Decorate cake with gum paste flowers.
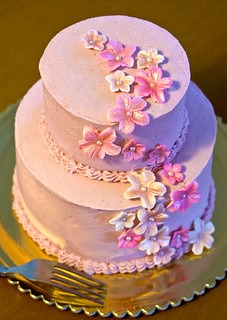
ODETTE SAYS: I decorated the cake with gumpaste flowers I made dusted with edible luster dust.
SERVING
Cut with a thin serrated knife. Wipe the knife with a wet cloth every time you make a cut because the buttercream is sticky.
STORAGE
Cakes frosted with Italian Meringue Buttercream should be refrigerated. The cake will keep for about 3 days.
VARIATIONS
Basic Genoise Cake Tutorial
Orange Cloud Mini-Layer Cake:
Flavor the Genoise cake with orange extract.
Lightly moisten layers with sugar syrup flavored with Grand Marnier and finely grated orange peel.
Then, fill and frost the cake with Orange Marmalade and frost it with Orange Tang Neoclassic French Buttercream.
Top with mandarin oranges or chocolate shavings to decorate.