
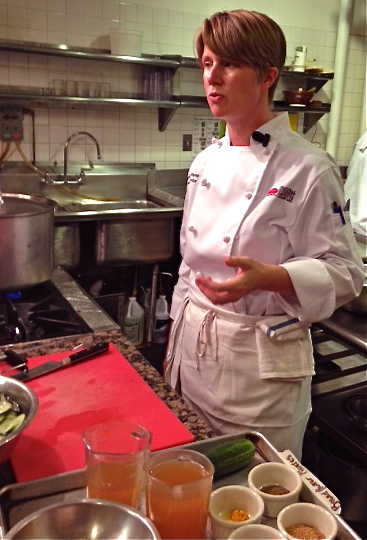
Chef Michaela Hayes
I was born and lived for about 7 years in the suburbs of Chicago. During that time my mother had an organic vegetable and edible flower garden surrounding the entire house and she used to can everything fresh from the garden for use during the winter months. In those formative years (and the years that followed), I helped her can, bake, and cook. Her jarred pickles, vegetables, and fruit often won blue ribbons at the Illinois State Fair.
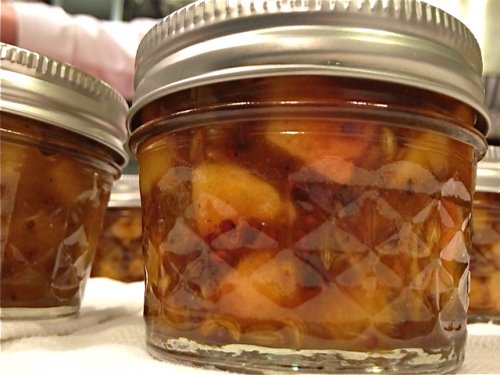
Years have gone by, and I have always wanted to re-learn how to can, as I still have vivid memories of those enjoyable and inspiring times with my mother. I even have her blue ribbon pickle recipe, which my kids have asked me to revive. I recently took a Waterbath Canning Class from Chef Michaela Hayes from www.crockandjar.com at the Natural Gourmet Institute, not far from where I currently reside in New York City. Memories and smells rushed back in, complete with goosebumps, while I made this Nectarine Chutney, which Chef Hayes created for the now closed Tabla Restaurant in NYC (founded by famed restaurateur Danny Meyer). I have adapted this recipe to make it my own, adding lots of notes for you.
After taking the class, I realized that I had built up home canning as some sort of huge, difficult process. But it was easier than I thought, and really a lot of fun. Just be sure to follow the rules, which I have spelled out in this tutorial, in order to be successful. Besides Chef Hayes, Ball Brand Jars has a treasure trove of information, other recipes that really do work, and my favorite canning supplies!
FRUIT AND PUREES INGREDIENT HELP
INGREDIENTS
4 pounds nectarines, peeled, pitted and cut into evenly sized chunks; combine some ripe with some that are a little less ripe (more pectin)
2 tablespoons good quality extra-virgin olive oil
1-inch piece fresh ginger, julienne
2 cloves garlic, thinly sliced
1 Pasilla chili, crushed
1 stick cinnamon, optional
2 tablespoons mustard seeds, brown or yellow
2 tablespoons fennel seeds
1 cup apple cider vinegar, 5% acidity; do not decrease the amount of vinegar in the recipe, nor the acidity level of at least 5% – it's what keeps the recipe safe from botulism.
3/4 cup honey
1/2 cup golden raisins
1 1/2 teaspoons salt
1 teaspoon coriander
1 teaspoon cumin
INSTRUCTIONS
STEP I: PREPARE THE WATERBATH AND THE JARS
1. Wash your jars and lids in hot, soapy water. Rinse well. There's no need to dry.
2. Prepare a stock pot, with a tight fitting lid, that is at least 7 1/2-inches tall and 9 1/2-inches in diameter: fit with a canning rack, and then fill with water so the canning jars will be submerged in at least 1-inch of water.
3. Place the jars in the water in the pot. Place the lids in a bowl of warm water. The rings can stay on the countertop on a clean kitchen towel or in a bowl.
4. Bring water in the pot to a simmer under high heat, and then adjust the heat to keep the water simmering.
5. Keep the jars in the pot until ready to use.
STEP II: MAKE THE CHUTNEY
1. Meanwhile, in a large, wide pan, add the oil and under low heat, sweat the ginger until it is fragrant.
SARAH SAYS: To “sweat” is to draw out moisture from the ginger and weaken and soften the cell walls. The ingredients are covered directly with a piece of foil or parchment paper, then the pot is tightly covered. With this method, the ingredients soften without browning, and cook in their own juices.
2. Add garlic, chili, cinnamon, mustard and fennel seeds, and sauté until the mustard seeds start to pop.

3. Stir in the apple cider vinegar, honey, raisins, chili, salt, coriander, and cumin.
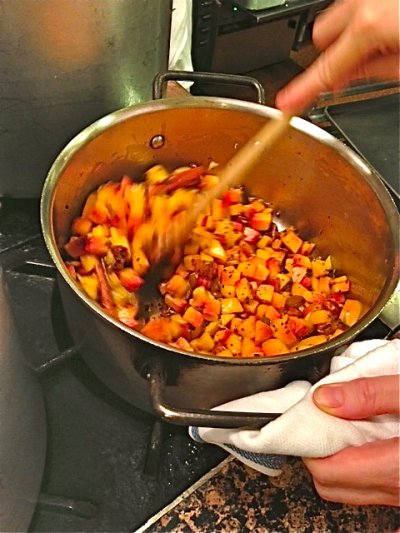
4. Cook chutney over medium heat until the nectarines begin to soften and give up their liquid. Turn off the heat when done cooking.

STEP III: FILL THE JARS WITH CHUTNEY AND CAN
1. Line a countertop with a few layers of cloth dish towels or thick cutting boards.
SARAH SAYS: I like to fold my dish towels over a couple of times. This will provide insulation against the cold counter when you remove the jars from the hot water.
2. Remove one or two jars at a time, with a Jar and Lid Lifter, from the hot waterbath, and place on the dish towel. Make sure you remove all of the water from the jar, by pouring it back into the pot.
SARAH SAYS: Remember not to set the hot jars on a cold countertop, otherwise they could crack .
2. Ladle hot chutney into the hot jar, leaving 1/2-inch head space, measured from the top rim of the jar to the top of the food.
SARAH SAYS: Headspace allows for food expansion, and helps the lid make an excellent seal during the canning process.

NOTE: After filling, remove any air bubbles by sliding a small non-metallic spatula or bamboo skewer inside the jar. Press the food with the spatula against the opposite side of the jar. With the skewer press through the spaces in the food in the jar. Wait until the liquid and food in the jar settles again before adjusting the head space, if necessary by adding more or taking out any hot chutney. Repeat process.
3. Wipe rim of jars and press the warm lid on top, and seal “hand or finger tight” with the ring, also known as a band.
SARAH SAYS: Hand or finger tight means to just screw on the ring until it is tight using your hand, but not overly so.
Ensure the bands are not overtight – air inside the jars needs to be able to escape during processing.
4. Repeat filling all of the canning jars, and seal “hand tight” with the ring.
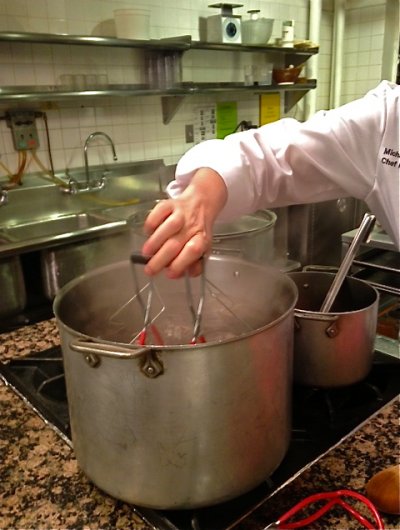
Meanwhile, do not turn off the heat from the simmering water. Add any necessary water to the pot so the jars will be submerged with at least 1-inch during canning.
5. Place the filled and sealed jars in the simmering water in the pot. Increase the heat to high to a steady boil.
6. Process jar in the steady boiling water bath for this recipe for 10 minutes, keeping the heat on high.
SARAH SAYS: Make sure the filled jars are submerged in boiling water, and the water circulates easily around the jars.
7. Turn off the heat, and let the jars stand in the boiled water for 5 minutes.
8. Then remove the jars from the pot with the Jar and Lid Lifter, to a folded kitchen towel on the countertop. Within a few minutes, you should hear the “pop” sound, or the button in the center of the lid inverting inward slightly or flattening. Check again after the jar has cooled in the next step.
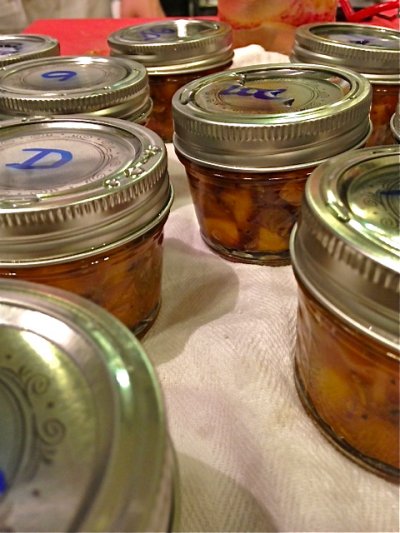
SARAH SAYS: Since this was a class, we all had placed our identifying initials on the tops of the jars with a sharpie permanent marker before boiling.
9. Cool the jars upright, at room temperature, for 12 hours. Do not re-tighten the ring while cooling.
After cooling, check to make sure the lid does not flex, and it has a good seal. Press in the center of the lid, and the “button” that was there and the center of the lid shouldn't move – that means that the jar has sealed properly.
SARAH SAYS: If the lid flexes, the jar did not seal properly. You can reprocess the chutney in the boiling water, following instructions on the Ball Brand Jar website, knowing that it will also cook the contents longer.
Or, you can place the unsealed and COOLED jar in the refrigerator, and use within 2 days.
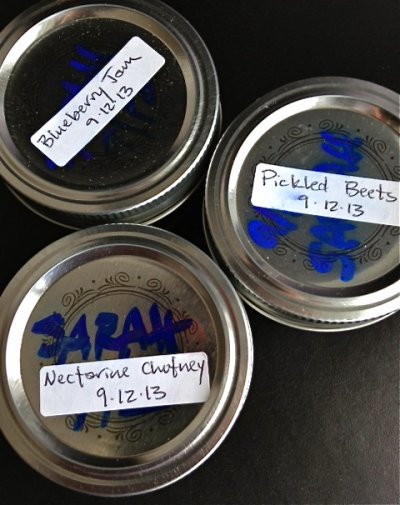
10. Clean the outside of jar, optionally remove rings, label and store.
SARAH SAYS: Make sure you put the name of the recipe, and the date of canning so you can keep track of the storage time. If you want to stack the jars, place the label on the front of the jar so you can see it!
11. Check lids for seal again after 24 hours. Lid should not flex up and down when center is pressed.
SERVE
Serve with basmati rice and chickpeas, or with cheese.
STORAGE
Unopened, will keep for 1 year in a cool dry place. Once opened, refrigerate where it will keep for a few days.