1/3 cup sugar, separated – 3 Tablespoons for Step II; 2 Tablespoons and 1 teaspoon for Step IV
1/4 cup water
3 tablespoons vegetable oil
1/2 teaspoon vanilla
2.8 ounces/80 grams cake flour
For the decorations, Step II:
1 large egg white
pinch of cornstarch
yellow, violet, pink and blue gel paste food coloring; Americolor
2 teaspoons cake flour, divided; 1/2 teaspoon for each color
For the filling:
3/4 cup heavy whipping cream, well chilled
1 1/2 Tablespoons sugar or powdered sugar
1/2 teaspoon vanilla
Quartered strawberries or raspberries, placed on paper towels to drain
Equipment:
Silicone Baking Mat, translucent to fit a 9 x 13-inch baking sheet: Must make sure it is 100% silicone if you have to cut to fit pan size and use for baking. Sources: NordicWare.com and World Cuisine Non-Stick Silicone Baking Mat
INSTRUCTIONS
STEP I: PREPARE THE RECIPE
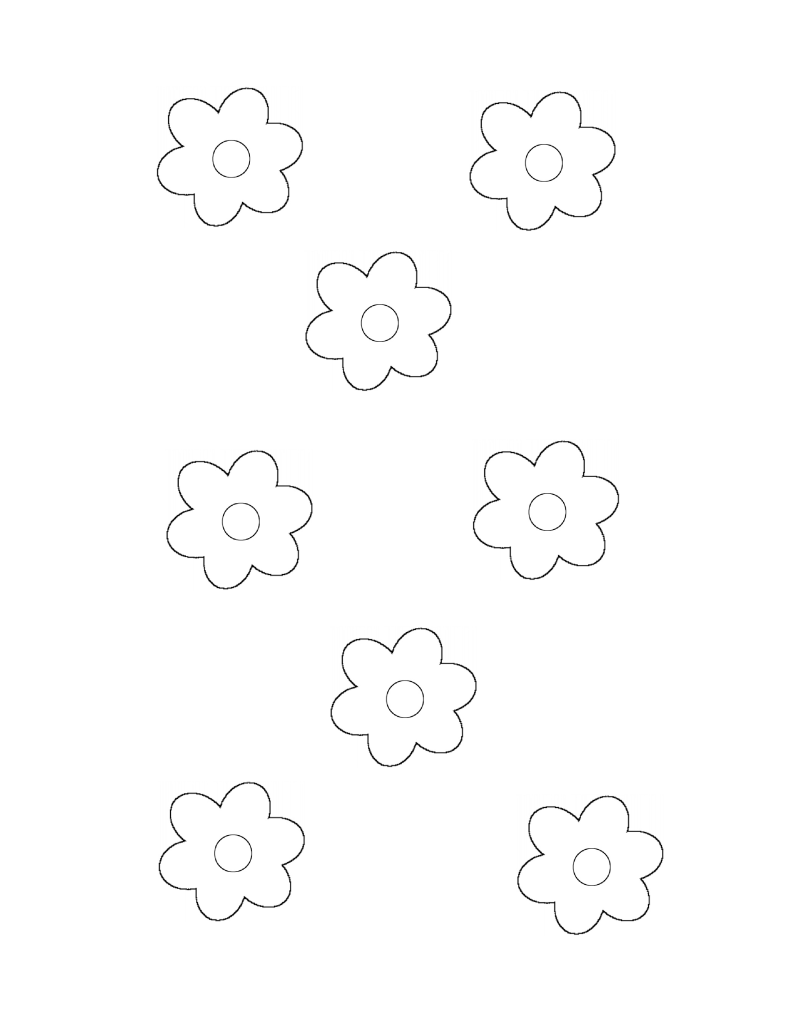
Print out the ONE each of piping templates:
Click on the link, above and then print
Click on the link, above and then print.
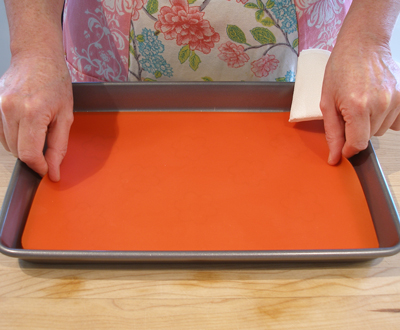
Prepare the pan:
1. Place the Black and White Piping Template in the bottom of a shallow 9 x 13-inch baking sheet(this is also known as a 1/4 sheet pan, or a brownie pan).
Trim the template to fit your pan, if you have to so it lies flat.
NOTE: You will remove this template after you bake the cake.

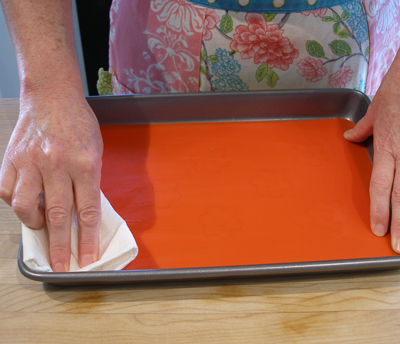
2. Place the silicone liner in the pan and rub the liner and the sides of the pan with a little vegetable oil.
NOTE: You will need to use a translucent liner, such as the one being used here, so you can see the Black and White Piping Template, below.
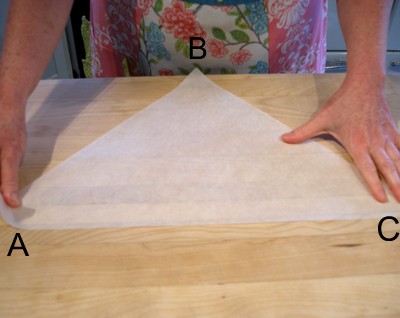
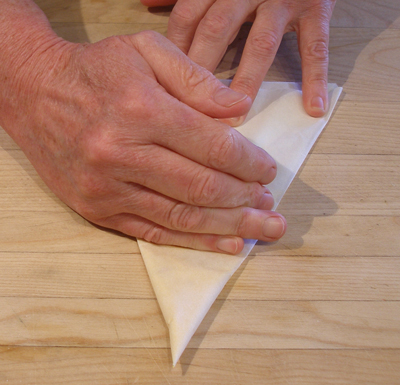
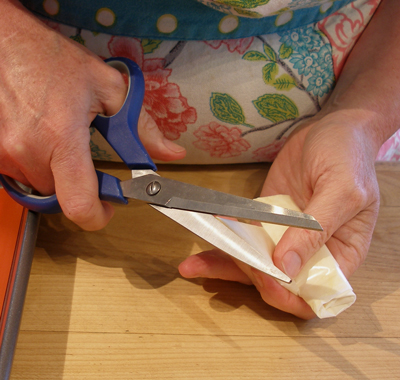
Make five parchment paper cone piping bags: (more)
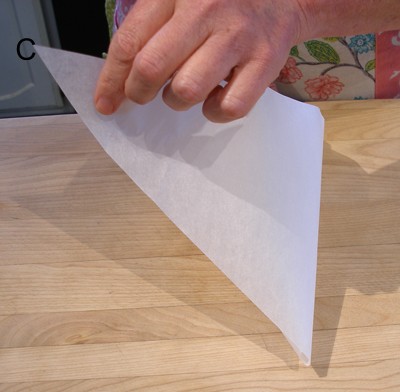
1. Place a parchment triangle(I used Wilton 15-inch parchment triangles) in front of you, with point B facing you.
2. Curl point A up and under, bringing it toward you until points A and B meet.
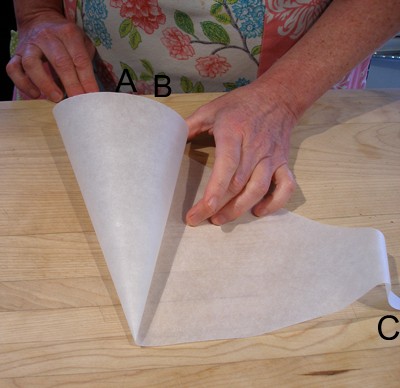
3. Hold points A and B together with your hand, picking up point C with your other hand. Wrap point C around to meet points A and B in back.
All 3 points align to form 1 sharp point, which forms the bag's cone.
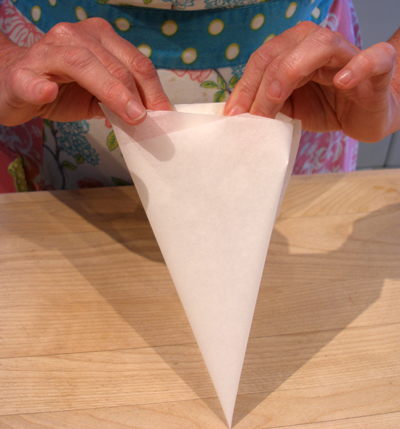
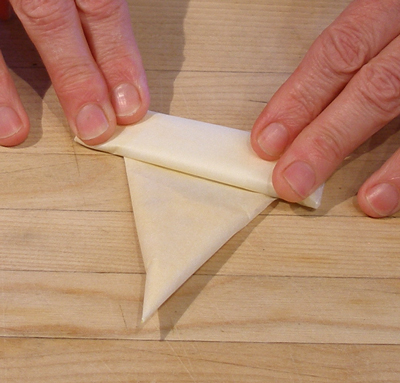
4. Hold the bag with both hands, thumbs inside, and slide points A and C in opposite directions to make an upside down “W” .
5. Fold the points of the bag down into the bag. Tape the outside seam of the bag if desired.
Do not cut the opening in the bottom of the bag until after you have filled them with batter.
6. Set bags aside until needed. You will need to make 5 of these parchment piping cones.
STEP II: MAKE THE EGG YOLK BATTER, BEAT THE EGG WHITE, TINT THE BATTER, AND COMPLETE THE BATTER FOR DECORATING THE CAKE ROLL
Make the egg yolk batter:
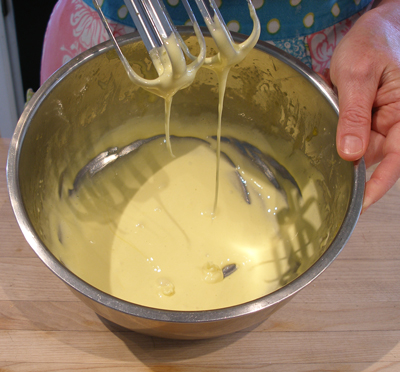
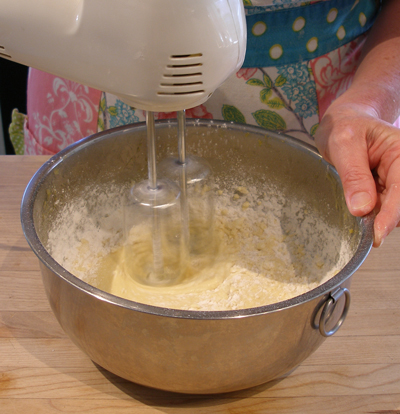
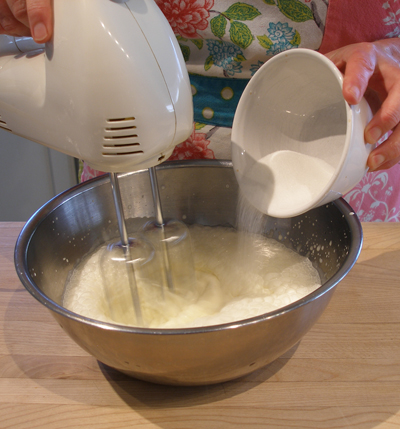
1. Beat three egg yolks with 3 tablespoons sugar with hand mixer on high, until ribbons form. Make sure to scrape down the sides of the bowl so no thick globs of egg yolk cling to the sides of the bowl.
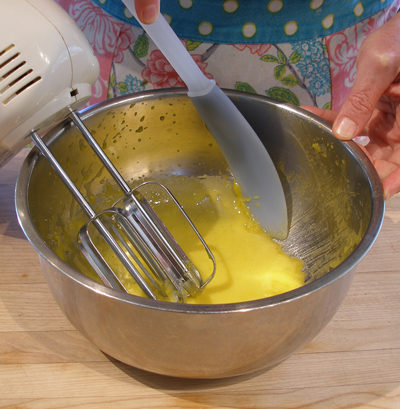
2. Add water, oil, vanilla, and mix well on high speed.
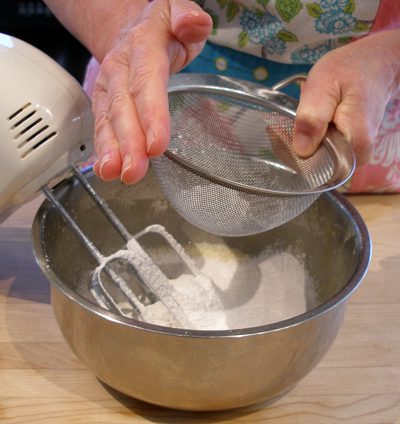
3. Sift the measured cake flour over the top of the egg mixture.
4. Beat on high with a hand mixer until the batter is thick, about 1 1/2 to 2 minutes. Remember to scrape the sides of the bowl so all the flour is incorporated.
5. Cover and set the egg yolk batter aside while you beat the egg whites in the next step.
Make the beaten egg white for decorating the cake roll:
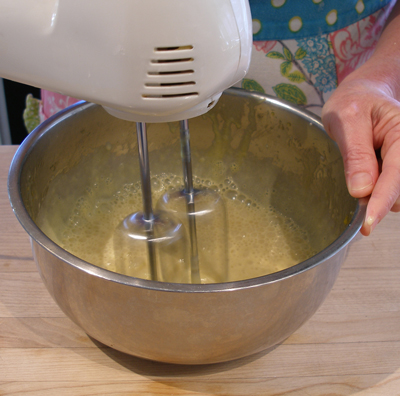
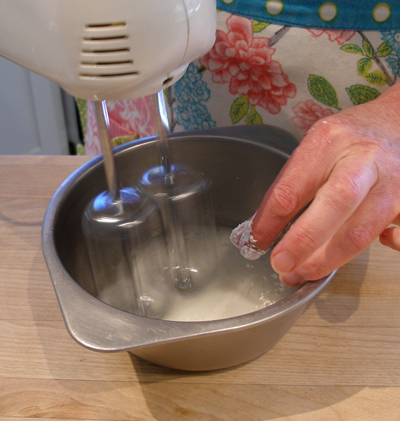
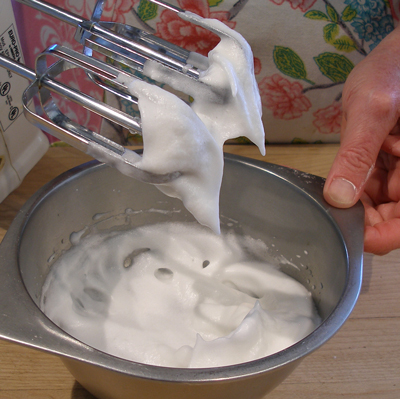
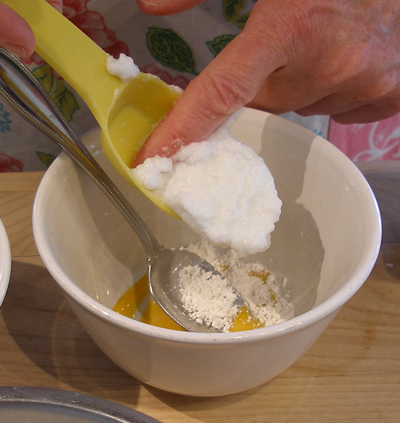
1. In a separate bowl, beat one egg white, on high speed, with a pinch of cornstarch until stiff peaks form.
Separate the egg yolk batter and tint each batter color:
NOTE: This recipe calls for 4 colors, so you need 4 small bowls.
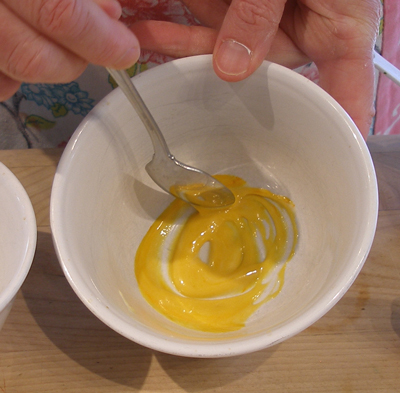
1. Put one teaspoon of the egg yolk batter into each of the four small bowls. Cover the remaining egg yolk batter in the larger bowl and refrigerate.
NOTE: Shown are 3 out of 4 bowls.
2. Using a toothpick, add a small amount of a different food color to the each egg yolk batter and stir to combine.
NOTE: I am making the yellow color used in the center of each flower. For each color I made, I do not use a whole drop. I just stick a toothpick in the gel color, and stir it around in the egg yolk batter in the small bowl to distribute it. If I want to make the deeper colors, I would use one drop food coloring each.
Complete the tinted batter for decorating the cake roll:
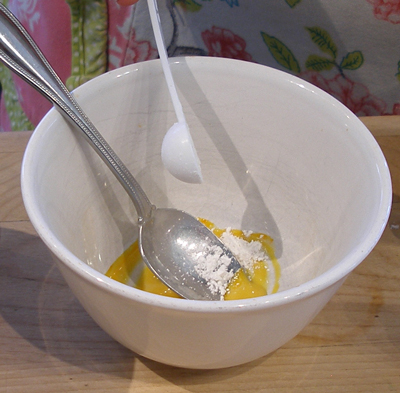
1. To each small bowl, add 1/2 teaspoon cake flour and 2 tablespoons of the reserved beaten egg whites. Stir until the mixture is uniform.
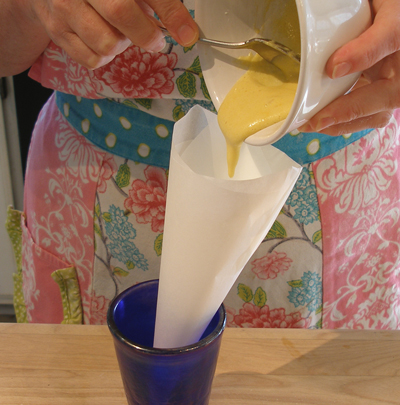
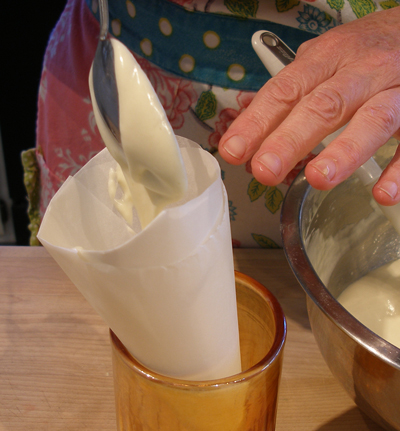
2. Place the yellow tinted batter mixture in its own parchment piping bag and fold down the top of the bag. This will force the batter to the tip of the bag. Set aside.
3. Repeat this procedure with the violet, pink and blue batters.
STEP III: PREHEAT THE OVEN. PIPE THE DECORATED SPONGE CAKE ROLL PATTERN AND BAKE.
Preheat the oven:
1. Position an oven shelf in the middle of the oven and preheat oven to 325 degrees F for 20 minutes.
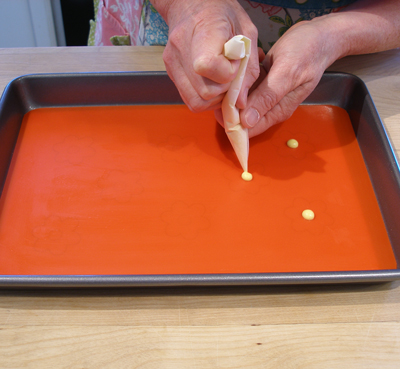
Pipe the decorative pattern on the prepared cake pan and bake:
1. If necessary, cut a tiny hole in the end of the parchment cone piping bag; you want to make sure the batter does not come out too quickly while piping!
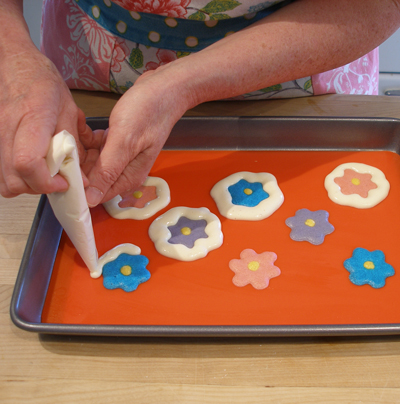
2. Pipe the centers of the flowers with the yellow batter, according to the Color Template, on the prepared silicone liner, from STEP I.
3. BAKE: Bake for exactly for 1 minute, then remove the pan from the oven.
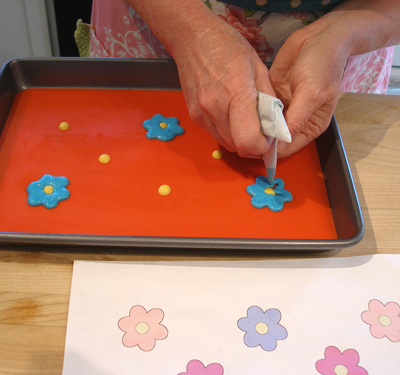
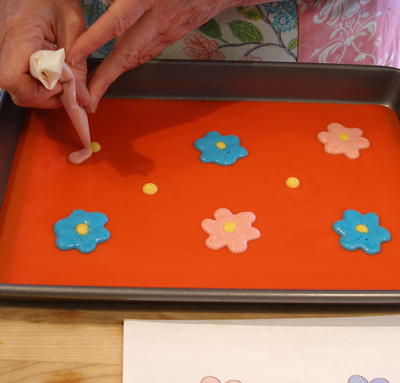
4. Pipe the all the colored petals of the flowers, using the Color Template, from STEP I, as a guide.
5. BAKE: When complete, bake the colored petals for 1 1/2 minutes, then remove the pan from the oven.
Do not turn off the oven.
STEP IV: FINISH THE SPONGE CAKE ROLL AND BAKE
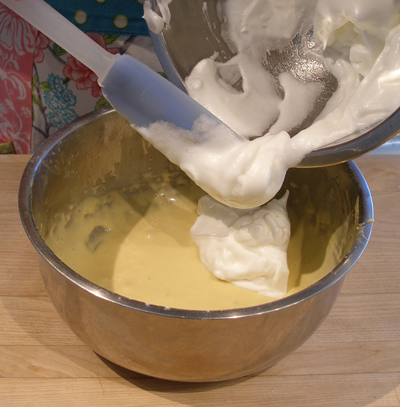
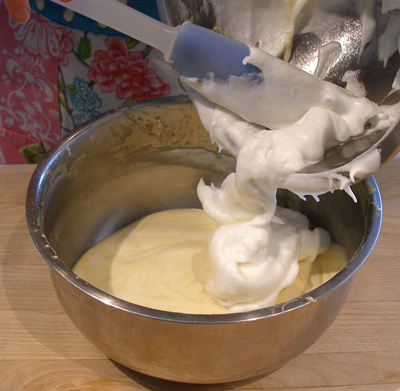
Complete the remaining plain cake batter:
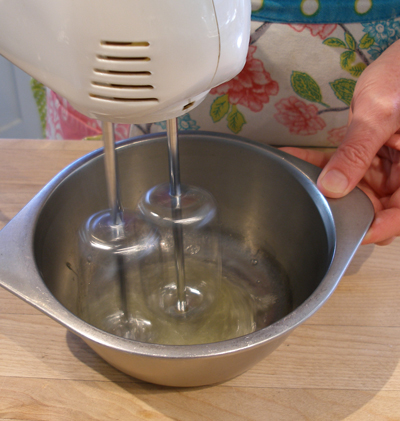
1. With the mixer on medium-low, beat the remaining 3 egg whites until they are foamy, then slowly add the 2 Tablespoons and 1 teaspoon(remaining sugar from the original 1/3 cup). Increase the mixer speed to high and beat until firm peaks form.
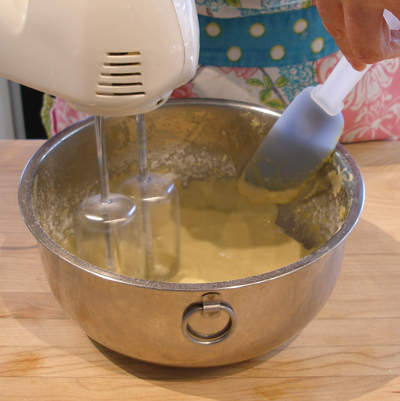
2. Remove the egg yolk batter from the refrigerator.
Refresh it by briefly mixing it with the hand mixer on medium-high to high speed. Scrape the sides and bottom of the bowl of the bowl when necessary.
3. Then, add 1/3 of the beaten egg whites to the egg yolk mixture and fold with a large rubber spatula to combine.
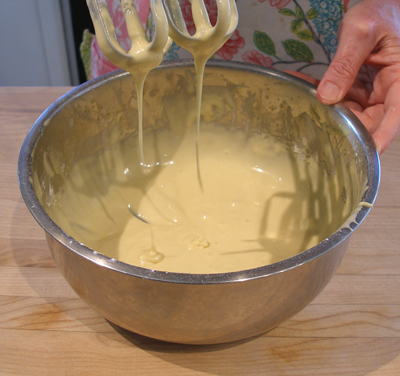
4. Add the rest of the egg whites, folding gently until no clumps of egg white are showing.
5. Remove about 1/4 cup of the plain cake batter and place it in a parchment piping bag.
Finish the baked cake:
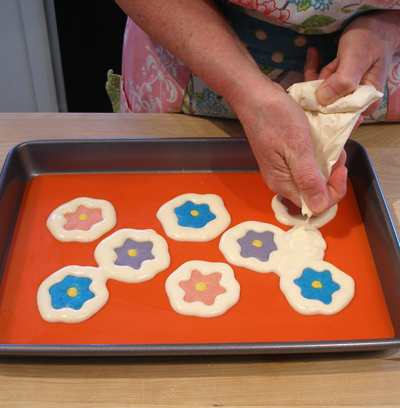
1. Cut a small hole in the tip of the piping bag. Pipe the plain cake batter around the partially baked decoration in the pan.
NOTE: This helps make sure that no air-bubbles form around the design in the finished cake.
2. Squeeze the rest of the plain cake batter in the piping bag out in an empty areas of the pan.
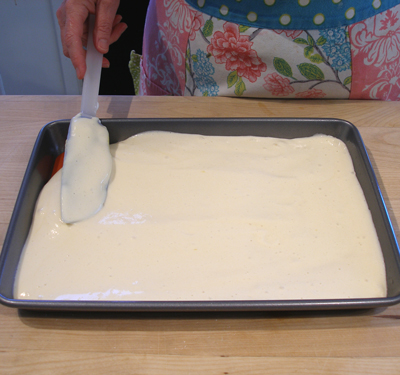
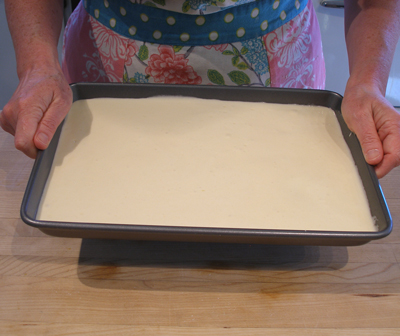
3. Pour the rest of the batter into the pan, and gently smooth the top with a rubber spatula, taking care you do not press down.
4. Gently drop the pan on the counter a couple of times to release any extra air bubbles.
Bake the cake:
1. Bake the cake for about 10 to 11 minutes.
To test for doneness, the cake should be slightly brown on the edges and still fairly pale on top. Test it with a toothpick. It should come out dry.
DO NOT over-bake the cake or it may crack when rolling.
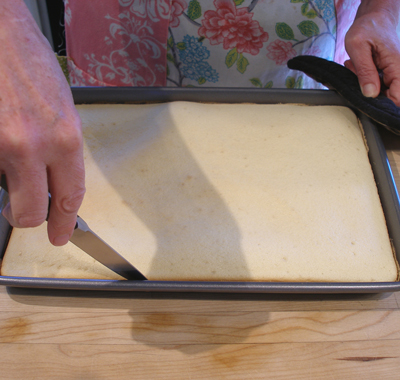
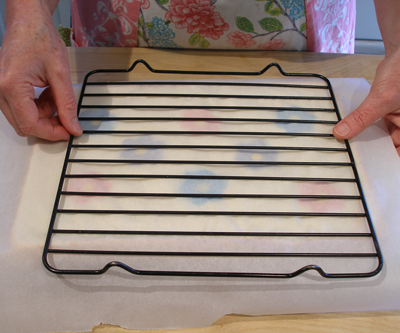
2. Place cake , while still in the pan, on a wire rack. Do not let it cool.
3. Remove the cake from pan while still hot.
To do:
a. Use a thin, sharp knife to loosen the sides of the cake from the pan.
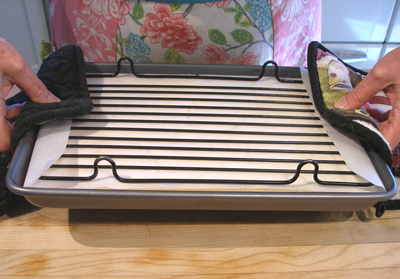
b. Place a piece of parchment on the top of the cake and flip the pan over.
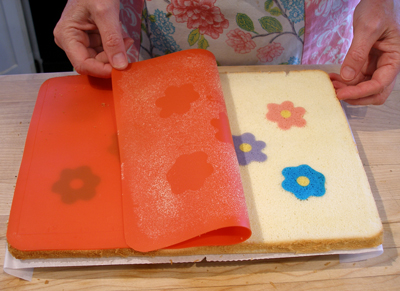
c. Remove the silicone sheet from the decorated side of the cake, and remove the Black and White Piping Template (the white paper between the silicone sheet and the pan).
Then place a large piece of parchment on top of it. This will help you roll up the cake, so it should be longer than the cake.
d. Let the cake cool for 15 minutes with the parchment on top of it, to keep it from drying out.
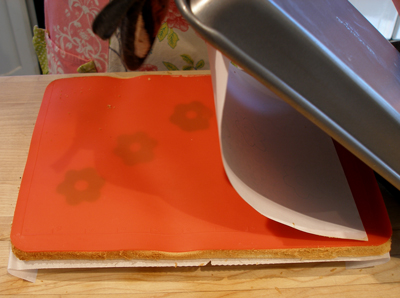
e. When cake is cool, flip the cake over so the decorated side is on the bottom.
STEP V: MAKE THE WHIPPED CREAM FILLING AND ROLL THE CAKE. SERVE.
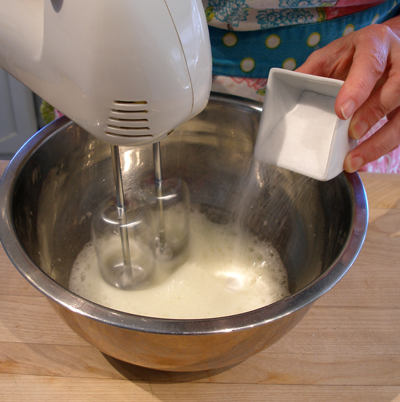
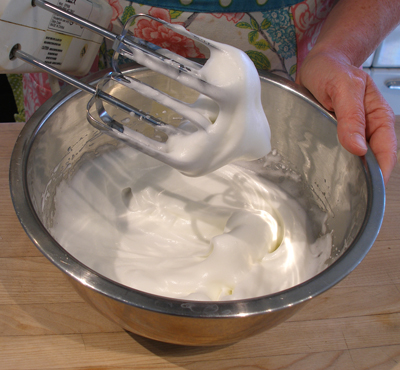
Make the whipped cream:
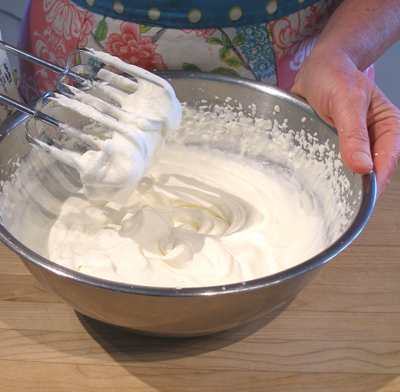
1. Place heavy whipping cream in a bowl and whip on high until it just starts to thicken.
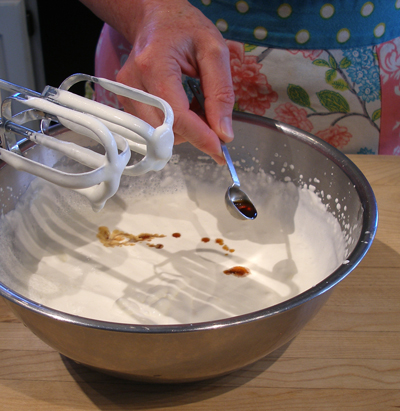
2. Start adding sugar at the side of the bowl, then add the vanilla. Whip on high until soft peaks form.
3. Cover and place in the refrigerator until needed.
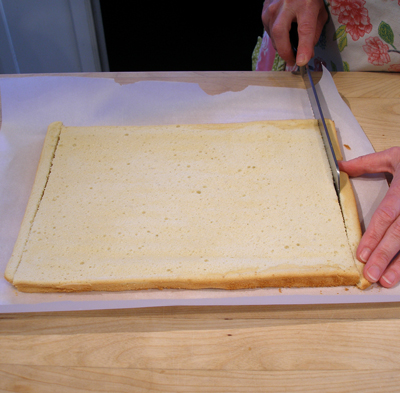
Trim the cake in a certain way:
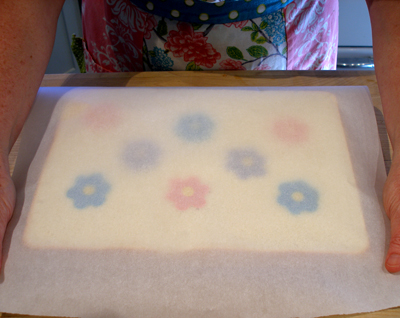
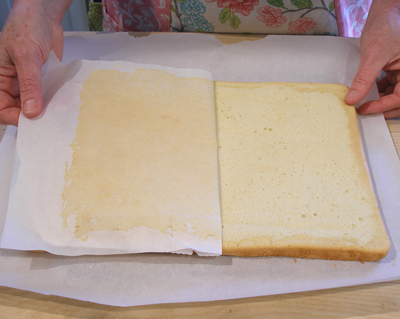
1. Remove the parchment from the plain side of the cake; the decorated side of the cake will be facing down.
The skin of the cake will stick to the parchment as you remove it, leaving pale and fluffy cake exposed.
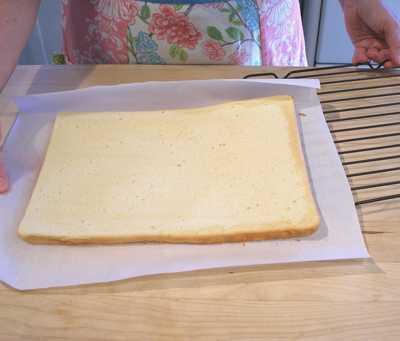
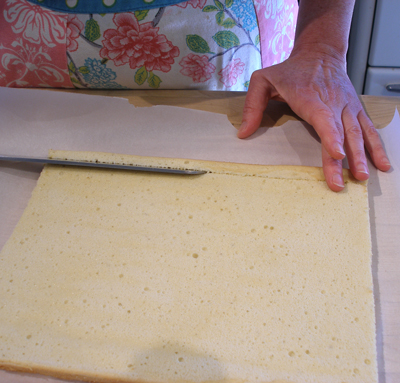
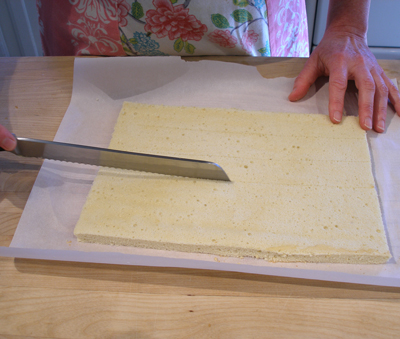
2. Position the cake, lengthwise, in front of you. With a sharp knife, trim off three edges: the browned edges on the two short sides and the long side that is not in front of you.
NOTE: It is very important that you trim the cake this way, otherwise it will crack when you roll it.
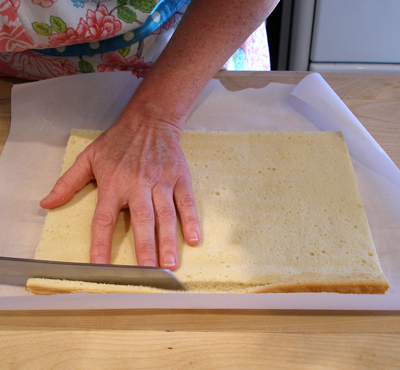
3. On the edge of the cake that is facing you, cut a bevel across it.
4. In the first few inches of the cake, make two or three SHALLOW cuts across the cake; do not cut all the way through the cake.
NOTE: This will also help prevent cracking, when you start rolling the cake.
Fill the cake and roll:
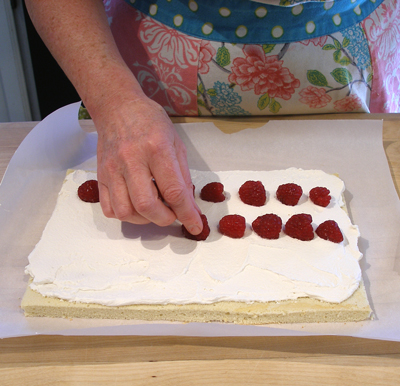
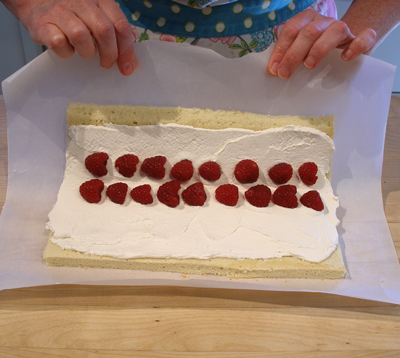
1. With the cake still positioned lengthwise in front of you, spread the whipped cream evenly on the cake. The cream should be a bit thicker on the side of the cake facing you, and thinner toward the opposite side.
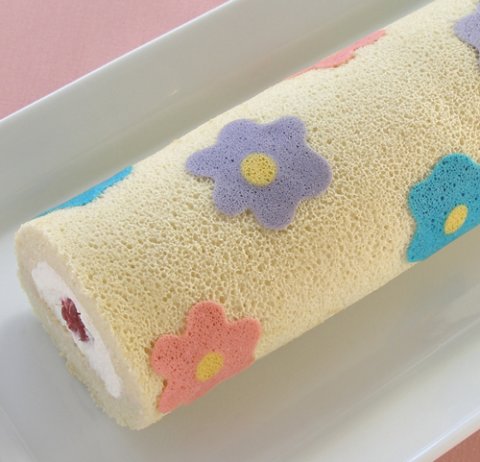
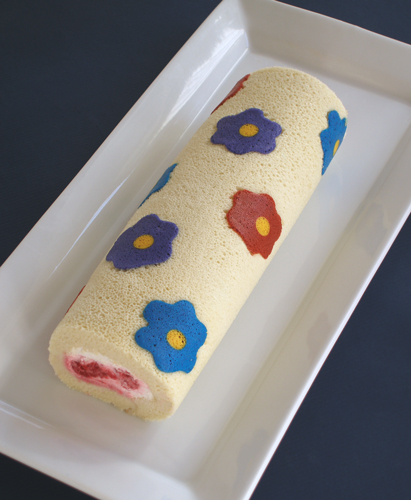
2. Place two rows of berries(quartered strawberries or whole raspberries) across the length of the cake as shown in the photo below.
NOTE: If the strawberries are large, cut them in 6 pieces instead of 4.
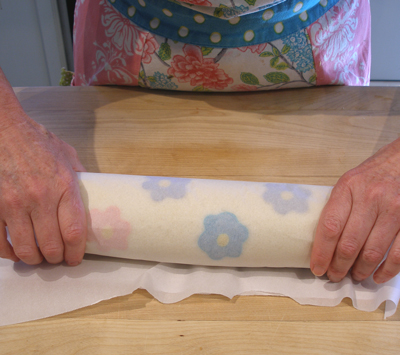
3. Roll the cake up, using the parchment to help you. Start from the edge facing you, and roll away from you.
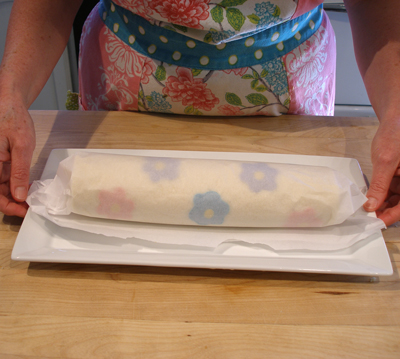
4. Place the rolled cake in the refrigerator to chill for at least two hours.
Serve:
1. Unwrap the cake. Then trim the cake ends, if necessary, with a sharp serrated knife, to neaten.
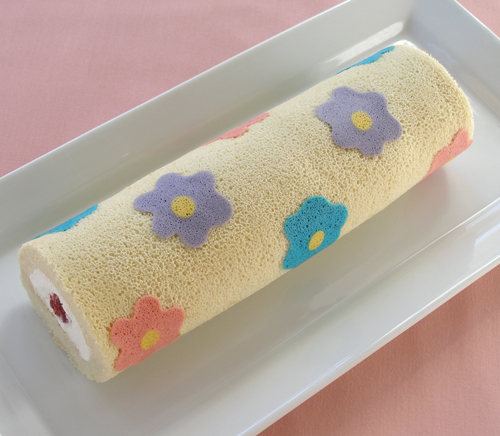
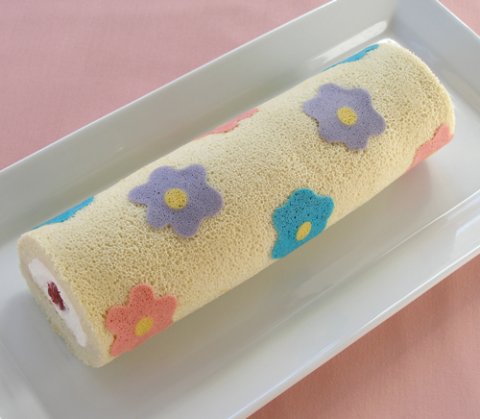
2. Place on a pretty platter, seam side down so the pretty pattern shows. Cut into slices and serve.
STORAGE
The cake's whipped cream and fruit filling is perishable, and the cake must remain refrigerated. Keep out of refrigeration at the cool side of room temperature for no more than two hours. The unfilled cake can remain at room temperature for a few days, well covered, or can be frozen for a month or more.
VARIATIONS
If you want to use bolder colors for your flowers, simply use more food coloring in the decorating batter. We used a drop of food coloring for each color.
We call this our “Flower Power” Decorated Cake Roll
